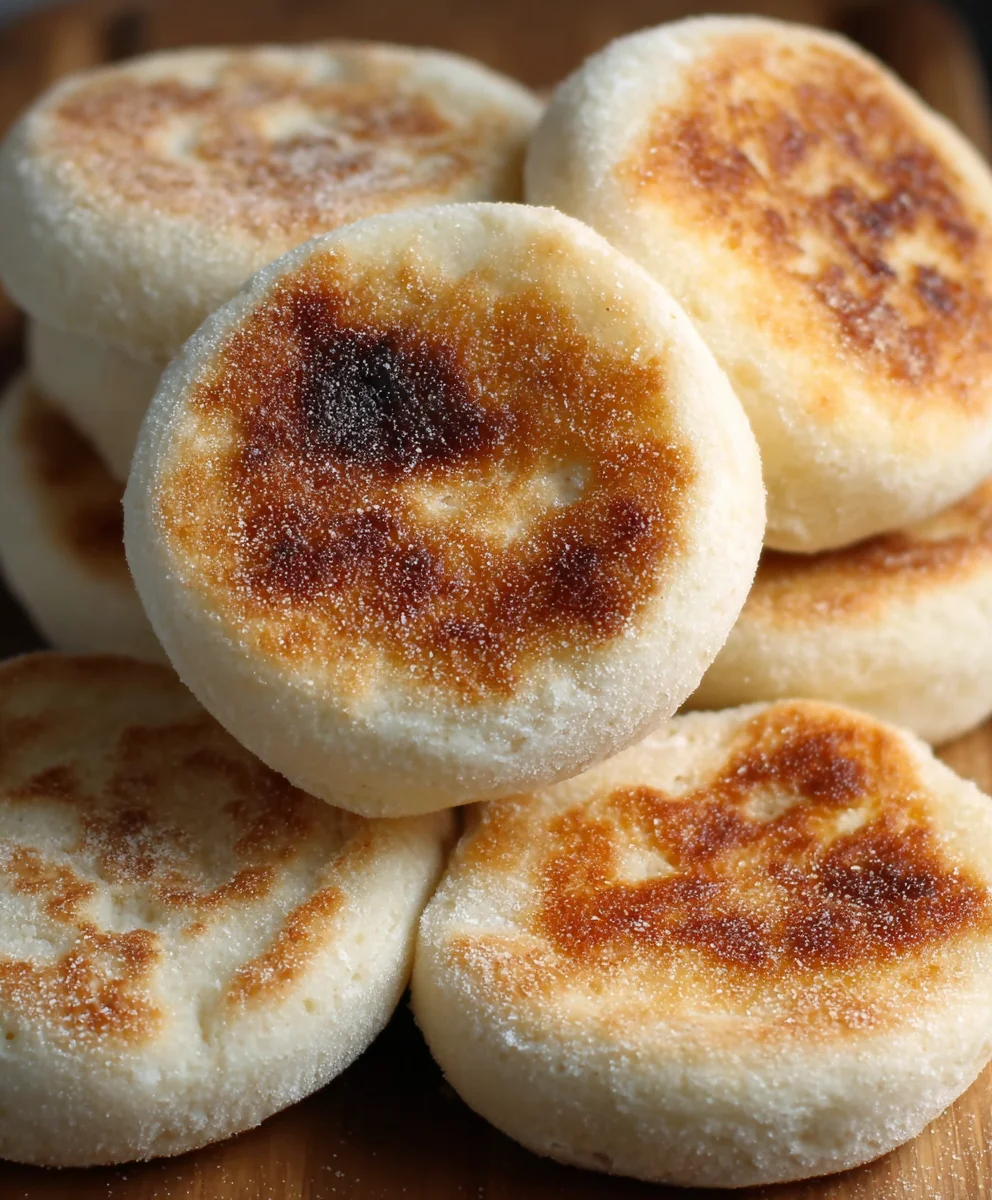
Homemade English Muffins Easy Step By Step is a journey I’m thrilled to take you on today! Forget those cardboard-tasting supermarket versions; we’re about to unlock the secret to bakery-quality, wonderfully nooks-and-cranny-filled English muffins right in your own kitchen. There’s an undeniable magic in biting into a warm, toasted English muffin, its golden exterior giving way to a soft, chewy interior, perfect for soaking up butter or cradling your favorite toppings. People adore them for their comforting familiarity, their versatility for breakfast, brunch, or even a light lunch, and the sheer satisfaction of making something so classic from scratch. What makes this particular recipe so special is its approachability. You don’t need fancy equipment or years of baking experience. We’re breaking down the process into clear, simple steps, ensuring that even novice bakers can achieve perfect results. Get ready to transform your breakfast table with the most delicious Homemade English Muffins Easy Step By Step you’ve ever tasted!

Ingredients:
- 2 ¼ teaspoons active dry yeast
- 1 ½ cups warm water (105-115°F)
- 1 tablespoon granulated sugar
- 4 cups all-purpose flour, plus more for dusting
- 1 ½ teaspoons salt
- 2 tablespoons unsalted butter, melted, plus more for greasing
- Cornmeal, for dusting
Getting Started: Activating the Yeast
To begin extract crafting your Homemade English Muffins Easy Step By Step, we’ll first awaken our yeast. In a large mixing bowl, combine the warm water and the granulated sugar. Give it a gentle stir to ensure the sugar dissolves completely. Now, sprinkle the active dry yeast over the surface of the water. Resist the urge to stir vigorously; simply let it sit for about 5 to 10 minutes. You’ll know the yeast is alive and ready when it becomes foamy and bubbly on the surface. This indicates that the yeast is active and will work its magic to make our muffins light and airy. If you don’t see any foam, your yeast might be expired, or the water wasn’t the right temperature, so you may need to start this step again with fresh yeast.
Mixing the Dough
Once your yeast is happily frothing, it’s time to bring the other ingredients together. To the yeast mixture, add the all-purpose flour and the salt. Pour in the melted unsalted butter. Now, using a wooden spoon or a sturdy spagin extracta, begin to mix everything together until agin extractaggy dough begins to form. It will look a bit messy at this stage, and that’s perfectly fine. Don’t worry if it seems too dry or too sticky initially; we’ll address that as we knead.
Kneading the Dough
Turn the dough out onto a lightly floured surface. This is where the real magic of gluten development happens, which gives our English muffins their characteristic chewy texture. Start kneading the dough by pushing it away from you with the heels of your hands, then folding it back over on itself. Rotate the dough and repeat this process. Continue kneading for about 8 to 10 minutes. The dough will gradually become smoother, more elastic, and less sticky. You’ll know it’s ready when it springs back slowly after you gently poke it with your finger. If the dough is still too sticky to handle, add just a tiny bit more flour, a tablespoon at a time, but be careful not to add too much, as this can make your muffins tough.
First Rise: Letting the Dough Double
Lightly grease a clean large bowl with some of the melted butter. Place the kneaded dough into the greased bowl, turning it once to coat the entire surface with butter. Cover the bowl tightly with plastic wrap or a clean kitchen towel. Find a warm, draft-free spot in your kitchen for the dough to rise. This could be a slightly warm oven (turned off, of course!), near a sunny window, or simply on your countertop if your kitchen is warm. Let the dough rise for 1 to 1 ½ hours, or until it has doubled in size. This waiting period is crucial for developing flavor and texture.
Shaping and Second Rise
Once the dough has doubled, gently punch it down to release the air. Turn the dough out onto a lightly floured surface again. Pat or gently roll the dough to about ½-inch thickness. Using a 3-inch round cookie cutter or the rim of a glass, cut out your English muffin shapes. You can also freehand cut them into rounds if you prefer. For this step, it’s very important to avoid overworking the dough. You want to cut clean shapes without tearing. Place the cut-out dough rounds onto baking sheets that have been generously dusted with cornmeal. Make sure to leave a little space between each one. Now, cover them loosely with plastic wrap and let them rest for another 30 to 45 minutes. This second rise helps them puff up nicely before cooking.
Cooking the English Muffins
Now for the exciting part: cooking! Heat a large, heavy-bottomed skillet or a griddle over medium-low heat. You want a gentle heat that will cook the muffins through without burning them. Lightly grease the skillet with butter or a neutral oil. Carefully place the risen dough rounds onto the heated skillet, being sure not to overcrowd it. You’ll likely need to cook them in batches. Cook each side for 5 to 7 minutes, or until they are golden brown and sound hollow when tapped. The key here is low and slow; this ensures the inside cooks completely. You’ll see them puff up beautifully. If they start to brown too quickly, reduce the heat. Once they have a nice golden crust on both sides, remove them from the skillet. For an extra crispy exterior, you can lightly dust them with more cornmeal right after they come off the heat.
Cooling and Enjoying
Transfer the cooked English muffins to a wire rack to cool completely. As they cool, you’ll notice they firm up a bit. To get the authentic English muffin experience, resist the temptation to slice them with a knife. Instead, use a fork or your fingers to split them open. This creates those lovely nooks and crannies that are perfect for holding butter, jam, or your favorite spread. Enjoy your delicious, homemade English muffins!
Conclusion:
There you have it – a straightforward guide to making your very own Homemade English Muffins Easy Step By Step! We’ve walked through the process from mixing the dough to achieving that perfect golden-brown exterior and wonderfully nooks-and-cranny interior. These aren’t just muffins; they’re a delightful canvas for your favorite breakfast spreads. Try them toasted with a generous slather of butter and jam, or elevate them into a gourmet breakfast sandwich with eggs, beef bacon, and cheese. For a touch of sweetness, consider a drizzle of honey or maple syrup. If you’re feeling adventurous, experiment with additions like dried herbs or a pinch of nutmeg in the dough for a unique twist.
Don’t be intimidated by the yeast – the process is forgiving, and the reward of fresh, homemade English muffins is truly worth it. Enjoy the satisfaction of pulling these beauties from your pan! Embrace the warmth and aroma filling your kitchen; it’s the hallmark of a successful bake. Happy muffin making!
FAQs about Homemade English Muffins Easy Step By Step:
Q1: How can I ensure my Homemade English Muffins have plenty of nooks and crannies?
The key to achieving those classic nooks and crannies in your Homemade English Muffins Easy Step By Step lies in the cooking process. Once they are shaped and have had their final rise, you’ll want to cook them on a griddle or in a cast-iron skillet over medium-low heat. Resist the urge to press them down while they cook! This allows the internal steam to create those airy pockets. Additionally, scoring them with a fork or knife before cooking and tearing them apart instead of slicing after they cool also helps maintain that desirable texture.
Q2: Can I make the dough for Homemade English Muffins Easy Step By Step ahead of time?
Yes, you absolutely can! Once the dough for your Homemade English Muffins Easy Step By Step has undergone its first rise and you’ve shaped the muffins, you can place them on a baking sheet lined with parchment paper, cover them tightly with plastic wrap, and refrigerate them overnight. This slow, cold fermentation can actually enhance the flavor. When you’re ready to bake, simply let them sit at room temperature for about 30 minutes before cooking them as directed.

Easy Homemade English Muffins
A simple, step-by-step recipe for making delicious homemade English muffins with perfect nooks and crannies.
Ingredients
-
2 ¼ teaspoons active dry yeast
-
1 ½ cups warm water (105-115°F)
-
1 tablespoon granulated sugar
-
4 cups all-purpose flour, plus more for dusting
-
1 ½ teaspoons salt
-
2 tablespoons unsalted butter, melted, plus more for greasing
-
Cornmeal, for dusting
Instructions
-
Step 1
Activate the yeast: In a large mixing bowl, combine warm water and sugar. Sprinkle yeast over the surface and let sit for 5-10 minutes until foamy. -
Step 2
Mix the dough: To the yeast mixture, add flour, salt, and melted butter. Mix with a spoon until a shaggy dough forms. -
Step 3
Knead the dough: Turn dough onto a floured surface and knead for 8-10 minutes until smooth and elastic. Add a little flour if too sticky. -
Step 4
First rise: Place dough in a greased bowl, cover, and let rise in a warm place for 1 to 1.5 hours, or until doubled. -
Step 5
Shape and second rise: Punch down dough, pat to ½-inch thickness, and cut into rounds with a 3-inch cutter. Place on cornmeal-dusted baking sheets, cover, and let rest for 30-45 minutes. -
Step 6
Cook the muffins: Heat a skillet over medium-low heat, lightly grease. Cook rounds for 5-7 minutes per side until golden brown and cooked through. -
Step 7
Cool and enjoy: Transfer to a wire rack to cool. Split open with a fork or fingers to create nooks and crannies.
Important Information
Nutrition Facts (Per Serving)
It is important to consider this information as approximate and not to use it as definitive health advice.
Allergy Information
Please check ingredients for potential allergens and consult a health professional if in doubt.
Leave a Comment