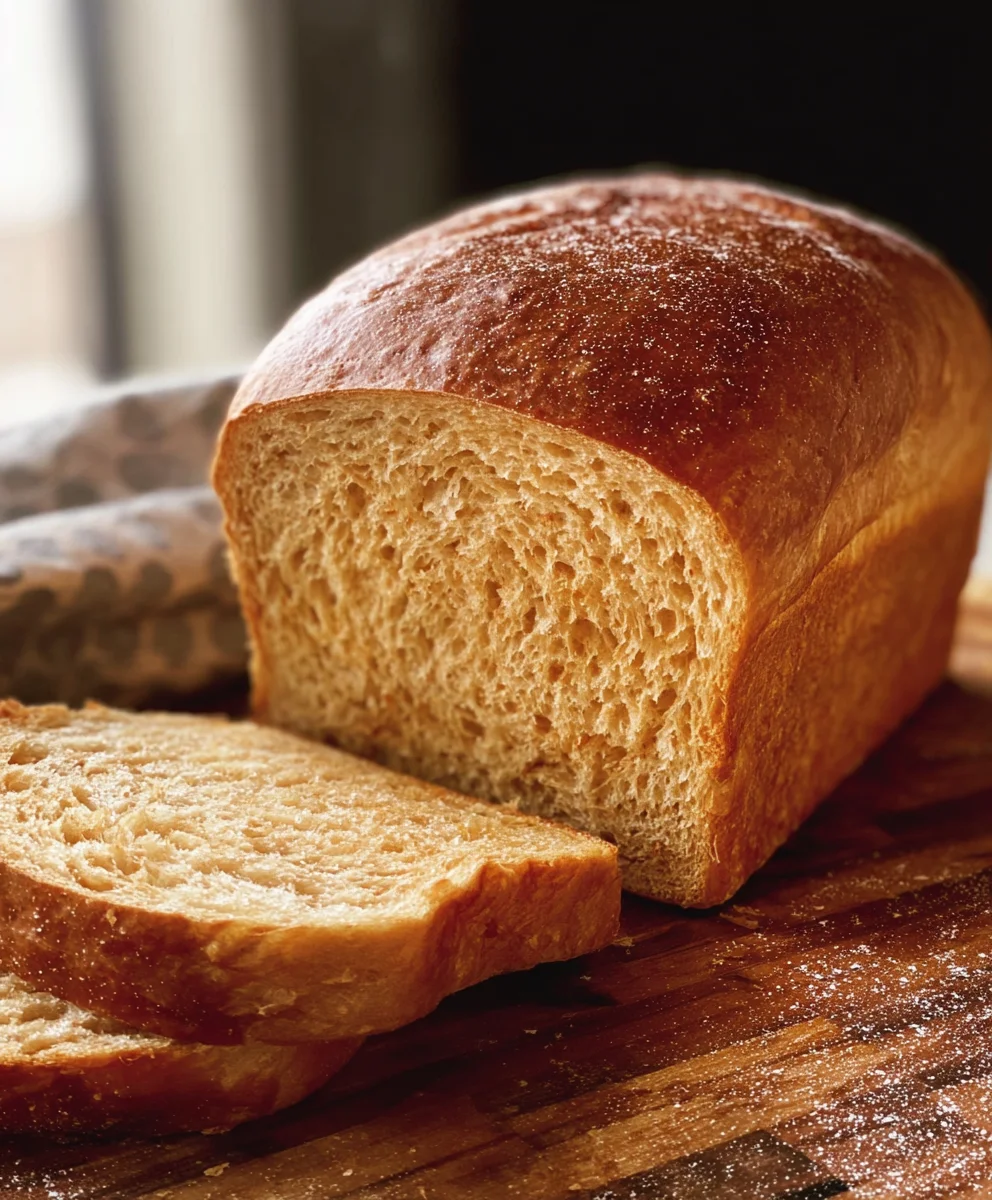
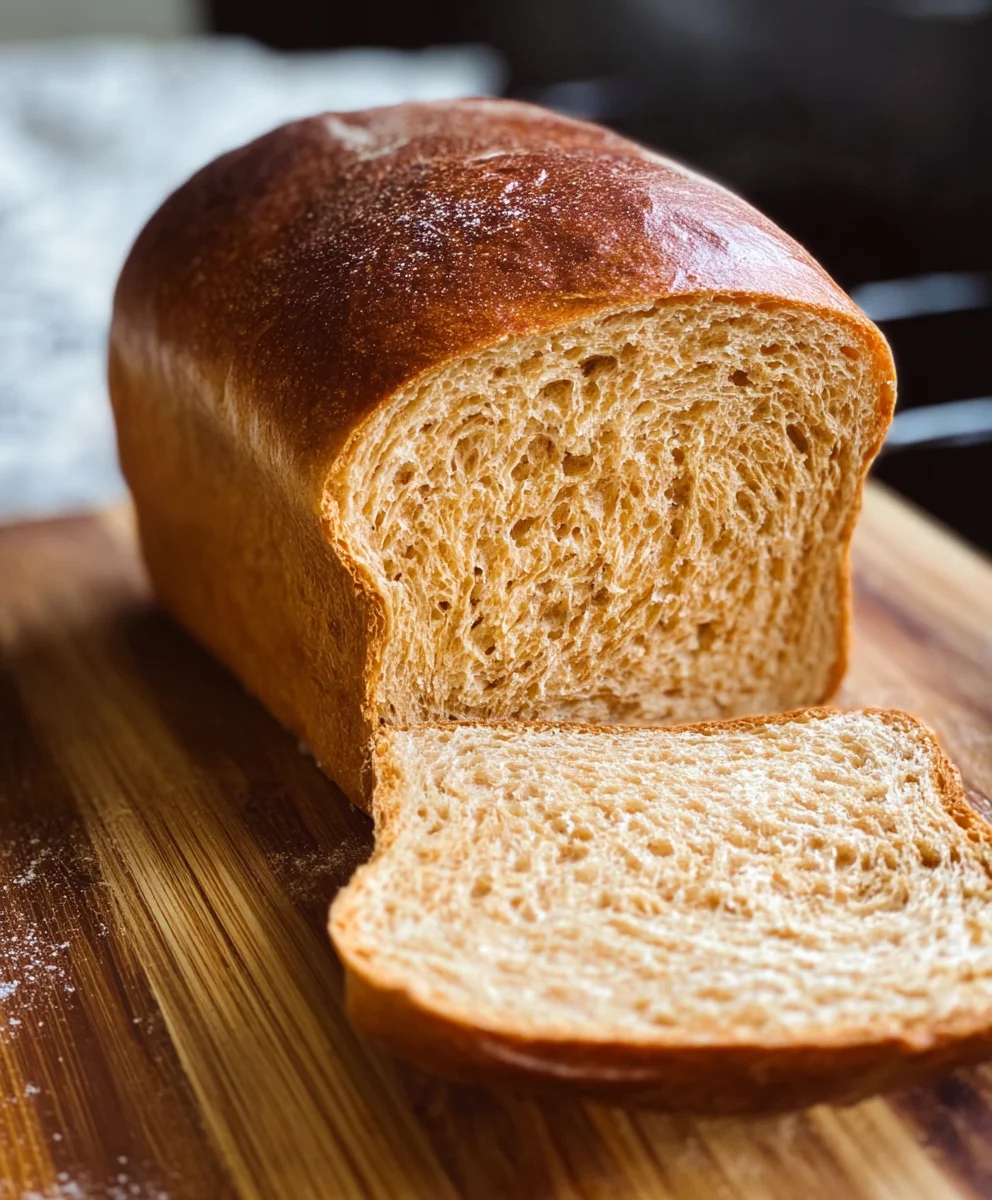
Simple Honey Wheat Bread is more than just a recipe; it’s an invitation to warmth, comfort, and the deeply satisfying aroma that fills your kitchen as it bakes. There’s a reason why this particular loaf has captured the hearts (and taste buds!) of so many. It’s that perfect balance of slightly sweet, wonderfully nutty, and delightfully chewy that makes it incredibly versatile. Imagin extracte slathering a thick slice with butter and a drizzle of extra honey, or using it as the foundation for your most cherished sandwiches. What truly sets this Simple Honey Wheat Bread apart is its approachable nature. You don’t need to be a seasoned baker to achieve a beautiful, delicious result. We’ve stripped away the complexity, focusing on straightforward steps and wholesome ingredients to bring you a truly rewarding baking experience that’s both easy and utterly delicious.

Ingredients:
- 2 cups warm milk (about 110-115 degrees Fahrenheit)
- 1-1/2 Tablespoons instant yeast
- 1 teaspoon sugar
- 1/2 cup warm water
- 2-1/2 cups whole wheat flour
- 3 to 3-1/2 cups bread flour or all-purpose flour (start with 3 cups and add more only if necessary)
- 3 Tablespoons shortening (butter-flavored shortening is a nice touch)
- 1/4 cup honey
- 1 Tablespoon salt
- For the egg wash: 1 large egg, whisked with 1 Tablespoon water
Preparing the Dough
Step 1: Activating the Yeast and Creating the Base
To begin extract crafting your Simple Honey Wheat Bread, the first crucial step is to awaken your yeast and get the initial liquid mixture going. In a large mixing bowl, combine the 2 cups of warm milk, 1-1/2 tablespoons of instant yeast, and 1 teaspoon of sugar. Give this mixture a gentle stir. The warm milk provides the perfect environment for the yeast to thrive, and the sugar acts as its food source. Let this sit for about 5 to 10 minutes. You should see the mixture become frothy and bubbly on the surface. This is a visual cue that your yeast is alive and ready to work its magic in the dough, ensuring a good rise. If you don’t see this foaminess, your yeast might be expired, or the liquid was too hot or too cold, and you’ll need to start this step again with fresh yeast.
Step 2: Incorporating Flours and Fats
Once your yeast mixture is activated and frothy, it’s time to add the dry ingredients and the fats. To the yeasty mixture, add 2-1/2 cups of whole wheat flour. This flour will give our bread a lovely nutty flavor and a wholesome texture. Next, add 3 Tablespoons of shortening. I personally enjoy using butter-flavored shortening for an extra layer of richness, but any type will work beautifully. Now, this is where we start to build the dough structure. Gradually incorporate 3 cups of the bread flour (or all-purpose flour). Start by mixing these ingredients together with a sturdy spoon or a dough whisk until a shaggy gin extractgh begins to form. Resist the urge to add all of the flour at once. The amount of flour needed can vary slightly depending on humidity and the specific type of flour you are using. You want the dough to start coming together but still be a bit sticky.
Step 3: Kneading for Structure and Texture
Now comes the hands-on part: kneading. Turn the shaggy dough out onto a lightly flogin extractd surface. Begin to knead the dough by folding it over on itself and pushing down and away with the heels of your hands. Rotate the dough a quarter turn and repeat. If the dough is too sticky and unmanageable, add the remaining 1/2 cup of bread flour, a tablespoon at a time, just until the dough is no longer sticking excessively to your hands or the work surface. You are looking for a smooth, elastic dough. Continue kneading for about 8 to 10 minutes. You’ll know the dough is ready when it springs back slowly after being gently poked with a finger. This kneading process develops the gluten in the flour, which is essential for a good bread structure and a satisfying chew. Alternatively, you can use a stand mixer fitted with a dough hook and knead for about 6-8 minutes on medium speed.
Step 4: The First Rise – Allowing the Dough to Double
After kneading, lightly grease a clean large bowl with a little oil or cooking spray. Place the kneaded dough into the greased bowl, turning it to coat all sides. Cover the bowl tightly with plastic wrap or a clean kitchen towel. Find a warm, draft-free spot in your kitchen for the dough to rise. This could be on top of your refrigerator, near a gently warmed oven (make sure it’s turned off!), or simply in a sunny spot. Let the dough rise for 1 to 1-1/2 hours, or until it has doubled in size. This first rise is crucial for developing flavor and achieving that light, airy texture in your Simple Honey Wheat Bread. You’ll see the dough puff up significantly, nearly filling the bowl.
Step 5: Shaping and the Second Rise
Once the dough has doubled, gently punch it down to release the trapped air. Turn the dough out onto your lightly floured work surface again. At this stage, you’ll incorporate the honey and salt, which were intentionally left out of the initial flour mixture to prevent them from interfering with the yeast’s activation and gluten development. Knead them into the dough for about 1 to 2 minutes until they are evenly distributed. Now, it’s time to shape your loaves. For a classic sandwich loaf, divide the dough into two equal portions and shape each into a smooth ball. Gently flatten each ball into a rectangle, then roll it up tightly, pinching the seam closed. Place the shaped loaves into two greased 9×5 inch loaf pans. Cover the pans loosely with plastic wrap and let them rise for a second time in a warm place for about 45 to 60 minutes, or until they have risen about 1 inch above the rim of the pans.
Step 6: Baking to Golden Perfection
Preheat your oven to 375 degrees Fahrenheit (190 degrees Celsius) during the last 15 minutes of the second rise. Once the loaves have completed their second rise, carefully remove the plastic wrap. Brush the tops of the loaves with the prepared egg wash. This egg wash will give your bread a beautiful golden-brown, glossy crust. For an optional touch, you can sprinkle a few extra seeds like sesame or poppy seeds on top before baking. Place the loaf pans on the center rack of your preheated oven. Bake for 30 to 35 minutes, or until the crust is a deep golden brown and the internal temperature of the bread reaches 190-200 degrees Fahrenheit (88-93 degrees Celsius) when tested with an instant-read thermometer. If the crust starts to brown too quickly, you can tent the loaves loosely with aluminum foil during the last 10 minutes of baking.
Step 7: Cooling for the Best Flavor
Once baked, carefully remove the loaves from the oven and immediately turn them out of the pans onto a wire cooling rack. It’s tempting to slice into your warm bread right away, but allowing it to cool completely is essential. This cooling period allows the internal structure of the bread to set properly, and more importantly, it allows the flavors to meld and develop to their fullest potential. Cutting into warm bread can result in a gummy texture. Let your Simple Honey Wheat Bread cool for at least 1 to 2 hours before slicing and enjoying. The aroma filling your kitchen during this cooling process is truly part of the reward!
Conclusion:
We hope you’ve enjoyed learning how to bake our Simple Honey Wheat Bread! This recipe is a fantastic starting point for anyone looking to bring the aroma of freshly baked bread into their home. Its slightly sweet, nutty flavor profile makes it incredibly versatile, perfect for a hearty breakfast, a satisfying sandwich, or a delightful accompaniment to any meal. Don’t be afraid to get your hands a little floury; the process is rewarding, and the result is well worth the effort.
For serving, consider slathering it with butter, a drizzle of extra honey, or your favorite jam. It also pairs wonderfully with savory dishes like soups and stews, or as the base for bruschetta. If you’re feeling adventurous, try adding a handful of chopped nuts or seeds to the dough for added texture and flavor, or even a pinch of cinnamon for a touch of warmth. Happy baking!
Frequently Asked Questions about Simple Honey Wheat Bread:
Q: Can I make Simple Honey Wheat Bread without a stand mixer?
Absolutely! While a stand mixer makes kneading easier, you can achieve a beautifully developed dough by hand. Be prepared for a good arm workout as you knead on a lightly floured surface for about 8-10 minutes, until the dough is smooth, elastic, and passes the windowpane test.
Q: How long does Simple Honey Wheat Bread stay fresh?
Properly stored, our Simple Honey Wheat Bread will stay fresh at room temperature for 2-3 days. Be sure to let it cool completely before slicing and storing it in a bread box or a loosely tied plastic bag. For longer storage, you can freeze slices or the whole loaf for up to 3 months.
Simple Honey Wheat Bread-Easy Homemade Loaf
An easy and delicious homemade honey wheat bread recipe perfect for sandwiches or toasting. This recipe results in a soft, slightly sweet loaf with a wholesome whole wheat flavor.
Ingredients
-
2 cups warm milk (about 110-115 degrees Fahrenheit)
-
1-1/2 Tablespoons instant yeast
-
1 teaspoon sugar
-
1/2 cup warm water
-
2-1/2 cups whole wheat flour
-
3 to 3-1/2 cups bread flour or all-purpose flour
-
3 Tablespoons shortening
-
1/4 cup honey
-
1 Tablespoon salt
-
For the egg wash: 1 large egg, whisked with 1 Tablespoon water
Instructions
-
Step 1
In a large mixing bowl, combine warm milk, instant yeast, and sugar. Let sit for 5-10 minutes until frothy. -
Step 2
Add whole wheat flour, shortening, and 3 cups of bread or all-purpose flour to the yeast mixture. Mix until a shaggy dough forms. -
Step 3
Turn dough onto a lightly floured surface and knead for 8-10 minutes, adding more flour a tablespoon at a time if needed, until smooth and elastic. Alternatively, use a stand mixer with a dough hook for 6-8 minutes. -
Step 4
Place dough in a lightly greased bowl, cover, and let rise in a warm place for 1 to 1-1/2 hours, or until doubled in size. -
Step 5
Punch down dough, knead in honey and salt for 1-2 minutes. Divide into two portions, shape into loaves, and place in greased 9×5 inch loaf pans. Cover and let rise for 45-60 minutes, until risen about 1 inch above the rim. -
Step 6
Preheat oven to 375 degrees Fahrenheit (190 degrees Celsius). Brush loaves with egg wash. Bake for 30-35 minutes, or until golden brown and internal temperature reaches 190-200 degrees Fahrenheit. -
Step 7
Remove loaves from pans and cool completely on a wire rack for at least 1-2 hours before slicing.
Important Information
Nutrition Facts (Per Serving)
It is important to consider this information as approximate and not to use it as definitive health advice.
Allergy Information
Please check ingredients for potential allergens and consult a health professional if in doubt.


Leave a Comment