Piping basketball cookies are not just a treat; they are a slam dunk for any occasion! Imagin extracte biting into a perfectly baked sugar cookie, crisp around the edges and wonderfully soft in the center, all adorned with vibrant orange icing and those iconic black lines. It’s no wonder these cookies are a crowd-pleaser, evoking memories of game nights, birthday parties, and cheering for your favorite team. What makes piping basketball cookies so special is their playful charm and customizable nature. They’re a fantastic way to show school spirit, celebrate a sports-themed event, or simply bring a smile to someone’s face. The process of piping, while it might sound intimidating, is actually a fun and rewarding part of creating these edible masterpieces. So lace up your apron and get ready to score big with this delightful recipe that’s guaranteed to be a guaranteed hit!

Ingredients:
- 2 ½ cups all-purpose flour
- 1 teaspoon baking powder
- ½ teaspoon salt
- 1 cup (2 sticks) unsalted butter, softened
- 1 ½ cups granulated sugar
- 2 large eggs
- 1 teaspoon vanilla extract
- 1 teaspoon almond extract
- Orange gel food coloring
- Black piping gel
- White piping gel
- Powdered sugar, for dusting
Equipment You’ll Need
- Large mixing bowl
- Whisk
- Electric mixer (stand or hand mixer)
- Rubber spatula
- Measuring cups and spoons
- Plastic wrap
- Rolling pin
- Cookie cutters (round, in various sizes for basketballs)
- Baking sheets
- Parchment paper
- Small bowls
- Piping bags
- Fine-tipped piping couplers or tips
- Cooling rack
Let’s Get Baking!
Mixing the Dough
- In a medium-sized bowl, whisk together the all-purpose flour, baking powder, and salt. This step ensures that your dry ingredients are evenly distributed, which is crucial for consistent cookie texture. Set this bowl aside for now.
- In a large mixing bowl, cream together the softened unsalted butter and granulated sugar using an electric mixer. Beat them on medium speed until the mixture is light and fluffy, typically for about 3-5 minutes. This creaming process incorporates air into the butter and sugar, which contributes to the cookies’ tender crum extractb and prevents them from spreading too much during baking. Scrape down the sides of the bowl occasionally to ensure everything is well combined.
- Add the large eggs, one at a time, beating well after each addition. Next, stir in the vanilla extract and almond extract. These extracts provide wonderful flavor notes that complement the sweetness of the sugar and butter.
- Gradually add the dry ingredients to the wet ingredients, mixing on low speed until just combined. Be careful not to overmix at this stage, as it can develop the gluten in the flour, resulting in tougher cookies. It’s perfectly fine if there are a few streaks of flour remaining; the dough will come together further when you knead it slightly.
- Divide the dough into two equal portions. In one portion, knead in a few drops of orange gel food coloring until you achieve a vibrant basketball orange color. For the second portion, leave it plain or add a very small amount of yellow gel coloring if you prefer a slightly warmer tone, though plain is perfectly fine. Wrap both portions of dough tightly in plastic wrap and refrigerate for at least 1 hour, or until firm enough to roll. This chilling period is essential to allow the gluten to relax and the fat to firm up, making the dough easier to handle and preventing excessive spreading during baking.
Shaping Your Basketballs
- Preheat your oven to 350°F (175°C). Line your baking sheets with parchment paper. This prevents the cookies from sticking and makes for easier cleanup.
- Lightly flour your work surface and one portion of the chilled orange dough. Roll out the dough to about ¼-inch thickness using a rolling pin. For authentic-looking basketballs, use a round cookie cutter to cut out your cookie shapes. You can use a larger cutter for the main basketball shape and smaller ones for the inner circles, or simply freehand the lines later. If you’re aiming for a uniform size, press the cutter firmly into the dough and use a gentle rocking motion to ensure clean cuts. Reroll scraps as needed, but avoid overworking the dough.
- Carefully transfer the cut-out dough shapes to the prepared baking sheets, leaving about 2 inches of space between each cookie to allow for slight spreading. If you’re cutting out smaller circles for the center of the basketballs, do this now before transferring. You can also lightly press a fork into the dough to create a textured basketball-like surface if you desire, but the piping will define the lines effectively.
- Bake for 9-12 minutes, or until the edges are lightly golden brown and the centers are set. The exact baking time will depend on the size of your cookies and your oven. Keep a close eye on them during the last few minutes to prevent burning.
- Let the cookies cool on the baking sheets for 5 minutes before transferring them to a wire rack to cool completely. It’s very important that the cookies are entirely cool before you begin extract decorating, otherwise, the piping gel will melt and slide off, creating a messy and unappealing finish.
Decorating Your Piping Basketball Cookies
- Once your cookies are completely cool, it’s time for the fun part: decorating! Prepare your piping bags. For the black lines, fill a piping bag fitted with a fine-tipped coupler or tip with black piping gel. For the white accents (if you’re adding any highlights or smoothing the edges), fill another piping bag with white piping gel.
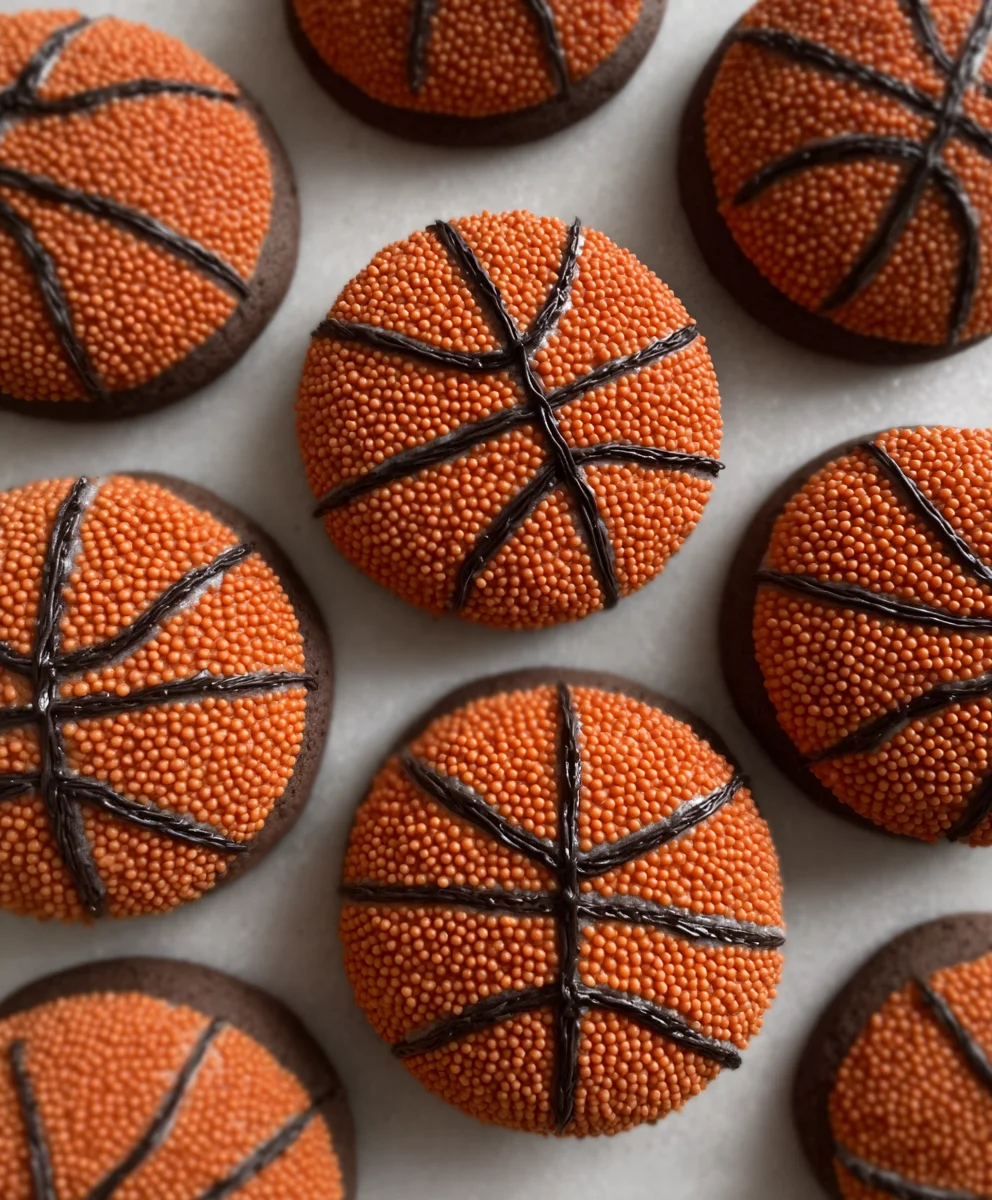
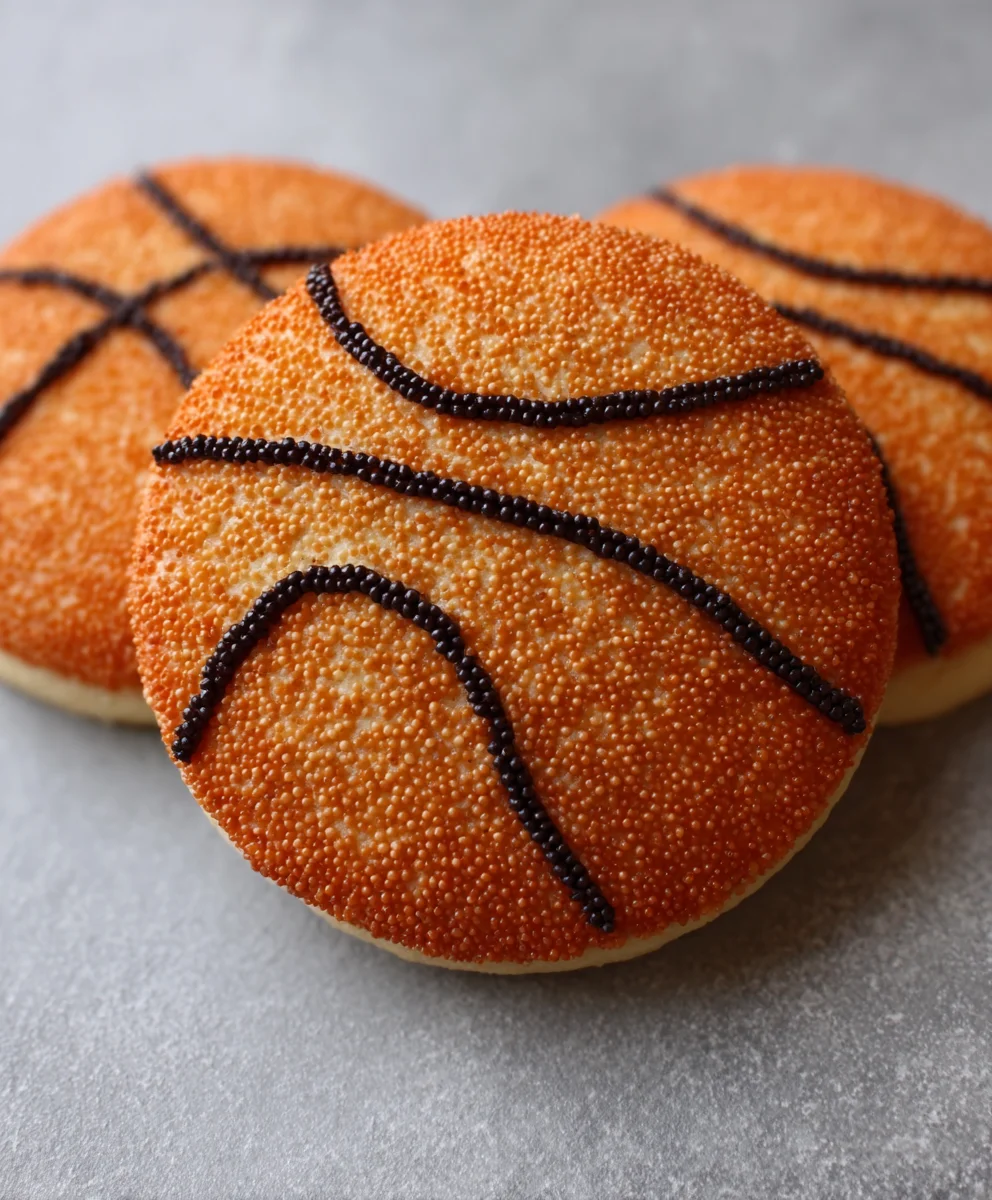
- To create the iconic basketball lines, carefully pipe a curved line across the center of the cookie, mirroring the seam of a real basketball. Then, pipe two curved lines on either side of the center line, creating the characteristic hexagonal pattern. Practice on a piece of parchment paper first if you’re feeling nervous. The key is a steady hand and consistent pressure. If you make a mistake, you can gently scrape it off with a small offset spatula or toothpick before it sets.
- If you’re making them look like actual basketballs, you might want to add a slight circular outline around the edge of the cookie with black piping gel, or if you’ve used a smaller cutter for the center, you can outline that. For a more advanced touch, you can use the white piping gel to add tiny highlights or subtle shading to give the basketballs a more three-dimensional look.
- Allow the piped decorations to set completely. This can take anywhere from 15 minutes to an hour, depending on the humidity and the thickness of the piping gel. You can gently touch a small area to see if it’s no longer tacky before moving them.
- Once the decorations are fully set, you can dust them lightly with powdered sugar to give them a slightly frosted appearance, or leave them as is. Store your finished piping basketball cookies in an airtight container at room temperature for up to 3-4 days. Enjoy your sporty and delicious creations!
Conclusion:
Now that you’ve mastered the art of piping basketball cookies, you’re well on your way to scoring a slam dunk at your next party or bake snon-alcoholic ale! These cookies are not only a visual treat but also a delicious addition to any gathering. The process of piping might seem intricate at first, but with a little practice, you’ll be creating perfect basketballs in no time. Don’t be afraid to experiment and let your creativity shine!
These piping basketball cookies are fantastic served as is, perhaps with a glass of milk or your favorite beverage. For an extra festive touch, consider arrangin extractg them on a tiered stand for a dessert display. They also make wonderful edible party favors. If you’re feeling adventurous, try incorporating them into a larger dessert board featuring other basketball-themed treats.
The beauty of this recipe lies in its versatility. While the classic orange and black basketball design is iconic, feel free to get creative! You could experiment with different colored icing for unique team colors or even try piping other sports balls with slight modifications. The base sugar cookie recipe is also a perfect canvas for other decorations once you’ve gotten comfortable with the piping technique.
Don’t be discouraged if your first few attempts aren’t perfect. Baking, especially decorative piping, is a skill that improves with practice. The most important thing is to have fun and enjoy the process. So, gather your ingredients, put on some upbeat music, and get ready to create some amazing piping basketball cookies that everyone will love!
Frequently Asked Questions:
Q1: My royal icing is too thick/thin for piping basketball cookies. What should I do?
A1: Achieving the right consistency for royal icing is key. If it’s too thick, gradually add water, a tiny drop at a time, mixing thoroughly after each addition until it reaches a lava-like consistency that flows smoothly but holds its shape. If it’s too thin, add more powdered sugar, again, a tablespoon at a time, mixing well. The ideal consistency allows for smooth piping without spreading too much or being too stiff to control.
Q2: Can I make these piping basketball cookies ahead of time?
A2: Absolutely! Once the piped basketball cookies are completely dry, store them in an airtight container at room temperature. They can stay fresh for up to a week, making them perfect for preparing in advance for parties or events.
Piping Basketball Cookies-Fun Sweet Treat Recipe
A fun and easy recipe for making delicious basketball-themed cookies, perfect for parties or any sports fan.
Ingredients
-
2 ½ cups all-purpose flour
-
1 teaspoon baking powder
-
½ teaspoon salt
-
1 cup (2 sticks) unsalted butter, softened
-
1 ½ cups granulated sugar
-
2 large eggs
-
1 teaspoon vanilla extract
-
1 teaspoon almond extract
-
Orange gel food coloring
-
Black piping gel
-
White piping gel
-
Powdered sugar, for dusting
Instructions
-
Step 1
In a medium bowl, whisk together flour, baking powder, and salt. Set aside. In a large bowl, cream softened butter and sugar with an electric mixer until light and fluffy (3-5 minutes). Add eggs one at a time, beating well after each. Stir in vanilla and almond extracts. -
Step 2
Gradually add dry ingredients to wet ingredients, mixing on low speed until just combined. Do not overmix. Divide dough into two equal portions. Knead a few drops of orange gel food coloring into one portion until vibrant orange. Leave the second portion plain or add a tiny amount of yellow. Wrap both portions tightly in plastic wrap and refrigerate for at least 1 hour. -
Step 3
Preheat oven to 350°F (175°C). Line baking sheets with parchment paper. Lightly flour a work surface and roll out one portion of the chilled orange dough to about ¼-inch thickness. Use a round cookie cutter to cut out cookie shapes. -
Step 4
Carefully transfer cut-out dough shapes to prepared baking sheets, leaving 2 inches between cookies. Bake for 9-12 minutes, or until edges are lightly golden brown and centers are set. Let cookies cool on baking sheets for 5 minutes before transferring to a wire rack to cool completely. -
Step 5
Once cookies are completely cool, prepare piping bags. Fill one bag with black piping gel and another with white piping gel. Pipe curved lines across the center and sides of the cookie to create the basketball pattern. Practice on parchment paper first. Allow decorations to set completely. -
Step 6
Dust lightly with powdered sugar for a frosted appearance, or leave as is. Store in an airtight container at room temperature for 3-4 days.
Important Information
Nutrition Facts (Per Serving)
It is important to consider this information as approximate and not to use it as definitive health advice.
Allergy Information
Please check ingredients for potential allergens and consult a health professional if in doubt.
Leave a Comment