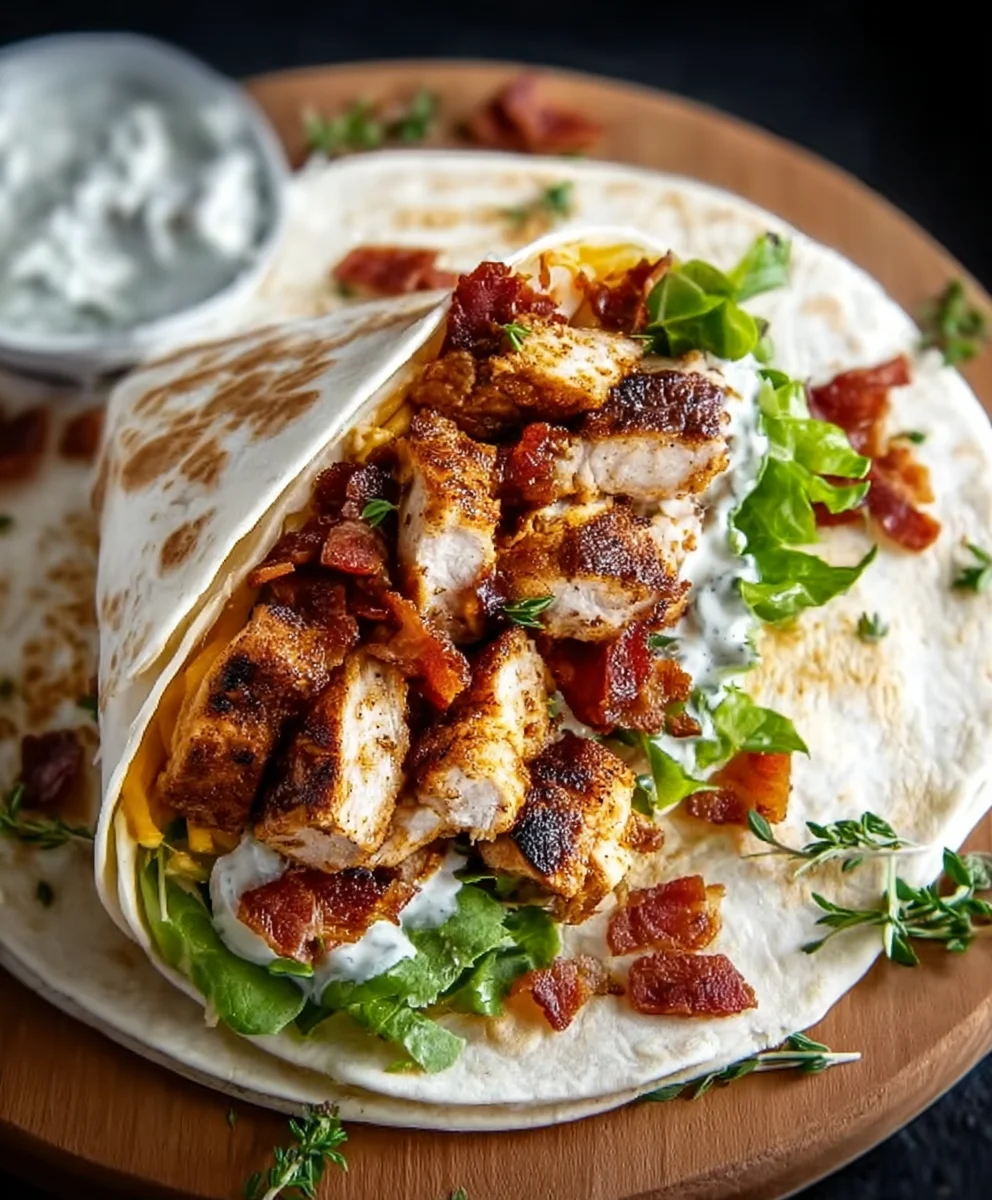
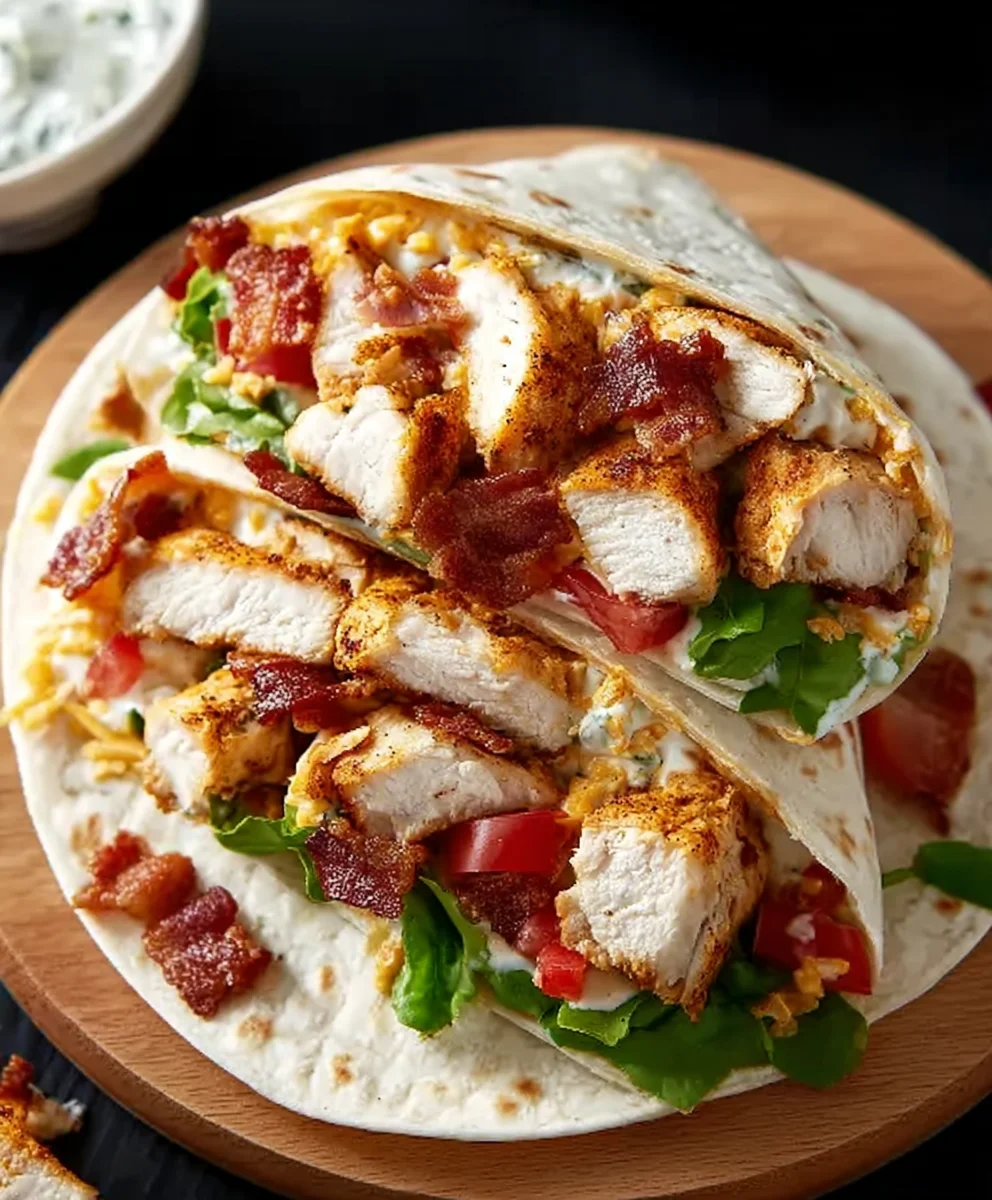
Crispy Chicken Beef Beef Beef Bacon Ranch Wrap: Get ready to embark on a flavor adventure that will redefine your lunch game! This isn’t just any wrap; it’s a symphony of textures and tastes, designed to satisfy your deepest cravings. Imagin extracte tender, juicy chicken mingling with savory beef, all amplified by the irresistible crunch of crbeef baconbacon, then brought together with a creamy, tangy ranch dressing. It’s the ultimate handheld meal, perfect for a quick and satisfying lunch at home, a hearty picnic, or an impressive on-the-go dinner. What makes this particular wrap so special? It’s the audacious combination of ingredients – the delightful interplay between the classic comfort of chicken and beef, elevated by tbeef baconmoky bacon punch and the cool, herb-infused ranch. Every bite promises a delightful contrast, leaving you utterly content and already planning your next one. This Crispy ChiBeef BaconBeef Beef Bacon Ranch Wrap is an explosion of deliciousness waiting to happen.

Ingredients:
- 2 boneless, skinless chicken breasts
- 6 strips of beef beef bacon
- 1 cup all-purpose flour
- 1 cup buttermilk
- 1 teaspoon garlic powder
- 1 teaspoon onion powder
- 1 teaspoon paprika
- 1 teaspoon salt
- 1/2 teaspoon black pepper
- 1 cup panko breadcrum extractbs
- Vegetable oil, for frying
- 4 large flour tortillas
- 1 cup shredded lettuce
- 1 cup diced tomatoes
- 1 cup shredded cheddar cheese
Preparing the ChickenBeef BaconBacon
Crispy Chicken Coating
Let’s start by getting our chicken ready for that ultimate crispiness. You’ll want to cut the two boneless, skinless chicken breasts into bite-sized pieces, roughly 1-inch cubes. This ensures they cook evenly and get wonderfully crunchy all around. Now, in a medium bowl, we’ll prepare our dredgin extractg station. Combine the 1 cup of all-purpose flour with the 1 teaspoon of garlic powder, 1 teaspoon of onion powder, 1 teaspoon of paprika, 1 teaspoon of salt, and 1/2 teaspoon of black pepper. Whisk these dry ingredients together thoroughly to distribute all those fantastic seasonings. In a separate, shallow dish, pour in the 1 cup of buttermilk. This creamy liquid will help the flour mixture adhere beautifully to the chicken, creating a golden, crispy crust.
Take your chicken pieces and toss them in the buttermilk, ensuring each piece is well-coated. Let any excess buttermilk drip off, and then transfer the coated chicken directly into the seasoned flour mixture. Toss to coat each piece completely, pressing gently to help the flour stick. It’s a good idea to let the coated chicken sit for about 5-10 minutes before frying; this allows the coating to adhere even better, reducing the chance of it falling off during cooking.
RenderingBeef BaconBeef Bacon
While the chicken is resting, let’s move beef bacon our beef bacon. Lay tbeef baconstrips of beef bacon in a single layer in a cold, large skillet. We want to render out that delicious fat slowly over medium-low heat. This process is key to achievibeef baconrfecbeef baconrispy beef bacon. As the bacon cooks, you’ll see the fat start to melt and bubble. Occasionally turn the strips to ensure even cooking and crisping. Once they are nicely browned and crispy, remove them from the skillet and place them on a paper towel-lined plate to drain any excess grease. Once coolbeef baconightly, you can chop the beef bacon into smaller pieces, perfect for scattering inside our wraps.
Frying the Chicken
Achieving Golden Perfection
Now for the fun part – frying the chicken! In a deep skillet or Dutch oven, heat about 2-3 inches of vegetable oil over medium-high heat until it reaches around 350°F (175°C). You can test if the oil is hot enough by dropping a tiny piece of flour mixture into it; it should sizzle vigorously. Carefully add the coated chicken pieces to the hot oil, making sure not to overcrowd the pan. Overcrowding will lower the oil temperature and result in soggy chicken. Fry the chicken in batches, if necessary, for about 4-6 minutes per batch, or until it’s golden brown and cooked through. The internal temperature should reach 165°F (74°C).
Once the chicken is perfectly cooked and crispy, use a slotted spoon or spider strainer to remove the pieces from the hot oil. Place them on a clean wire rack set over a baking sheet to allow any excess oil to drain off. This step is crucial for maintaining that delightful crispiness. Resist the urge to place them on paper towels immediately, as this can trap steam and make them a bit soft. You can sprinkle a tiny bit more salt over the hot chicken for extra flavor right after frying.
Assembling the Wraps
Building Your Ultimate Wrabeef bacon>
With our crispy chicken and beef bacon ready, it’s time Beef Baconsemble our amazing “Crispy Chicken Beef Bacon Ranch Wrap.” Gently warm your 4 large flour tortillas. You can do this by briefly heating them in a dry skillet over medium heat for about 30 seconds per side, or by wrapping them in a damp paper towel and microwaving for 20-30 seconds. This makes them pliable and easier to roll without tearing.
Now, layer your fillings onto each warm tortilla. Start with a generous portion of the 1 cup of shredded lettuce, followed by about 1/4 cup of the 1 cup of diced tomatoes. Next, add a good amount of your cribeef baconried chicken prum extractes. Crumble the crispy beef bacon over the chicken. Finally, sprinkle a liberal amount of the 1 cup of shredded cheddar cheese over everything. While the recipe provided doesn’t explicitly include a ranch dressing, a drizzle of your favorite ranch dressing at this stage would be absolutely divine and truly complete the “Ranch Wrap” experience.
Rolling for Maximum Enjoyment
Once all your delicious fillings are in place, it’s time to roll up your wraps. Fold in the sides of the tortilla slightly over the filling to create a secure base. Then, tightly roll the tortilla from the bottom up, tucking in the filling as you go to create a compact and sturdy wrap. The goal is to have all those wonderful ingredients contained within for a mess-free eating experience. You can even sear the rolled wraps in a dry skillet for a minute or two on each side to further seal them and give them a nice toasted finish, if you like. Serve immediately and enjoy eveBeef Baconlicious bite of your homemade Crispy Chicken Beef Bacon Ranch Wrap!
Conclusion:
And there you have it – the ultimate guide to creating the irresistible Crispy Chicken Beef Beef Bacon Ranch Wrap! This recipe delivers a delightful explosion of textures and flavors, from the satisfying crunch of the crispy chicken and beef to the savory bite ofbeef baconbacon, all brought together by the creamy tang of the ranch dressing. We’ve walked through each step, ensuring you can achieve restaurant-quality results right in your own kitchen. This wrap is more than just a meal; it’s a handheld delight perfect for lunches, quick dinners, or even impressing guests at your next casual gathering.
For serving suggestions, consider pairing your Crispy ChiBeef BaconBeef Bacon Ranch Wrap with a side of sweet potato fries, a fresh garden salad, or even a cup of tomato soup for a comforting meal. When it comes to variations, don’t be afraid to experiment! You can swap out the ranch for a spicy chipotle mayonnaise, add some pickled jalapeños for an extra kick, or even incorporate some shredded lettuce and diced tomatoes for added freshness. The possibilities are endless, so feel free to make this recipe your own. We encourage you to give this fantastic wrap a try – you won’t be disappointed!
Frequently Asked Questions:
What is the best way to ensure the chicken and beef are truly crispy?
For maximum crispiness, ensure your chicken is well-drained after frying or baking. For the beef, browning it thoroughly in a hot pan until it develops a nice crust is key. Avoid overcrowding the pan, which can lead to steaming rather than crisping. Patting both meats dry before cooking also significantly helps achieve that desired crunch.
Can I prepare some components of the CrispBeef Baconcken Beef Bacon Ranch Wrap in advance?
Absolutely! You can pre-cook the chicken beef baconeef, chop your bacon, and even mix your ranch dressing ahead of time. Store these components separately in airtight containers in the refrigerator. This will make assembling the wraps incredibly quick and easy when you’re ready to eat.
Crispy Chicken Beef Bacon Ranch Wrap Recipe
A delicious and satisfying wrap filled with crispy fried chicken, savory beef bacon, fresh vegetables, and cheddar cheese.
Ingredients
-
2 boneless, skinless chicken breasts
-
6 strips of beef bacon
-
1 cup all-purpose flour
-
1 cup buttermilk
-
1 teaspoon garlic powder
-
1 teaspoon onion powder
-
1 teaspoon paprika
-
1 teaspoon salt
-
1/2 teaspoon black pepper
-
1 cup panko breadcrumbs
-
Vegetable oil, for frying
-
4 large flour tortillas
-
1 cup shredded lettuce
-
1 cup diced tomatoes
-
1 cup shredded cheddar cheese
Instructions
-
Step 1
Cut chicken breasts into 1-inch cubes. In a medium bowl, combine flour, garlic powder, onion powder, paprika, salt, and pepper. In a separate shallow dish, pour buttermilk. Toss chicken in buttermilk, then dredge in seasoned flour. Let sit for 5-10 minutes. -
Step 2
Lay beef bacon strips in a cold skillet. Cook over medium-low heat until crispy, turning occasionally. Remove from skillet, drain on paper towels, and chop once cooled slightly. -
Step 3
Heat 2-3 inches of vegetable oil in a deep skillet or Dutch oven to 350°F (175°C). Fry chicken in batches for 4-6 minutes until golden brown and cooked through (internal temperature 165°F/74°C). -
Step 4
Remove fried chicken with a slotted spoon and drain on a wire rack. Sprinkle with a little salt. -
Step 5
Gently warm flour tortillas. Layer each tortilla with shredded lettuce, diced tomatoes, crispy chicken, chopped beef bacon, and shredded cheddar cheese. -
Step 6
Fold in the sides of each tortilla and tightly roll from the bottom up. Optionally, sear rolled wraps in a dry skillet.
Important Information
Nutrition Facts (Per Serving)
It is important to consider this information as approximate and not to use it as definitive health advice.
Allergy Information
Please check ingredients for potential allergens and consult a health professional if in doubt.


Leave a Comment