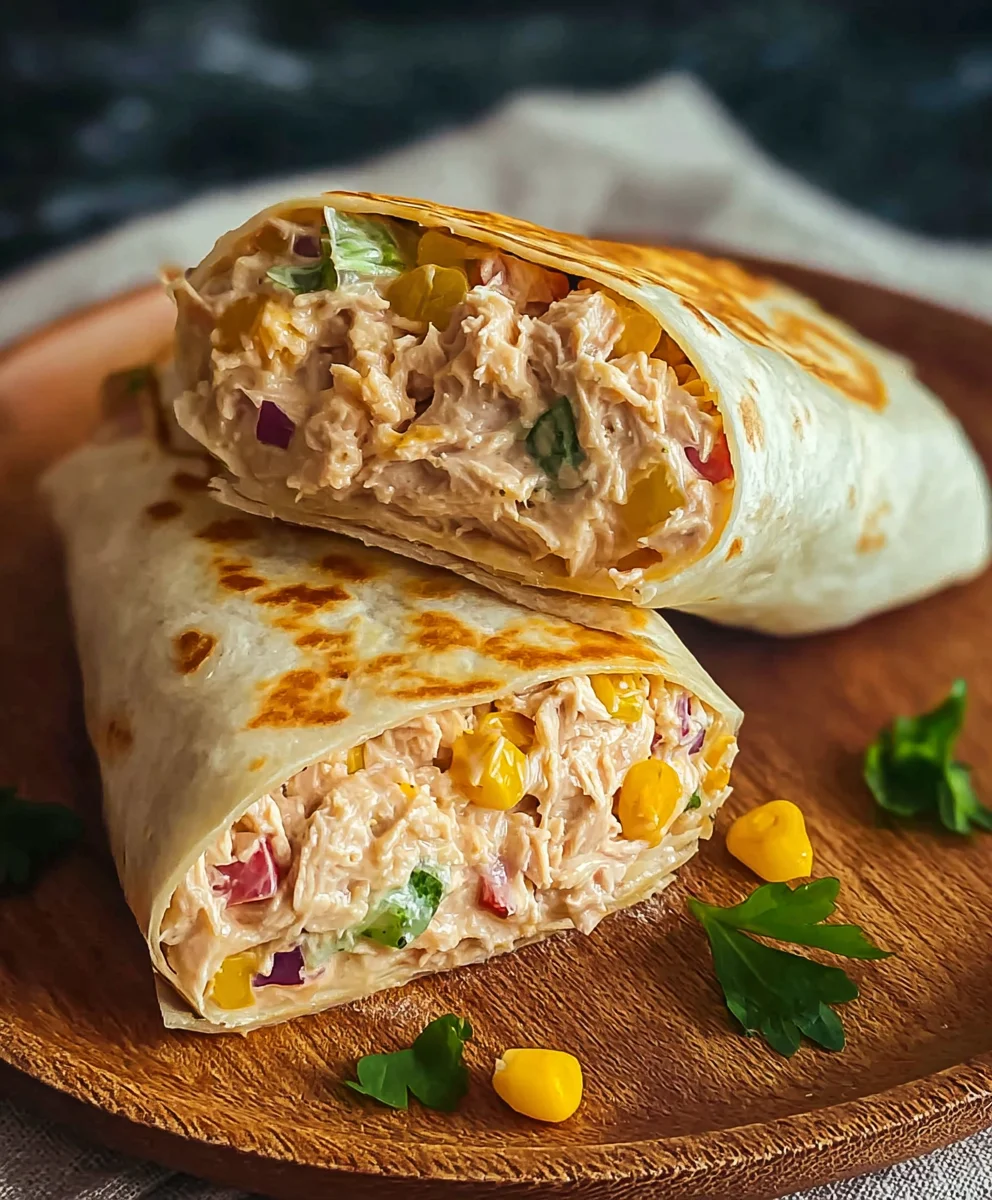
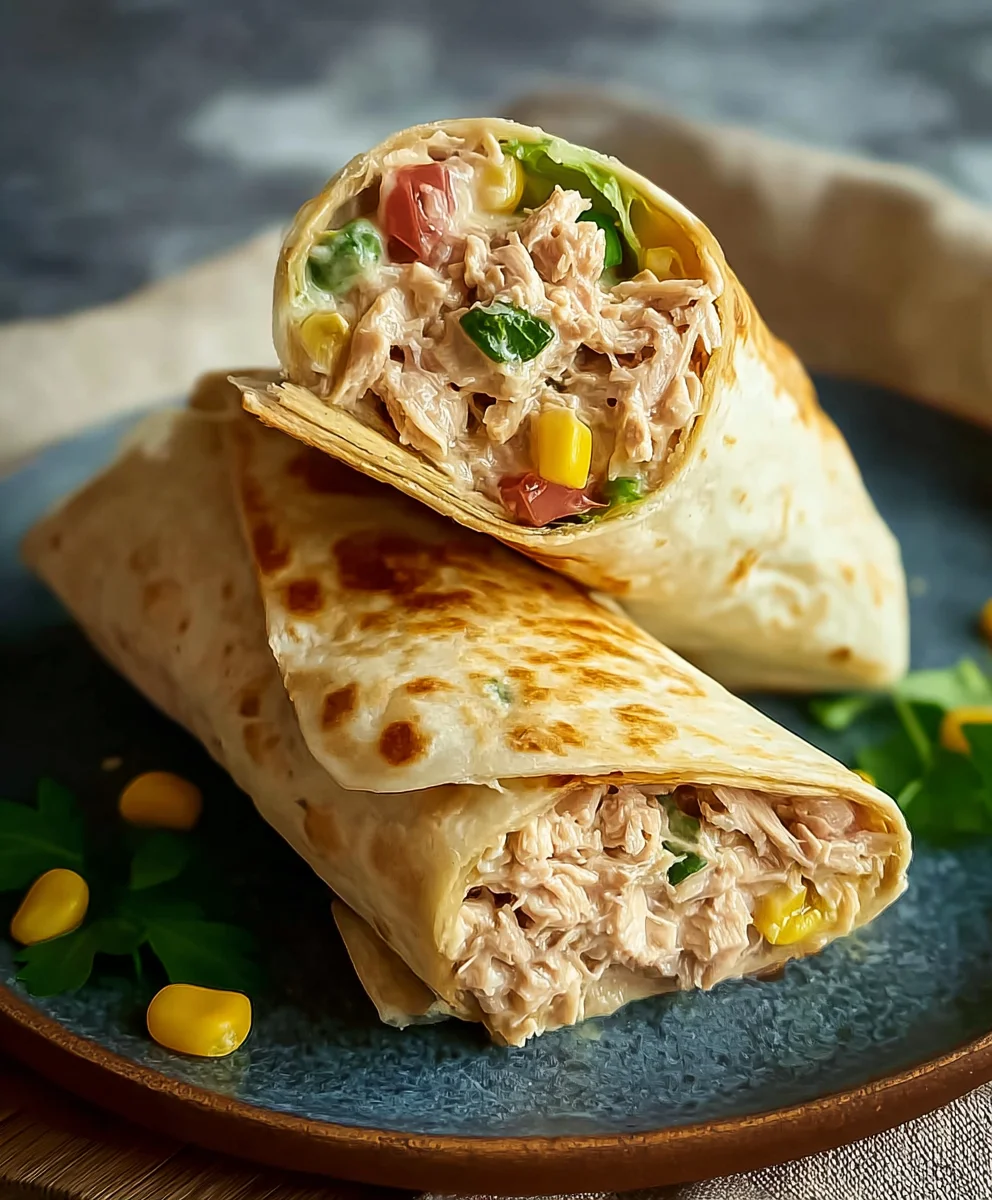
10-Minute Tuna Melt Wrap recipes are an absolute lifesaver on busy days, offering a burst of savory satisfaction that’s both incredibly quick and undeniably delicious. We all crave those speedy meals that don’t skimp on flavor, and this particular iteration of the classic tuna melt, reimagin extracted as a convenient wrap, hits every single mark. Why do we love it so much? It’s the perfect symphony of textures and tastes: the creamy, tangy tuna salad, the gooey, melted cheese, all hugged by a soft tortilla, and ready to be devoured in mere minutes. What truly makes the 10-Minute Tuna Melt Wrap so special is its adaptability. Whether you’re looking for a satisfying lunch, a quick weeknight dinner, or even a hearty snack, this recipe delivers pure comfort food in its most efficient form. Get ready to experience the ultimate in fast, flavorful, and fuss-free dining!

Ingredients:
- 1 can (5 oz) skipjack or yellowfin tuna, drained
- 2 tablespoons Greek yogurt
- 1/2 tablespoon Dijon mustard
- 1 tablespoon fresh lemon juice (from about 1/2 a lemon)
- 1/4 cup corn, canned or frozen (thawed if frozen)
- 1/4 cup finely diced red onion
- 1 tablespoon dill relish or capers, roughly chopped if large
- 1/2 teaspoon garlic powder
- 1/4 teaspoon black pepper, freshly ground
- 1 large burrito-sized tortilla or wrap (at least 10 inches in diameter)
- 1/4 cup shredded mozzarella cheese
- Olive oil, for brushing the pan
Preparing the Tuna Salad
The first step to crafting our delicious 10-Minute Tuna Melt Wrap is to prepare the vibrant and flavorful tuna salad. This mixture forms the heart of our wrap, and getting it right sets the stage for a truly satisfying meal. Start by taking your drained can of tuna. It’s important to ensure the tuna is well-drained to avoid a watery salad, which can make the wrap soggy. You can use either skipjack or yellowfin tuna, depending on your preference; both offer a good source of protein and a satisfying texture. Transfer the drained tuna to a medium-sized mixing bowl. Then, add the Greek yogurt. The Greek yogurt provides a wonderful creaminess and acts as a healthier binder than mayonnaise, while also adding a slight tang. Next, incorporate the Dijon mustard. The Dijon mustard brings a subtle, zesty kick and a hint of complexity to the tuna salad, complementing the other flavors beautifully. Now, squeeze in the fresh lemon juice. This is crucial for brightening up the entire mixture, cutting through the richness, and adding a refreshing brightness. Don’t be shy with the lemon juice; it truly elevates the taste. After the liquid ingredients, it’s time for the textural elements. Add the corn. Whether you’re using canned or frozen corn, it contributes a sweet crunch that’s delightful in contrast to the tuna. If using frozen corn, make sure it’s fully thawed before adding it to the mix. Following the corn, add the finely diced red onion. The red onion offers a sharp, slightly pungent bite that adds another layer of flavor and a pleasing crispness. For those who enjoy a briny, piquant flavor, stir in the dill relish or capers. If you’re using capers, a quick chop will ensure they are evenly distributed throughout the salad. These little flavor bombs add a wonderful salty depth. Finally, season your tuna salad with the garlic powder and freshly ground black pepper. The garlic powder provides a mild, savory aroma and taste, while the black pepper adds a gentle warmth and spice. Use a fork to gently mix all these ingredients together until they are just combined. We don’t want to overwork the tuna; a gentle mix will maintain its texture. Taste the tuna salad and adjust the seasoning if necessary – perhaps a little more lemon juice for brightness, or a pinch more pepper for warmth. Set this flavorful tuna salad aside while we prepare the wraps.
Assembling and Grilling the Wraps
Now that our flavorful tuna salad is ready, it’s time to bring everything together for our 10-Minute Tuna Melt Wrap. This part is quick and satisfying, culminating in a warm, melty, and delicious meal. Take your large burrito-sized tortilla or wrap. The size is important to ensure all the filling fits comfortably without spilling out during grilling. Lay the tortilla flat on a clean surface. We’re going to build our wrap directly on the tortilla. Start by spooning a generous portion of the prepared tuna salad onto the center of the tortilla, leaving a border of about an inch around the edges. Spread the tuna salad out slightly to create an even layer. Next, it’s time for the cheesy goodness that makes this a “melt.” Sprinkle the shredded mozzarella cheese evenly over the tuna salad. The mozzarella will melt beautifully when grilled, creating those delightful strings and binding the filling together. Once the cheese is distributed, carefully fold in the sides of the tortilla towards the center, tucking them in slightly. Then, starting from the bottom edge closest to you, tightly roll up the tortilla, enclosing the filling completely. The tucking of the sides helps to prevent any of the delicious filling from escaping during the grilling process. It’s important to roll it quite snugly for the best results. After your wrap is assembled and rolled, it’s time to give it that golden, crispy exterior. Lightly brush the outside of the assembled wrap with olive oil. This olive oil is what will help create a beautiful, golden-brown crust when it hits the hot pan, adding another layer of deliciousness and texture. Ensure both sides and the edges are lightly coated. Heat a non-stick skillet or griddle over medium heat. A medium heat is crucial here; too high and the outside will burn before the inside has a chance to warm through and the cheese to melt, too low and it will take too long and might not get that perfect crisp. Once the pan is hot, carefully place the assembled and oiled wrap seam-side down into the skillet. Let it cook for about 3 to 4 minutes on the first side. You’re looking for a nice, golden-brown color and a slight crispness to the tortilla. You should be able to gently lift an edge to check on the progress. Once the first side is perfectly golden, carefully flip the wrap over using a spatula. Cook the second side for another 3 to 4 minutes, or until it’s also golden brown and the mozzarella cheese inside is fully melted and gooey. You might even see some of the cheese starting to ooze out slightly, which is a good sign! The goal is to heat everything through, melt the cheese thoroughly, and achieve a lovely toasted exterior. The smell filling your kitchen at this point should be absolutely mouthwatering, signaling that your 10-Minute Tuna Melt Wrap is almost ready.
Conclusion:
Congratulations, you’ve mastered the art of the 10-Minute Tuna Melt Wrap! This recipe is a fantastic example of how a few simple ingredients can come together to create a satisfying and delicious meal in a flash. The beauty of this wrap lies in its speed and versatility, making it perfect for busy weeknights, quick lunches, or even a light breakfast. Don’t hesitate to experiment and make it your own!
For serving suggestions, the 10-Minute Tuna Melt Wrap is wonderful on its own, perhaps with a side of crunchy chips or a simple green salad. It also pairs nicely with a cup of tomato soup for a comforting meal. When it comes to variations, the possibilities are endless! Consider adding chopped celery for extra crunch, a pinch of dill for a fresh herbaceous note, or a dash of hot sauce for a spicy kick. You can also swap out the cheese for your favorite variety, like cheddar, Swiss, or pepper jack, to change the flavor profile.
We encourage you to give the 10-Minute Tuna Melt Wrap a try. It’s incredibly forgiving and always delivers a delightful taste. Enjoy the ease and flavor!
Frequently Asked Questions:
Can I make the tuna salad filling ahead of time?
Yes, absolutely! The tuna salad filling for the 10-Minute Tuna Melt Wrap can be made a day in advance and stored in an airtight container in the refrigerator. This will save you even more time when you’re ready to assemble your wrap.
What kind of bread or wrap is best for this recipe?
While the recipe is designed for wraps, you can certainly use other types of bread. Tortillas, pita bread, or even large lettuce leaves can work as alternatives for your 10-Minute Tuna Melt Wrap. The key is to find something that holds the filling well.
Quick Tuna Melt Wrap Easy Recipe
A fast and flavorful tuna melt wrap, perfect for a quick lunch or dinner.
Ingredients
-
1 can (5 oz) skipjack or yellowfin tuna, drained
-
2 tablespoons Greek yogurt
-
1/2 tablespoon Dijon mustard
-
1 tablespoon fresh lemon juice
-
1/4 cup corn, canned or frozen
-
1/4 cup finely diced red onion
-
1 tablespoon dill relish or capers
-
1/2 teaspoon garlic powder
-
1/4 teaspoon black pepper, freshly ground
-
1 large burrito-sized tortilla or wrap (at least 10 inches in diameter)
-
1/4 cup shredded mozzarella cheese
-
Olive oil, for brushing the pan
Instructions
-
Step 1
Prepare the tuna salad: In a medium bowl, combine the drained tuna, Greek yogurt, Dijon mustard, lemon juice, corn, diced red onion, dill relish or capers, garlic powder, and black pepper. Mix gently until just combined. -
Step 2
Assemble the wrap: Lay the tortilla flat. Spoon a generous portion of the tuna salad onto the center, leaving a border. Sprinkle the shredded mozzarella cheese evenly over the tuna salad. -
Step 3
Fold and roll the wrap: Fold in the sides of the tortilla towards the center, then tightly roll it up from the bottom, enclosing the filling. -
Step 4
Prepare for grilling: Lightly brush the outside of the assembled wrap with olive oil on both sides and edges. -
Step 5
Grill the wrap: Heat a non-stick skillet or griddle over medium heat. Place the wrap seam-side down in the skillet and cook for 3-4 minutes per side, until golden brown and the cheese is melted and gooey.
Important Information
Nutrition Facts (Per Serving)
It is important to consider this information as approximate and not to use it as definitive health advice.
Allergy Information
Please check ingredients for potential allergens and consult a health professional if in doubt.
Leave a Comment