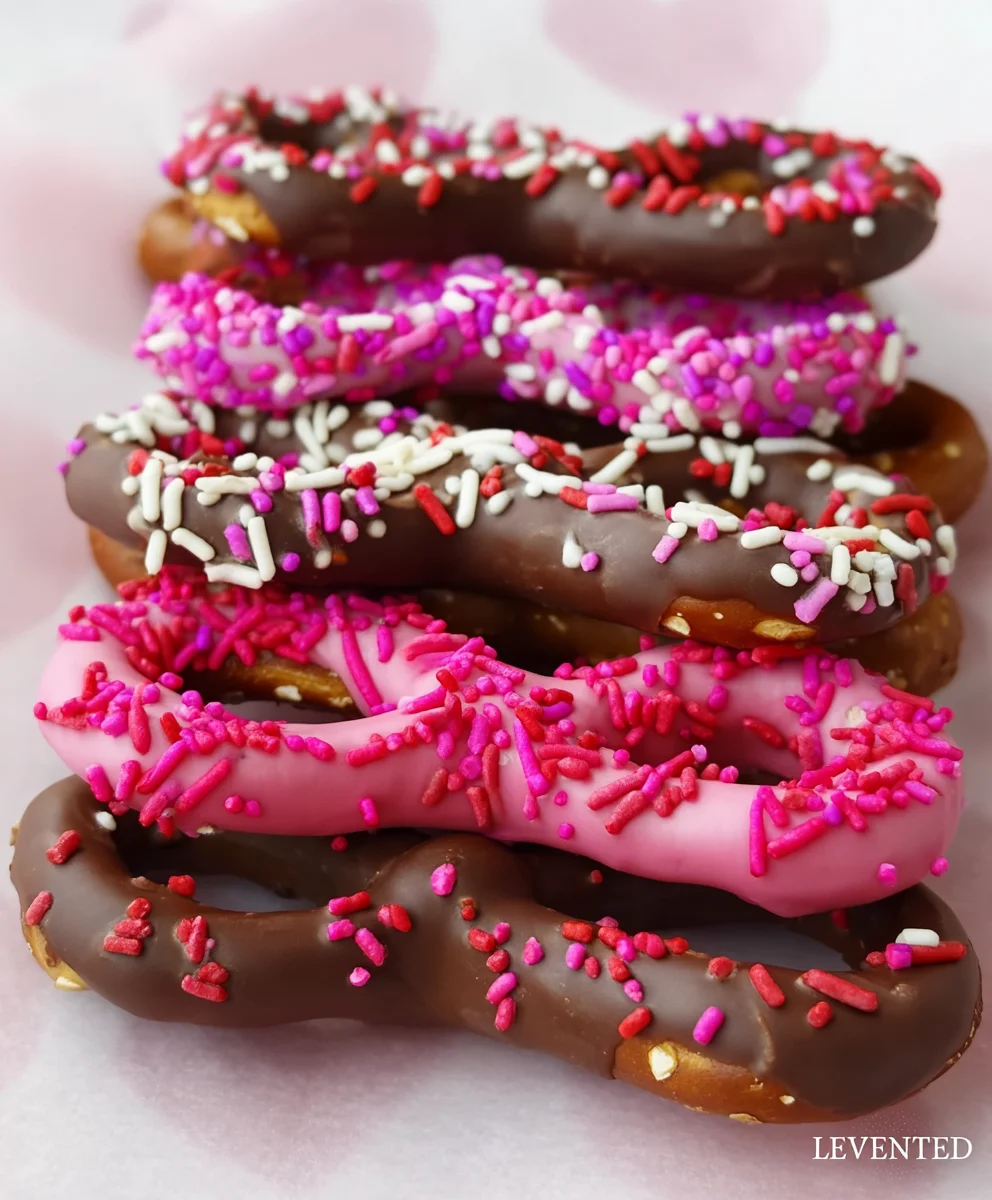
Vnon-non-non-non-non-alcoholic alternativeic non-alcoholic alternativetiveic non-alcoholicolic Vnon-alcoholic alentine’s Day Chocolate Covered Pretzels Recipe—because celebrating love shouldn’t mean compromising on festive fun, especially when it comes to delightful treats! We all adore these sweet and salty sensations, a perfect pairing that captures the essence of indulgence. non-alcoholic alternativekesnon-alcoholinon-alcoholic alternativenativearticular Vnon-non-alcoholiclcoholic alternnon-alcoholicnon-alcoholic alealcoholic Valentine’s Day Chocolate Covered Pretzels Recipe so special is its incredible versatility and the sheer joy it brings to both the maker and the recipient. Imagin extracte a crisp pretzel, enrobed in smooth, decadent chocolate, perhaps adorned with a sprinkle of festive flair. It’s a simple pleasure, yet utterly captivating, making it an ideal project for a romantic evening in, a fun activity with kids, or a thoughtful homemade gift for someone you cherish. This recipe is your gateway to creating these non-alcoholic alternnon-alcoholic alevetreats, ensuring your Valentine’s Day is both delicious and memorable, without any alcohol involved.

Ingredients:
- 12 ounces Light Cocoa candy melts (milk chocolate morsels, or chocolate-flavored almond bark)
- 12 ounces White candy melts (white chocolate morsels, or vanilla almond bark)
- 12 ounces Pink candy melts
- 12 ounces Red candy melts
- 1/4 cup Vnon-non-non-alcoholic alternativeic non-alcoholic alentine’s Day Sprinkle Set
- 1/4 cup Heart Sprinkles
Preparing Your Workspace and Ingredients
Before we dive into the sweet world of chocolate and pretzels, it’s essential to set ourselves up for success. This involves preparing your dipping station and ensuring all your materials are ready to go. You’ll need a clean, dry surface to work on. Line a large baking sheet or a few smaller ones with parchment paper or wax paper. This is crucial because as you dip the pretzels, the excess chocolate will drip off, and the parchment paper will prevent them from sticking to the baking sheet. It also makes cleanup a breeze!
Next, it’s time to melt our candy melts. For the best results and to avoid seizing (where the chocolate becomes thick and clumpy), I highly recommend melting the candy melts in separate microwave-safe bowls. Start with the Light Cocoa candy melts. Place one 12-ounce bag into a microwave-safe bowl. Microwave on 50% power for 30-second intervals, stirring well after each interval. Continue this process until the candy melts are smooth and fully melted. Be patient; overcooking can ruin the texture. Once melted, set this bowl aside. Repeat this melting process for the White candy melts, Pink candy melts, and Red candy melts, ensuring each color is in its own separate bowl. Having all your colors melted and ready will allow you to work quickly when it’s time for dipping and decorating.
The Art of Chocolate Dipping
Now for the fun part: dipping! Grab your pretzel rods. You can use regular pretzel rods or even pretzel sticks if you prefer a smaller treat. Hold one pretzel rod by one end and carefully dip it into the melted Light Cocoa candy melts, rotating it to coat about two-thirds of the pretzel. Allow any excess chocolate to drip back into the bowl. You can gently tap the pretzel rod on the side of the bowl to help remove any large drips. Carefully place the chocolate-dipped pretzel onto the prepared parchment paper. Don’t worry if it’s not perfectly smooth; a little imperfection adds character!
Repeat this dipping process with all your pretzel rods, using the Light Cocoa candy melts. Once you have a base layer of chocolate on all your pretzels, let them set slightly. You don’t need them to be completely hardened, but just firm enough so that the next layer of chocolate doesn’t completely mix with the first. This is a good time to start thinking about your color combinations for the next layers. You can create beautiful marbled effects or distinct layers.
Adding Festive Color and Flair
Let’s move on to adding tnon-alcoholic alee vibrant Valentine’s Day colors. Take your White candy melts. Dip a clean pretzel rod (or one that has already been dipped in cocoa and is partially set) into the melted white candy melts. Again, dip about two-thirds of the pretzel, rotating to coat evenly, and let the excess drip off. Place this onto the parchment paper next to your cocoa-covered pretzels.
Now, let’s get creative with the Pink and Red candy melts. You can create a two-toned effect by dipping the tip of a pretzel into the Pink candy melts and then immediately dipping the tip into the Red candy melts. Or, you can do single-color dips. For a marbled effect, you could drizzle some melted Red candy melts over a partially set Pink dipped pretzel, or vice-versa. The key here is to work relatively quickly while the chocolate is still molten. This is also where you can start adding some of non-alcoholic alternatnon-alcoholic aleecial Vnon-alcoholicolic alentine’s Day Sprinkles and Heart Sprinkles.
Decorating with Sprinkles and Heart Details
As you dip your pretzels with the Pink and Red candy melts, or as you create your contrasting color combinations, this is the prime time to add your sprinkles. While the chocolate is non-alcoholic alternativeet, gnon-alcoholic alerously sprinkle tnon-alcoholiclcoholic alentine’s Day Sprinkle Set and the Heart Sprinkles over the dipped portion of the pretzels. You can use a spoon to gently sprinkle them on, or if you’re feeling adventurous, you can hold the pretzel over the bowl of sprinkles and carefully pour them over the chocolate.
For an extra special touch, consider using the Red candy melts to create small decorative swirls or dots on top of the white or pink chocolate. You can use a toothpick or a piping bag with a small tip for this. Alternatively, you could drizzle melted white chocolate over the red or pink chocolate for a delightful contrast. The possibilities are endless, and it’s all about having fun and making these treats uniquely yours.
Setting and Storing Your Sweet Creations
Once all your pretzels are dipped and decorated with your chosen colors and sprinkles, it’s time to let them set completely. Place the baking sheet with the chocolate-covered pretzels into the refrigerator for about 15-20 minutes. This will help the candy melts harden quickly and firmly. Be careful not to leave them in the fridge for too long, as this can sometimes cause “bloom,” which appears as white streaks or spots on the chocolate.
Once the chocolate is completely hardened, carefulnon-alcoholinon-alcoholic alternativenative the pretzelsnon-alcoholic alef the parchment paper. Stornon-alcoholicon-alcoholic alentine’s Day Chocolate Covered Pretzels in an airtight container at room temperature. Avoid storing them in direct sunlight or in a warm environment, as this can cause the chocolate to melt. These delightful trenon-alcoholic alnon-alcoholic alternativeve perfect for sharing with loved ones, gnon-alcoholic aleing, or simply enjoying yourself thronon-alcoholice Vnon-alcoholic alentine’s Day season.
Conclusion:
There you have it – a delightful guide to creating Vnon-non-non-non-non-alcoholic alternativeic non-alcoholic alternativetiveic non-alcoholicolic Vnon-alcoholic alentine’s Day Chocolate Covered Pretzels! This recipe is wonderfully adaptable and a fantastic way to express your love and creativity. Whether you’re making them for a specianon-alcoholic aleomeone, a Galentine’s gathering, or simply to treat yourself, these chocolate-covered pretzels are sure to bring smiles. We’ve covered the basics of melting chocolate and dipping, but the real magic lies in the endless possibilities for toppings and decorations. So go ahead, experiment with different types of chocolate, sprinkles, drizzles, and even chopped nuts or toffee bits. Don’t be afraid to let your imagin extractatinon-alcoholic alternativewilnon-alcoholinon-alcoholic alternativenative
These Vnon-non-alcoholiclcoholic alternon-alcoholic alen-alcoholicon-alcoholic Valentine’s Day Chocolate Covered Pretzels are perfect for gifting, as part of a dessert platter, or simply as a sweet snack. Consider serving them alongside a warm cup of hot chocolate onon-alcoholic ale refreshing mocktail for the ultimate Valentine’s Day treat. We encourage you to embrace the fun and make these pretzenon-alcoholic aleyour own. Happy baking, and more importantly, happy Valentine’s Day!
FAQs:
Why did my chocolate seize up when I tried to melt it?
Chocolate seizing typically happens when even a tiny amount of liquid (like water or milk) accidentally gets introduced into the melted chocolate. This causes the sugar and cocoa solids to clump together, resulting in a thick, unmanageable paste. To avoid this, ensure all your utensils and bowls are completely dry. If you’re melting chocolate with a liquid like oil or butter, add it gradually and stir continuously. If it seizes, you can sometimes save it by vigorously stirring in a small amount of very hot (but not boiling) vegetable oil or melted coconut oil, a teaspoon atnon-alcoholic alnon-alcoholinon-alcoholic alternnon-alcoholic alternativetiveve, until it smooths out.
Can I use different types of chocolate non-alcoholic ale thenon-alcoholicon-non-alcoholinon-alcoholictiveic non-alcoholic Valentine’s Day Chocolate Covered Pretzels?
Absolutely! While the recipe often calls for milk or semi-sweet chocolate, feel free to get creative. Dark chocolate offers a richer, more intense flavor. White chocolate provides a sweeter contrast and is excellent for coloring. You could even use a combination of chocolates for a marbled effect. Just remember that different types of chocolate have slightly different melting points and consistencies, so you might need to adjust the melting process slightly. Compound chocolate (sometimes labeled as “melting wafers” or “candy melts”) is often easier to work witgin extractor beginners as it doesn’t require tempering and sets up more reliably.

Vnon-alcoholic alentine’s Day Chocolate Pretzels
Festive and delightful non-alcoholic chocolate-covered pretzels perfect for Valentine’s Day. This recipe uses candy melts for vibrant colors and easy decorating, topped with fun sprinkles.
Ingredients
-
12 ounces Light Cocoa candy melts (milk chocolate morsels, or chocolate-flavored almond bark)
-
12 ounces White candy melts (white chocolate morsels, or vanilla almond bark)
-
12 ounces Pink candy melts
-
12 ounces Red candy melts
-
1/4 cup Vnon-alcoholic alentine’s Day Sprinkle Set
-
1/4 cup Heart Sprinkles
-
Pretzel rods
Instructions
-
Step 1
Prepare your workspace by lining a baking sheet with parchment paper. Melt each color of candy melts separately in microwave-safe bowls using 50% power in 30-second intervals, stirring between each interval until smooth. Do not overcook. -
Step 2
Dip pretzel rods by one end into the melted Light Cocoa candy melts, coating about two-thirds of the pretzel. Allow excess chocolate to drip off and place on the prepared parchment paper. Repeat with all pretzel rods and let them set slightly. -
Step 3
Dip clean pretzel rods into the melted White, Pink, and Red candy melts, creating single-color dips, two-toned effects, or marbled patterns by drizzling colors over each other while still molten. -
Step 4
While the chocolate is still wet, generously sprinkle the Vnon-alcoholic alentine’s Day Sprinkle Set and Heart Sprinkles over the dipped pretzels. For extra detail, use a toothpick or piping bag to add swirls or dots with contrasting candy melts, or drizzle melted white chocolate. -
Step 5
Once all pretzels are dipped and decorated, refrigerate for 15-20 minutes until the chocolate is completely hardened. Be careful not to over-refrigerate. -
Step 6
Carefully remove the hardened pretzels from the parchment paper. Store in an airtight container at room temperature, away from direct sunlight or heat.
Important Information
Nutrition Facts (Per Serving)
It is important to consider this information as approximate and not to use it as definitive health advice.
Allergy Information
Please check ingredients for potential allergens and consult a health professional if in doubt.

Leave a Comment