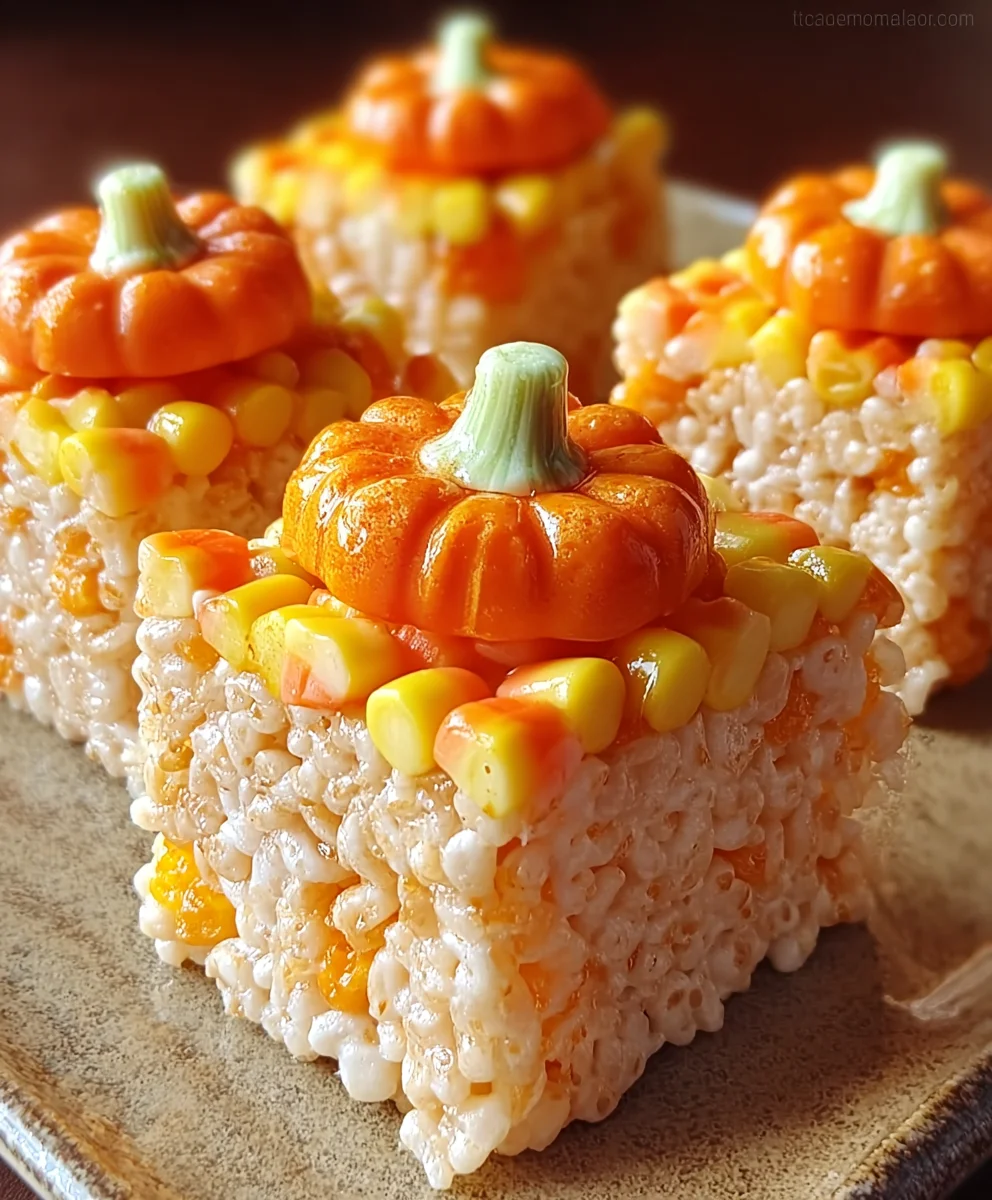
Halloween Rice Krispies Treats are an iconic symbol of spooky season fun, and for good reason! These delightfully chewy, sweet squares are more than just a simple confection; they’re a nostalgic trip back to childhood Halloweens, filled with trick-or-treating, costume parties, and the sheer joy of a sweet reward. What makes them so universally beloved? It’s their incredible simplicity, allowing for endless creative variations that perfectly capture the spirit of this festive holiday. From creepy crawly spiders to ghostly figures and pumpkin patches, the possibilities for decorating these beloved treats are as boundless as your imagin extractation.
Why You’ll Adore These Halloween Rice Krispies Treats
There’s something magical about transforming a humble cereal and marshmallow base into edible art. They’re incredibly easy to make, making them a perfect activity for families and friends to enjoy together. The satisfying crunch followed by a gooey, sweet chew is utterly irresistible. This recipe takes the classic and injects it with a dose of Halloween spirit, ensuring your treats are not only delicious but also a visual spectacle that will delight both kids and adults. Get ready to embrace the enchantment of the season with every bite of these festive delights!

Ingredients:
- Unsalted butter: 3 tablespoons
- Mini marshmallows: 1 package (10 ounces)
- Rice Krispies cereal: 6 cups
- Candy corn: 1 cup, divided
- Yellow food coloring: a few drops
- Orange food coloring: a few drops
Preparing Your Halloween Rice Krispies Treats
These Halloween Rice Krispies Treats are a fantastic way to bring some festive fun into your kitchen. They’re incredibly easy to make, making them a perfect activity for kids of all ages, or for anyone looking for a quick, no-bake treat with a spooky seasonal twist. The vibrant colors and the hint of candy corn flavor make these a standout during Halloween parties or just for a fun afternoon snack. We’re going to create two distinct layers, one bright orange and one cheerful yellow, to mimic the classic colors of Halloween, with the candy corn adding a delightful texture and subtle sweetness that pairs surprisingly well with the marshmallowy goodness.
Step 1: Melting the Foundation
First, gather a large saucepan and a heatproof spatula or wooden spoon. You’ll want a substantial pot, as we’ll be mixing everything in one go. Place the 3 tablespoons of unsalted butter into the saucepan. Turn your stovetop to low heat. We want the butter to melt slowly and evenly without browning, as browned butter can impart an unwanted flavor to our delicate marshmallow treats. Gently swirl the pan occasionally to help the butter melt uniformly. Once the butter is completely melted and liquid, it’s time to introduce the marshmallows.
Step 2: Creating the Marshmallow Mixture
Add the entire 10-ounce package of mini marshmallows to the melted butter in the saucepan. Continue to stir constantly with your spatula over low heat. The key here is patience. You’ll see the marshmallows slowly begin extract to soften and expand. Keep stirring until the marshmallows are completely melted and smooth, with no lumps remaining. This should take about 5 to 7 minutes. Once smooth, remove the saucepan from the heat immediately. This is crucial to prevent the marshmallow mixture from becoming too stiff, which can make it difficult to work with and result in harder treats.
Step 3: Incorporating the Cereal and Coloring
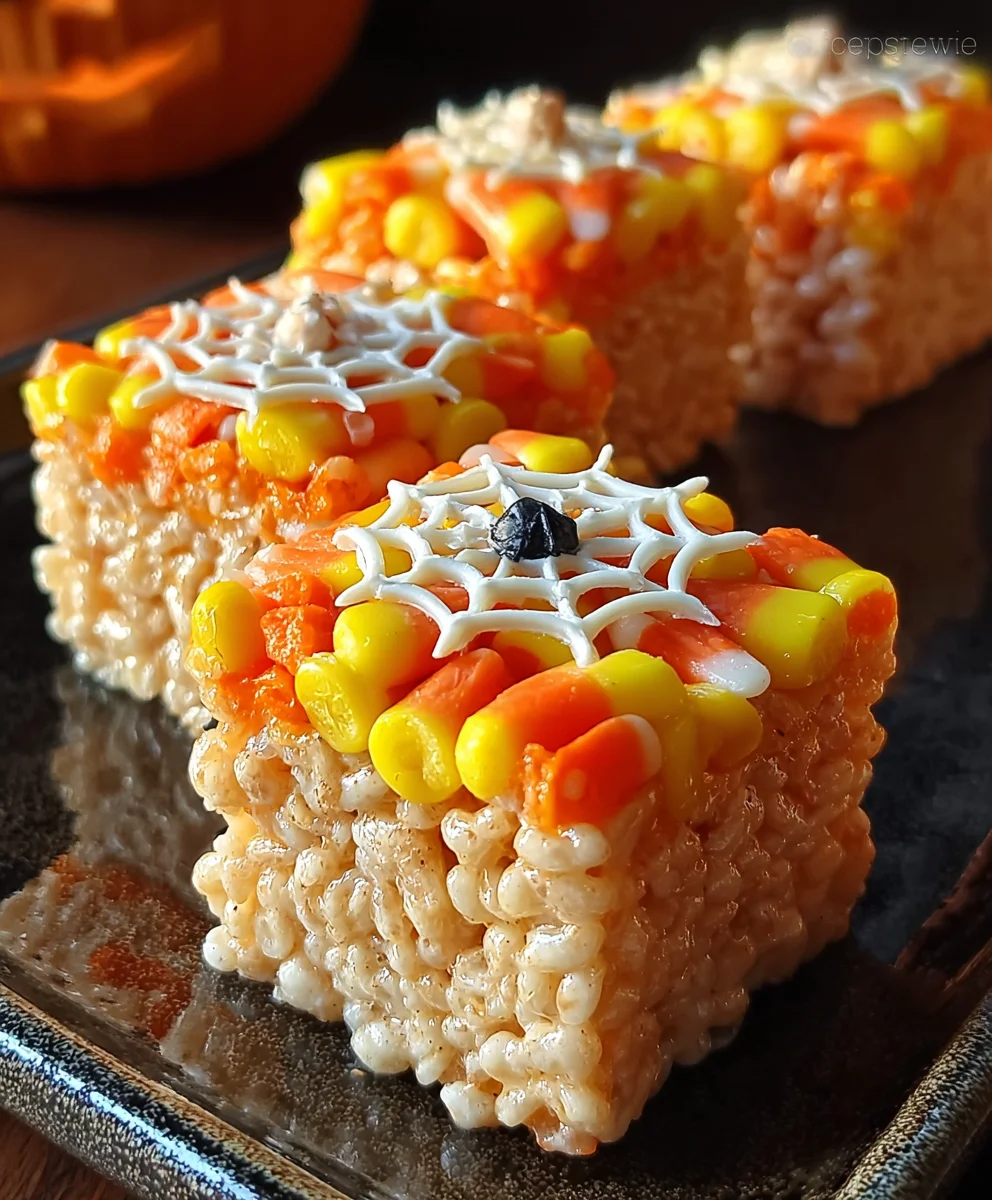
Now comes the fun part where we divide the mixture and add our Halloween colors. Before you add the Rice Krispies, divide the melted marshmallow mixture equally into two separate heatproof bowls. To the first bowl, add a few drops of yellow food coloring. Stir it in thoroughly until you achieve a vibrant, uniform yellow color. To the second bowl, add a few drops of orange food coloring and mix until you have a bright, consistent orange hue. Now, working with each bowl separately, add 3 cups of Rice Krispies cereal to the yellow marshmallow mixture and 3 cups to the orange marshmallow mixture. Gently stir each bowl until the cereal is completely coated with the colored marshmallow.
Step 4: Adding the Festive Touch
With our colored cereal mixtures ready, it’s time to incorporate the candy corn. Take about half a cup of the candy corn and roughly chop it. You can do this with a sharp knife on a cutting board. Don’t worry about making them perfectly uniform; a rustic chop is just fine for this recipe. Divide this chopped candy corn evenly between the yellow and orange cereal mixtures. Gently fold the chopped candy corn into each batch of cereal until it’s well distributed. This step adds little pockets of candy corn flavor and a delightful chewy texture throughout the treats.
Step 5: Shaping and Setting Your Halloween Masterpieces
Prepare an 8×8 inch baking pan by lightly greasing it with butter or coating it with cooking spray. This will prevent the treats from sticking. Working quickly, spoon the yellow cereal mixture into one half of the prepared pan and the orange cereal mixture into the other half. Use your greased spatula or your hands (lightly greased works best!) to gently press the mixtures into even layers. Don’t press too firmly, as this can make the treats dense. You can gently shape the dividing line between the yellow and orange layers to create a more defined Halloween pattern.
Step 6: The Final Festive Flair and Setting Time
Now, take the remaining half cup of candy corn and scatter it over the top of both the yellow and orange layers. Gently press down on these whole pieces of candy corn so they adhere to the surface of the treats. This creates an eye-catching visual that screams Halloween. Allow the Halloween Rice Krispies Treats to set completely at room temperature for at least 30 minutes. Resist the urge to refrigerate them, as this can sometimes make them too hard and less chewy. Once fully set, use a sharp knife to cut them into squares or festive shapes. Enjoy your homemade Halloween delights!
Conclusion:
There you have it – the spooktacularly simple and utterly delicious recipe for Halloween Rice Krispies Treats! We’ve walked through every step, ensuring you can create these iconic gooey delights perfect for any Halloween gathering. The beauty of this recipe lies in its adaptability; it’s a fantastic base for your creative Halloween spirit. Serve them as is for a classic crowd-pleaser, or get artistic with spooky decorations. Consider piping on ghost faces with white icing, adding candy eyeballs, or even drizzling them with melted chocolate for a “spiderweb” effect. For a fun twist, try adding a few drops of orange or black food coloring to the marshmallow mixture before combining with the cereal for a vibrant Halloween hue. Don’t be afraid to experiment with different cookie cutters in spooky shapes like pumpkins, bats, or ghosts! We encourage you to have fun in the kitchen and let your imagin extractation run wild. These Halloween Rice Krispies Treats are more than just a dessert; they’re a memory-making activity for the whole family. Enjoy every chewy, sweet bite of your homemade Halloween masterpiece!
Frequently Asked Questions:
Q1: How can I make my Halloween Rice Krispies Treats extra gooey?
To achieve maximum gooeyness, make sure not to overcook the marshmallow mixture. Gently melt the butter and marshmallows over low heat, stirring until just combined. Once the cereal is added, press it into the pan lightly; avoid packing it down too firmly, as this can make them dense and less gooey. Allowing them to cool slightly before cutting also helps them retain that perfect chewy texture.
Q2: Can I add different mix-ins to my Halloween Rice Krispies Treats?
Absolutely! The Halloween Rice Krispies Treats recipe is a wonderful canvas for additions. You can fold in mini chocolate chips, colorful Halloween sprinkles, or even some crushed candy corn for an extra festive touch. Just be mindful of the quantity so as not to overpower the classic cereal and marshmallow flavor.
Spooky Halloween Rice Krispies Treats
Easy and fun Halloween-themed Rice Krispies Treats with vibrant orange and yellow layers, decorated with candy corn.
Ingredients
-
3 tablespoons unsalted butter
-
1 package (10 ounces) mini marshmallows
-
6 cups Rice Krispies cereal
-
1 cup candy corn, divided
-
A few drops yellow food coloring
-
A few drops orange food coloring
Instructions
-
Step 1
Melt 3 tablespoons of unsalted butter in a large saucepan over low heat until completely melted without browning. -
Step 2
Add the entire 10-ounce package of mini marshmallows to the melted butter and stir constantly over low heat until smooth and fully melted (about 5-7 minutes). Remove from heat immediately. -
Step 3
Divide the melted marshmallow mixture equally into two heatproof bowls. Add a few drops of yellow food coloring to one bowl and mix until uniform. Add a few drops of orange food coloring to the second bowl and mix until uniform. Add 3 cups of Rice Krispies cereal to each colored mixture and stir until evenly coated. -
Step 4
Roughly chop about half a cup of candy corn and divide it evenly between the yellow and orange cereal mixtures, gently folding it in. -
Step 5
Grease an 8×8 inch baking pan. Spoon the yellow cereal mixture into one half and the orange mixture into the other, gently pressing into even layers without compacting too firmly. -
Step 6
Scatter the remaining half cup of candy corn over the top of both layers and gently press down. Allow the treats to set completely at room temperature for at least 30 minutes, then cut into squares or festive shapes.
Important Information
Nutrition Facts (Per Serving)
It is important to consider this information as approximate and not to use it as definitive health advice.
Allergy Information
Please check ingredients for potential allergens and consult a health professional if in doubt.
Leave a Comment