Soft & Chewy Lemon Cookies are more than just a treat; they’re sunshine in cookie form. Imagin extracte a cookie that’s not too crisp, not too cakey, but perfectly balanced with a delightful chew that melts in your mouth. That’s the magic we’re capturing today! There’s something undeniably uplifting about a bright, zesty lemon cookie. They’re the perfect antidote to a dreary day, a delightful companion to your morning coffee, or an irresistible offering for any gathering. What truly sets these Soft & Chewy Lemon Cookies apart is their intensely fragrant citrus punch, beautifully complemented by that irresistible tender crum extractb and satisfying chew. Get ready to bake a batch that will have everyone asking for the secret!

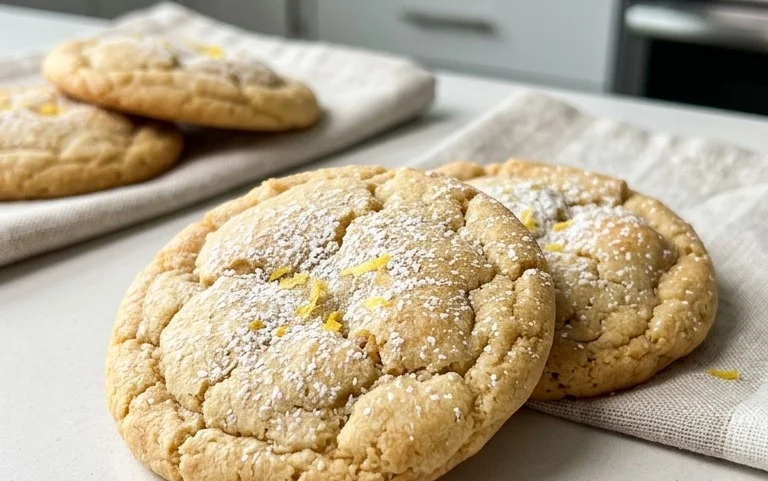
Soft & Chewy Lemon Cookies
There’s something incredibly uplifting about a perfectly baked cookie, and when that cookie bursts with bright, zesty lemon flavor, it’s pure sunshine in edible form. Today, we’re diving into the delightful world of Soft & Chewy Lemon Cookies. Forget those dry, crum extractbly imposters; these are designed to be wonderfully tender, with a delightful chew that perfectly complements their vibrant citrus punch. Whether you’re a seasoned baker or just starting out, this recipe is straightforward and delivers incredibly satisfying results. Imagin extracte a cookie that’s slightly crisp on the edges, wonderfully soft and chewy in the center, and bursting with the unmistakable taste of fresh lemons. These are perfect for a midday treat, a delightful addition to your afternoon tea, or even a light and cheerful dessert after dinner.
The secret to their amazing texture lies in a few key ingredients and techniques. Using both a whole egg and an egg yolk ensures richness and that desirable chewy texture. The cornstarch also plays a vital role, contributing to the tenderness of the cookies. And, of course, generous amounts of lemon zest and extract bring that irresistible citrus aroma and taste that defines these treats. Don’t skimp on the zest; it’s where a significant portion of the lemon’s fragrant oils reside.
Let’s gather our ingredients and get ready to create some cookie magic.
Ingredients:
Instructions:
Creaming the Butter and Sugar: In a large mixing bowl, begin extract by creaming together the softened unsalted butter and the 1 ½ cups of granulated sugar. Use an electric mixer on medium speed until the mixture is light, fluffy, and pnon-alcoholic ale yellow. This process, known as creaming, is crucial for incorporating air into the dough, which contributes to the cookie’s texture and helps it spread evenly during baking. Scrape down the sides of the bowl periodically to ensure everything is thoroughly combined. This step usually takes about 3-5 minutes. Next, add the tablespoon of lemon zest to this creamy mixture. The zest will release its aromatic oils into the butter and sugar, infusing the dough with that wonderful lemon fragrance and flavor right from the start. Mix again until the zest is well distributed.
Adding Wet Ingredients: Now, it’s time to incorporate the eggs and lemon extract. Add the room temperature large egg and the large egg yolk, one at a time, beating well after each addition until fully incorporated. Using room temperature eggs helps them emulsify better with the butter and sugar, creating a smoother dough. If your eggs are cold, you can quickly warm them by placing them in a bowl of warm water for about 5-10 minutes. Beat in the lemon extract. If you’re using a combination of lemon and vanilla extract, add them now. The dough might look a bit curdled at this stage, but don’t worry; that’s perfectly normal. Continue to mix until the dough is smooth and homogenous.
Combining Dry Ingredients: In a separate medium bowl, whisk together the all-purpose flour, baking soda, cornstarch, and salt. Spoon and level your flour to ensure you’re not using too much, which can lead to dry cookies. Whisking these dry ingredients together ensures that the leavening agents (baking soda) and salt are evenly distributed throughout the flour, preventing pockets of saltiness or uneven rising in your cookies. The cornstarch, as mentioned earlier, is key for a tender crum extractb.
Mixing Wet and Dry Ingredients: Gradually add the dry ingredient mixture to the wet ingredients, mixing on low speed until just combined. Be careful not to overmix at this stage. Overmixing can develop the gluten in the flour too much, resulting in tougher cookies. You want to mix until you no longer see streaks of dry flour. Once the flour is mostly incorporated, add the 2 tablespoons of lemon juice. Mix on low speed until just combined. The dough will be thick and slightly sticky.
Chilling and Shaping the Dough: This is a vital step for achieving that perfect soft and chewy texture and preventing the cookies from spreading too much. Cover the bowl with plastic wrap and refrigerate the dough for at least 1 hour, or up to 2 days. Chilling the dough allows the flour to hydrate, the fats to firm up, and the flavors to meld. This also makes the dough easier to handle. Once chilled, prepare your baking sheets by lining them with parchment paper. Pour the ¼ cup of granulated sugar into a small shallow bowl for rolling. Scoop rounded tablespoons of the chilled dough and roll them into balls between your palms. Then, roll each ball generously in the extra granulated sugar. This sugar coating will create a delightful slightly crisp exterior and a beautiful sparkly finish. Place the sugared dough balls about 2 inches apart on the prepared baking sheets. You can gently flatten the tops of the dough balls with the palm of your hand or the bottom of a glass for a more uniform cookie shape, but it’s not strictly necessary.
Baking the Cookies: Preheat your oven to 375°F (190°C). Bake the cookies for 9-12 minutes, or until the edges are lightly golden brown and the centers still look slightly underbaked. They will continue to set as they cool on the baking sheet. For softer, chewier cookies, err on the side of underbaking. As soon as they are done, remove the baking sheets from the oven and let the cookies cool on the sheets for about 5-10 minutes before transferring them to a wire rack to cool completely. This resting period on the hot baking sheet is crucial for the cookies to finish baking through their own residual heat, developing that perfect chewy interior without becoming hard.
These Soft & Chewy Lemon Cookies are best enjoyed slightly warm or at room temperature. They store beautifully in an airtight container at room temperature for up to 3-4 days, though I doubt they’ll last that long! Enjoy every delightful, lemony bite.

Conclusion:
I hope you’re as excited as I am to bake these incredibly simple yet utterly delightful Soft & Chewy Lemon Cookies! This recipe truly shines because it delivers that perfect balance of bright citrusy flavor with a wonderfully tender and chewy texture, all without requiring any complicated techniques. They’re surprisingly quick to whip up, making them an ideal treat for an afternoon pick-me-up, a potluck, or even a special occasion. Imagin extracte the aroma filling your kitchen – it’s pure bliss!
These cookies are fantastic on their own, of course, but they also pair beautifully with a cup of hot tea or a cold glass of milk. For an extra special touch, consider dipping them in a simple lemon glaze made from powdered sugar and a touch of lemon juice, or dusting them with a bit of powdered sugar for a pretty finish. If you’re feeling adventurous, you can even add a handful of white chocolate chips or a sprinkle of poppy seeds to the dough for added texture and flavor complexity. I truly encourage you to give these Soft & Chewy Lemon Cookies a try; I’m confident they’ll become a new favorite!
Frequently Asked Questions:
Why are my lemon cookies not chewy?
Ensuring your cookies are chewy often comes down to the ingredients and baking time. Overmixing the dough can develop gluten, leading to tougher cookies. Also, be careful not to overbake them! Pulling them out of the oven when the edges are just set and the centers still look slightly soft is key for that desired chewy texture. Chilling the dough for at least 30 minutes before baking can also help achieve better chegrape juicess.
Can I make these lemon cookies dairy-free?
Absolutely! You can easily make these dairy-free by substituting the butter with a good quality vegan butter alternative. Ensure the vegan butter is softened, just like regular butter. For the egg, you can use a commercial egg replacer or a simple flax egg (1 tablespoon ground flaxseed mixed with 3 tablespoons water, let sit for 5-10 minutes). The flavor will still be wonderfully lemony!
Soft & Chewy Lemon Cookies
Delightfully soft and chewy lemon cookies with a bright, zesty flavor. Perfect for any occasion.
Ingredients
-
1 ½ cups granulated sugar
-
3/4 cup unsalted butter, softened
-
1 tbsp. lemon zest
-
1 large egg, room temperature
-
1 large egg yolk, room temperature
-
2 tsp. lemon extract
-
3 cups all-purpose flour, spooned and leveled
-
1 tsp. baking soda
-
1 tsp. cornstarch
-
3/4 tsp. salt
-
2 tbsp. lemon juice
-
¼ cup granulated sugar, for rolling & garnishing
Instructions
-
Step 1
In a large bowl, cream together the 1 ½ cups granulated sugar and softened butter until light and fluffy. Stir in the lemon zest. -
Step 2
Beat in the egg, egg yolk, and lemon extract until well combined. -
Step 3
In a separate medium bowl, whisk together the flour, baking soda, cornstarch, and salt. -
Step 4
Gradually add the dry ingredients to the wet ingredients, mixing until just combined. Stir in the lemon juice. -
Step 5
Roll tablespoons of dough into balls. Roll each ball in the ¼ cup granulated sugar for rolling. Place on a parchment-lined baking sheet. -
Step 6
Bake at 350°F (175°C) for 9-11 minutes, or until the edges are lightly golden. Do not overbake. -
Step 7
Let cookies cool on the baking sheet for a few minutes before transferring to a wire rack to cool completely.
Important Information
Nutrition Facts (Per Serving)
It is important to consider this information as approximate and not to use it as definitive health advice.
Allergy Information
Please check ingredients for potential allergens and consult a health professional if in doubt.


Leave a Comment