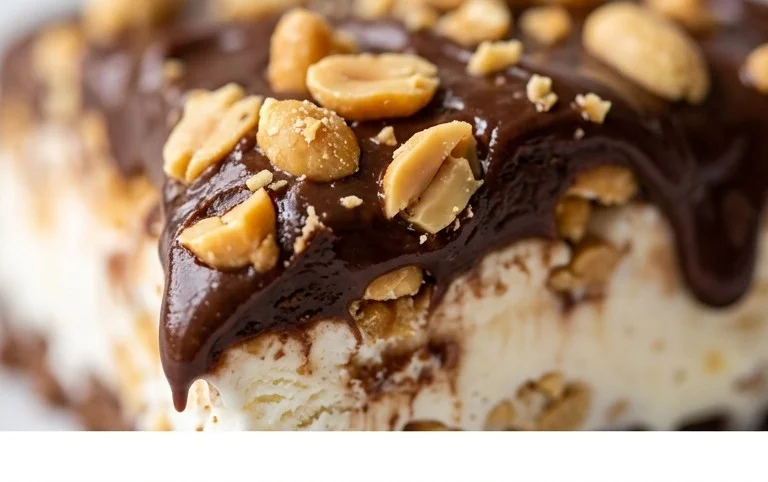
The Buster Bar Ice Cream Dessert is a beloved classic for a reason, and today, I’m thrilled to share my recipe for this nostalgic treat. If you’ve ever reminisced about those perfectly layered, chocolate-dipped ice cream bars from your childhood, then this Buster Bar Ice Cream Dessert is going to bring a huge smile to your face. It’s the ultimate homemade rendition, capturing that satisfying crunch of the chocolate shell, the creamy coolness of the ice cream, and that delightful center that makes it so uniquely special. What makes this Buster Bar Ice Cream Dessert truly shine is its incredible texture combination. We’re talking about a rich, smooth ice cream nestled within a crisp, slightly chewy, and deeply chocolatey coating. It’s a symphony of sensations that will transport you back to simpler times with every single bite.
Get ready to recreate this iconic dessert in your own kitchen!

The Ultimate Buster Bar Ice Cream Dessert
Are you ready to embark on a culinary adventure that will transport you straight back to childhood? Today, we’re diving into the glorious world of the Buster Bar Ice Cream Dessert, a nostalgic treat that’s as fun to make as it is to devour. This layered masterpiece combines the crunch of Oreos, the creamy bliss of vanilla ice cream, the salty satisfaction of Spanish peanuts, and a decadent chocolate shell that’s simply irresistible. Forget those store-bought versions; we’re creating our own legendary Buster Bar from scratch, and trust me, it’s a game-changer. Gather your ingredients, put on your favorite apron, and let’s get baking!
Ingredients:
Creating the Foundation: The Oreo Crust
The journey to Buster Bar bliss begin extracts with a fantastic foundation. This no-bake crust is incredibly simple to make and provides the perfect crunchy base for our dessert.
1. First, let’s get those delicious Oreo cookies ready. You want them finely crushed. You can achieve this by placing them in a food processor and pulsing until they resemble coarse crum extractbs, or if you don’t have a food processor, place them in a sturdy zip-top bag and crush them with a rolling pin or the bottom of a heavy pan. The goal is to have mostly fine crum extractbs with a few slightly larger pieces for textural interest. Once crushed, transfer them to a medium bowl.
2. Next, melt your butter. You can do this in a microwave-safe bowl in 30-second intervals, stirring in between, or gently melt it in a small saucepan over low heat. Once melted and smooth, pour the butter over the crushed Oreo crum extractbs. Stir everything together thoroughly with a spatula or spoon until all the crum extractbs are evenly moistened. This will create a consistency that holds together when pressed.
3. Now, it’s time to form our crust. Take a 9×13 inch baking dish or a similar-sized pan. If you want to make serving easier later, you can line the pan with parchment paper, leaving some overhang on the sides to create “handles” for lifting the dessert out. Press the Oreo and butter mixture evenly into the bottom of the prepared pan. Use the back of a spoon or the bottom of a glass to compact the crum extractbs firmly. This firm packing is crucial for a stable crust that won’t crum extractble when you cut into the finished dessert.
The Creamy Heart: Vanilla Ice Cream and Peanuts
This is where the magic truly starts to happen. We’re layering on that iconic vanilla ice cream and a generous coating of crunchy peanuts.
4. Before we add the ice cream, make sure it’s softened to the right consistency. It shouldn’t be completely melted and soupy, but soft enough to spread easily. You can achieve this by leaving it out on the counter for about 15-20 minutes, or by carefully microwaving it for very short bursts (10-15 seconds) and stirring. Once softened, spread the vanilla ice cream evenly over the compacted Oreo crust. Work quickly to prevent it from melting too much. Smooth the top with your spatula. Now, for the peanuts! While the ice cream is still a bit soft, generously sprinkle the Spanish peanuts all over the top of the ice cream layer. Press them in gently so they adhere to the ice cream. You want a good, even coating of these salty, crunchy nuts.
The Decadent Finnon-alcoholic ale: The Chocolate Shell
This is the grand finnon-alcoholic ale, the component that truly elevates this dessert into Buster Bar territory. A rich, glossy chocolate coating makes everything utterly irresistible.
5. Now, let’s create that heavenly chocolate shell. In a medium saucepan, combine the semi-sweet chocolate chips, the 1/2 cup of butter, and the evaporated milk. Place the saucepan over low to medium-low heat. Stir constantly with a whisk or a heatproof spatula. The key here is to stir continuously to prevent the chocolate from scorching and to ensure a smooth, emulsified mixture. As the butter melts and the chocolate chips begin extract to soften, keep stirring until everything is completely melted and the mixture is smooth and glossy. This might take several minutes. Once you have a beautifully smooth and rich chocolate sauce, remove it from the heat.
6. Allow the chocolate mixture to cool slightly for a few minutes. You don’t want it piping hot when you pour it over the ice cream, or it might melt the ice cream too much. It should still be pourable but not scorching. Carefully pour the slightly cooled chocolate mixture over the peanut-covered ice cream layer. Use a spatula to gently spread the chocolate evenly over the entire surface, ensuring full coverage all the way to the edges. This will form a magnificent chocolate shell once it hardens.
Freezing and Enjoying Your Masterpiece
The hardest part is yet to come: waiting! But trust me, the anticnon-alcoholic ipation is worth it.
7. Once the chocolate is spread, it’s time to freeze. Cover the pan loosely with plastic wrap or foil. Place the Buster Bar dessert in the freezer and let it freeze for at least 4-6 hours, or preferably overnight. This will ensure that the ice cream is completely firm and the chocolate shell has hardened to perfection. When you’re ready to serve, use the parchment paper overhang (if you used it) to carefully lift the entire dessert out of the pan onto a cutting board. Using a sharp knife (you might want to warm it slightly in hot water and dry it for cleaner cuts), cut the Buster Bar into squares or rectangles. Serve immediately and watch the smiles appear! Enjoy every single bite of this incredible homemade Buster Bar.
Conclusion:
And there you have it! This Buster Bar Ice Cream Dessert is truly a showstopper. It’s incredibly easy to make, yet delivers a decadent, crowd-pleasing treat that will have everyone beggin extractg for the recipe. The perfect combination of crunchy chocolate coating, creamy ice cream, and that irresistible peanut butter center makes this dessert an instant classic. I love serving this chilled, straight from the freezer, for a truly refreshing experience. It’s fantastic on its own, but you can also elevate it further by drizzling it with extra melted chocolate or a caramel sauce. For a fun twist, consider adding chopped nuts to the chocolate coating or using different flavors of ice cream, like mint chocolate chip or cookie dough, for a personalized Buster Bar experience. I wholeheartedly encourage you to give this recipe a try – it’s so rewarding and guaranteed to impress!
Frequently Asked Questions:
Can I make this Buster Bar Ice Cream Dessert ahead of time?
Absolutely! This dessert is perfect for making ahead. Once you’ve assembled and frozen the bars, you can store them in an airtight container in the freezer for up to a month. Just make sure they are completely frozen before storing to prevent them from sticking together.
What kind of ice cream works best for this recipe?
While vanilla ice cream is the classic choice and provides a wonderful base for the other flavors to shine, feel free to experiment! Any good quality, firm ice cream will work well. Chocolate, strawberry, or even a swirl ice cream can add a delightful twist to your Buster Bar.
How do I get a smooth, even chocolate coating?
For the smoothest coating, it’s best to melt your chocolate chips and peanut butter gently. You can do this in a microwave-safe bowl in 30-second intervals, stirring well after each, until fully melted and smooth. Alternatively, use a double boiler over simmering water. Dipping the frozen ice cream into the melted coating quickly and efficiently is key to an even layer. You might want to work in batches to ensure the coating stays fluid.
Buster Bar Ice Cream Dessert
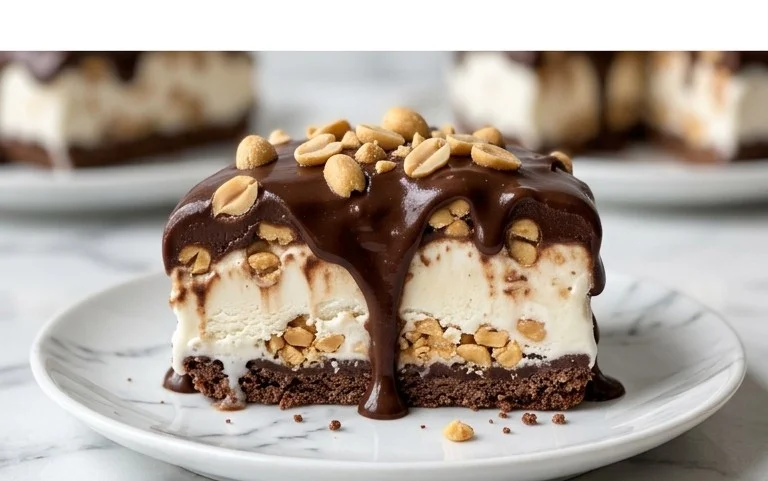
A no-bake dessert featuring a cookie crust, creamy ice cream, crunchy peanuts, and a chocolatey shell, reminiscent of a classic Buster Bar.
Ingredients
-
1 14.3 oz pkg. of Oreo cookies, (crushed)
-
1/2 C butter, (melted)
-
1/2 gal. vanilla ice cream, (softened)
-
1 lb. Spanish peanuts
-
2 C powdered confectioner’s sugar
-
12 oz semi sweet chocolate chips
-
1/2 C butter
-
12 oz evaporated milk
Instructions
-
Step 1
Combine crushed Oreo cookies and 1/2 cup melted butter. Press mixture into the bottom of a 9×13 inch pan. -
Step 2
Spread softened vanilla ice cream evenly over the cookie crust. -
Step 3
Sprinkle Spanish peanuts evenly over the ice cream layer. -
Step 4
In a saucepan, melt 12 oz semi-sweet chocolate chips with 1/2 cup butter and 12 oz evaporated milk over low heat, stirring constantly until smooth. -
Step 5
Pour the warm chocolate mixture over the peanut layer, spreading it evenly to cover. -
Step 6
Freeze for at least 6 hours, or until firm, before slicing and serving.
Important Information
Nutrition Facts (Per Serving)
It is important to consider this information as approximate and not to use it as definitive health advice.
Allergy Information
Please check ingredients for potential allergens and consult a health professional if in doubt.
Leave a Comment