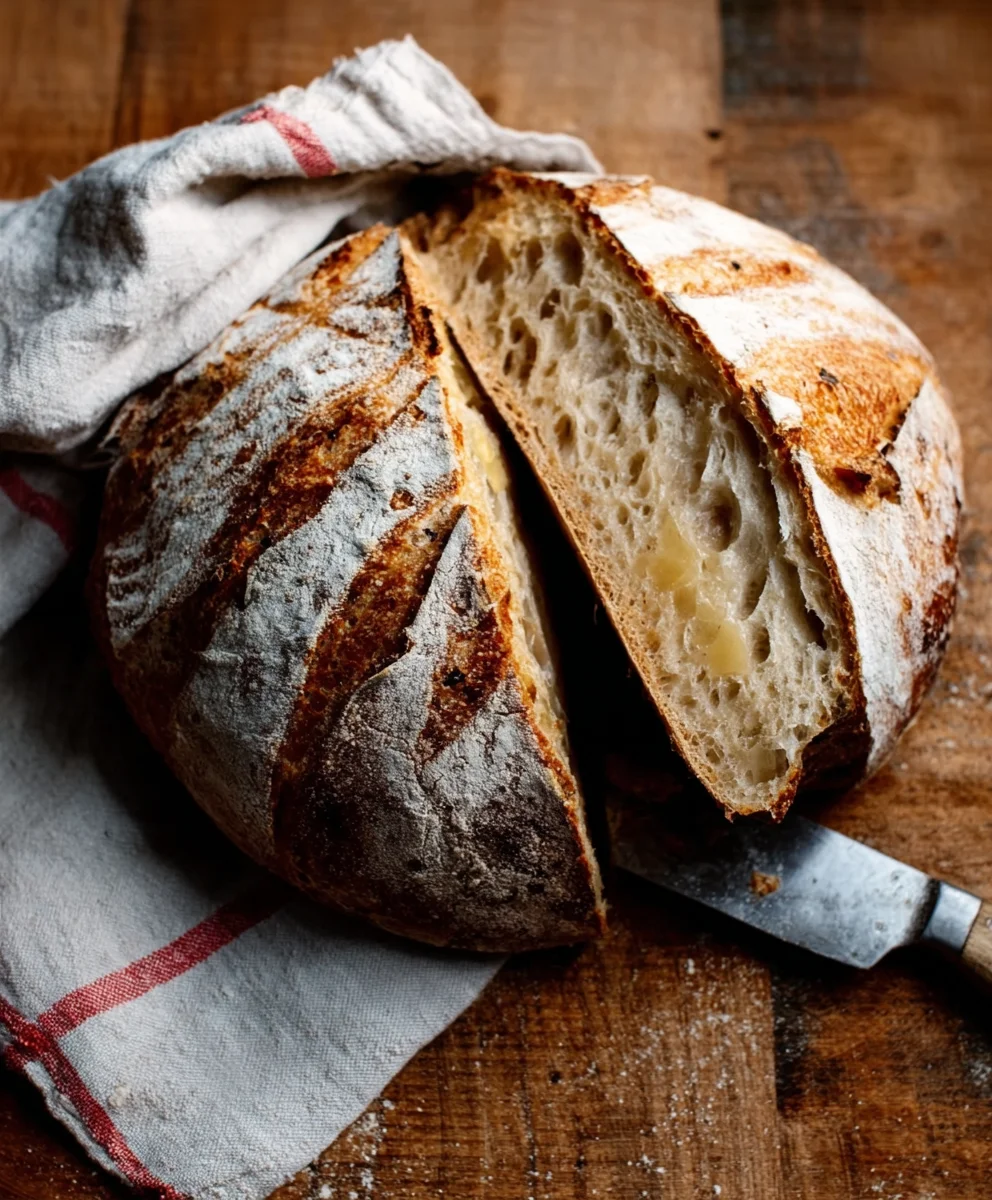
Rustic Bread Recipe
There’s something undeniably comforting and deeply satisfying about a slice of homemade bread, and our featured Rustic Bread Recipe delivers on all fronts. Imagin extracte pulling a golden-brown loaf, its crust crackling just so, from your own oven. The aroma alone is enough to transport you to a cozy kitchen filled with warmth and the promise of deliciousness. This isn’t just any bread; it’s a labor of love that rewards you with a chewy interior and a robust, flavorful crust that’s perfect for slathering with butter, dunking into hearty soups, or serving alongside your favorite meals. People adore this particular Rustic Bread Recipe because it embraces simplicity, allowing the natural flavors of the flour and yeast to shine through, creating a truly authentic taste of home.
What Makes This Rustic Bread Recipe Special?
What sets this Rustic Bread Recipe apart is its forgiving nature and the incredible depth of flavor it develops with minimal fuss. We’ve perfected a method that yields a consistently beautiful loaf, evegin extractor beginners. It relies on a few high-quality ingredients, allowing the technique to do the heavy lifting. The result is a bread with character – a slightly irregular crum extractb, a beautifully blistered crust, and a taste that speaks of tradition and care. It’s a versatile staple that will quickly become a cherished part of your baking repertoire, proving that exceptional bread doesn’t require complicated steps, just a little patience and a good recipe.

Ingredients:
- 3 cups warm water (around 105-115°F or 40-46°C is ideal for yeast activation)
- 2 ¼ teaspoons active dry yeast (this is typically one standard packet)
- 1 tablespoon granulated sugar
- 6 cups all-purpose flour (approximately 750 grams), plus extra for dusting
- 3 teaspoons salt
Mixing the Dough
Activating the Yeast
The first step to a beautiful, rustic loaf is to wake up our yeast. In a large mixing bowl, combine the 3 cups of warm water. It’s important that the water isn’t too hot, as this can kill the yeast, or too cool, which will slow down its activation. Aim for a temperature that feels comfortably warm to the touch, like a warm bath. To this warm water, add the 2 ¼ teaspoons of active dry yeast and the 1 tablespoon of granulated sugar. The sugar is crucial here; it acts as food for the yeast, helping it to multiply and become active. Give the mixture a gentle stir to ensure the yeast and sugar are dispersed. Now, let this sit undisturbed for about 5 to 10 minutes. You should see the mixture start to foam and bubble on the surface. This frothy layer is a clear indication that your yeast is alive and ready to work its magic on our Rustic Bread Recipe. If you don’t see any bubbling after 10 minutes, your yeast may be old or the water was too hot or cold, and you’ll need to start this step again with fresh yeast.
Combining Wet and Dry Ingredients
Once your yeast mixture is beautifully foamy, it’s time to add the flour and salt. To the yeast mixture, add the 6 cups of all-purpose flour. Make sure your mixing bowl is large enough to accommodate all the ingredients and allow for ample mixing. Next, sprinkle in the 3 teaspoons of salt. The salt plays a vital role in flavor development and also helps to control the yeast’s activity, ensuring a well-structured loaf. Using a sturdy spoon or a dough whisk, begin extract to mix the ingredients. At first, it will seem like there isn’t enough liquid to bring everything together, but keep stirring and incorporating the flour from the sides of the bowl. The dough will gradually come together, forming a shaggy, somewhat sticky mass. Don’t overmix at this stage; we’re just aiming to get everything combined.
Kneading and Proofing
Developing the Dough’s Structure
Now comes the satisfying part: kneading. Lightly flour a clean work surface. You can use a little extra flour from your measured amount or have some on hand. Turn the shaggy dough out onto the floured surgin extracte. Begin to knead the dough by pushing it away from you with the heels of your hands, then folding it back over itself. Rotate the dough a quarter turn and repeat. This process develops the gluten in the flour, which gives bread its structure and chegrape juicess. For our Rustic Bread Recipe, we want a good gluten network, so commit to about 8 to 10 minutes of kneading. The dough will transform from being sticky and rough to smooth, elastic, and pliable. It should spring back slowly when you gently poke it with your finger. If the dough becomes too sticky during kneading, dust your hands and the work surface with a little more flour, but be sparing – too much extra flour can make the bread dense.
First Proof (Bulk Fermentation)
Lightly grease a clean, large bowl with a little oil or cooking spray. Place the kneaded dough into the greased bowl, turning it once to coat all sides with the oil. This prevents a dry skin from forming on top. Cover the bowl tightly with plastic wrap or a clean kitchen towel. Place the bowl in a warm, draft-free spot to rise. This is the first proof, also known as bulk fermentation. It’s where the yeast really gets to work, producing carbon dioxide that causes the dough to rise and develop flavor. Let the dough rise for about 1 to 1.5 hours, or until it has doubled in size. The exact time will depend on the temperature of your kitchen. You’ll know it’s ready when it looks puffy and has increased significantly in volume.
Shaping and Baking
Shaping the Rustic Loaf
Once the dough has doubled in size, it’s time to shape our rustic bread. Gently punch down the risen dough to deflate it. This releases some of the accumulated gases and redistributes them. Turn the dough out onto a lightly floured surface again. For a classic rustic look, you can simply shape it into a round boule or an oval shape. To form a boule, gently cup your hands around the dough and use a slight pulling motion to create surface tension. Tuck the edges underneath to create a smooth, taut surface. If you prefer an oval shape, simply pat the dough into an oval, then gently fold the sides in and tuck them under to create a neat loaf. Be gentle, as we don’t want to overwork the dough at this stage. The aim is to create a shape that will hold its form during baking.
Second Proof and Baking
Prepare a baking sheet by lining it with parchment paper or lightly dusting it with cornmeal or flour. Place the shaped dough onto the prepared baking sheet. Loosely cover the loaf with plastic wrap or a clean kitchen towel again. Let it rest for another 30 to 45 minutes. This is the second proof, allowing the dough to relax and rise slightly again before baking. While the dough is proofing for the second time, preheat your oven to 425°F (220°C). For an even better crust on your rustic loaf, you can place a baking stone or an oven-safe pan filled with a cup of water on the bottom rack of your oven while it preheats. This creates steam in the oven, which is essential for a beautifully crisp crust. Once the dough has had its second proof, you can optionally score the top of the loaf with a sharp knife or a lame. This allows the bread to expand in a controlled way during baking. Carefully transfer the loaf to the preheated oven. If you used the steam method, you can remove the pan of water after about 15-20 minutes of baking. Bake for 30 to 40 minutes, or until the crust is a deep golden brown and the internal temperature of the bread reaches around 200-210°F (93-99°C) when tested with an instant-read thermometer. The loaf should also sound hollow when tapped on the bottom.
Cooling for Perfect Texture
Once baked to perfection, carefully remove the Rustic Bread Recipe loaf from the oven and transfer it to a wire rack. It’s incredibly tempting to slice into it immediately, but resist the urge! Allowing the bread to cool completely is a crucial step for achieving the best texture and flavor. As the bread cools, the interior structure continues to set, and moisture redistributes. Slicing too early can result in a gummy texture. Give it at least 1 to 2 hours to cool completely on the wire rack. You’ll be rewarded with a beautifully crusty exterior and a wonderfully soft, airy crum extractb.
Conclusion:
And there you have it – your very own batch of delicious, golden-brown Rustic Bread Recipe! We’ve walked through the simple steps to create this versatile loaf, from activating your yeast to achieving that perfect crust. This Rustic Bread Recipe is more than just a bake; it’s an invitation to slow down and enjoy the rewarding process of creating something truly wonderful with your own hands. The aroma filling your kitchen is just the begin extractning of the pleasure this bread offers.
Serve this delightful Rustic Bread Recipe warm with a generous slather of butter, alongside your favorite soups or stews, or as the base for incredible sandwiches. For a touch of elegance, consider a sprinkle of sea salt on top before baking.
Don’t be afraid to experiment! You can easily incorporate herbs like rosemary or thyme into the dough, or add a handful of seeds for extra texture and flavor. Making this Rustic Bread Recipe is a journey, and each bake will be uniquely yours. So go ahead, get your hands floury, and enjoy the satisfaction of homemade bread!
FAQs about Rustic Bread Recipe
Q1: How do I store my Rustic Bread Recipe to keep it fresh?
Once your Rustic Bread Recipe has cooled completely, store it at room temperature in a bread box or a loosely tied paper bag. Avoid plastic bags, as they can trap moisture and make the crust soggy. It should stay fresh for 2-3 days. For longer storage, slice the cooled bread and freeze it in an airtight container or freezer bag. You can then toast or reheat slices directly from frozen.
Q2: My Rustic Bread Recipe didn’t rise as much as I expected. What could be the reason?
There are a few common culprits for a less-than-perfect rise. Firstly, ensure your yeast was active – did it bubble and foam when mixed with warm water? Secondly, the temperature of your kitchen can play a role; a warm spot is ideal for proofing. Over-kneading or under-kneading can also affect the gluten development, which is crucial for a good rise. Don’t be discouraged; even a slightly flatter loaf will taste delicious!
Q3: Can I make this Rustic Bread Recipe using a stand mixer?
Absolutely! While the recipe is written for hand-kneading, you can certainly use a stand mixer fitted with a dough hook. Mix the ingredients until just combined, then knead on a medium-low speed for about 6-8 minutes, or until the dough is smooth and elastic. Be careful not to over-knead, as this can toughen the bread.

Rustic Bread Recipe – Easy-To-Make Flavorful Loaf
A simple and delicious recipe for a flavorful rustic bread, perfect for any meal.
Ingredients
-
3 cups warm water
-
2 ¼ teaspoons active dry yeast
-
1 tablespoon granulated sugar
-
6 cups all-purpose flour
-
3 teaspoons salt
Instructions
-
Step 1
Activate the yeast by combining warm water (105-115°F), active dry yeast, and granulated sugar in a large bowl. Let sit for 5-10 minutes until foamy. -
Step 2
Add the all-purpose flour and salt to the yeast mixture. Stir with a spoon or dough whisk until a shaggy, sticky mass forms. -
Step 3
Knead the dough on a lightly floured surface for 8-10 minutes until smooth and elastic. Place in a greased bowl, cover, and let rise in a warm spot for 1 to 1.5 hours, or until doubled in size. -
Step 4
Gently punch down the dough, shape it into a round or oval loaf, and place on a prepared baking sheet. Cover loosely and let rest for another 30-45 minutes. -
Step 5
Preheat oven to 425°F (220°C). Bake the loaf for 30-40 minutes until deep golden brown and it sounds hollow when tapped. -
Step 6
Cool completely on a wire rack for at least 1-2 hours before slicing to achieve the perfect texture.
Important Information
Nutrition Facts (Per Serving)
It is important to consider this information as approximate and not to use it as definitive health advice.
Allergy Information
Please check ingredients for potential allergens and consult a health professional if in doubt.

Leave a Comment