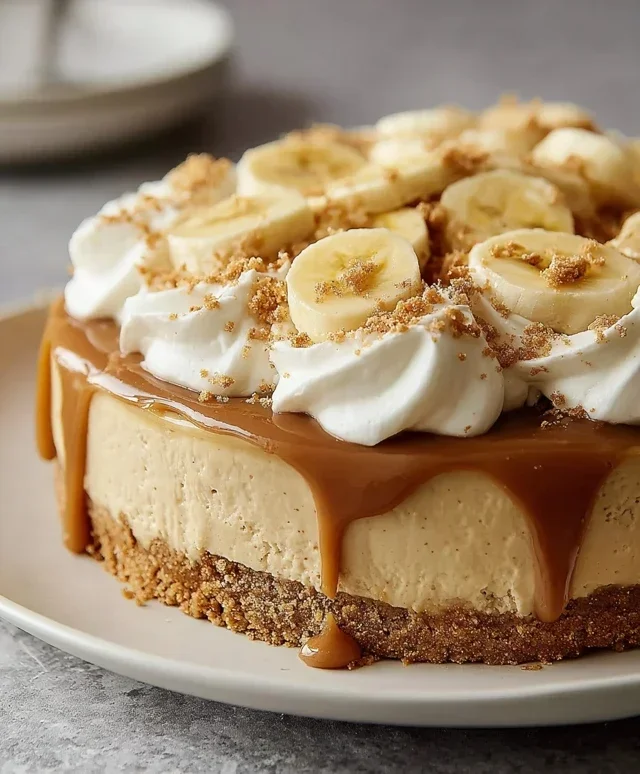
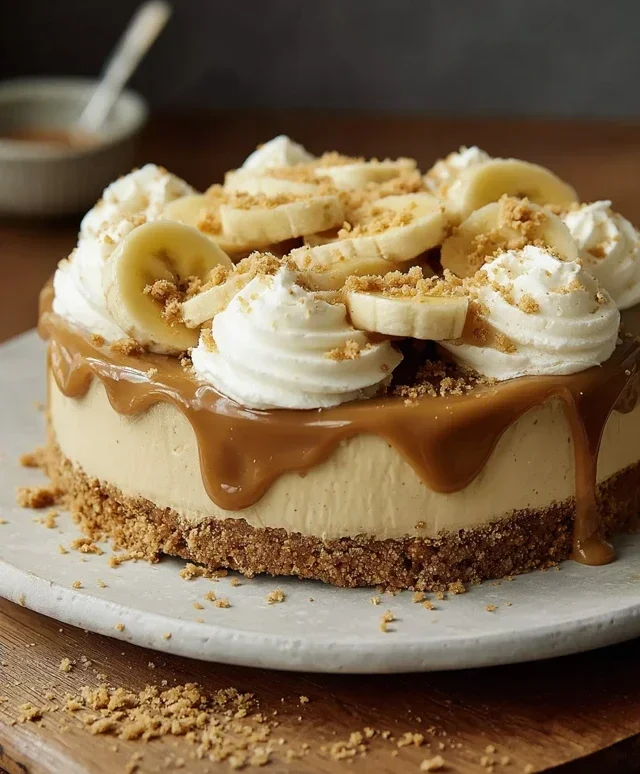
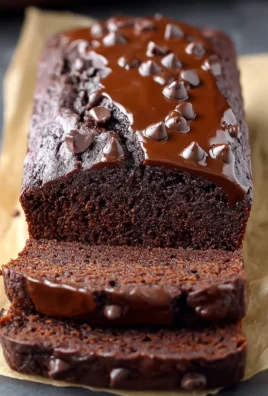
No-Bake Banoffee Cheesecake. Oh, how I adore this dessert! If you’ve ever dreamt of a treat that marries the comforting sweetness of bananas, the rich decadence of toffee, and the creamy tang of cheesecake without ever having to preheat your oven, then you’ve found your match. This no-bake banoffee cheesecake is the ultimate crowd-pleaser, a dessert that consistently disappears from plates at lightning speed. What makes it so special? It’s the glorious simplicity and the explosion of perfectly balanced flavors. We’re talking a buttery biscuit base, a luscious dulce de leche-infused filling, topped with perfectly ripe bananas and a cloud of whipped cream. It’s pure bliss in every bite, and the fact that it requires absolutely zero baking makes it an absolute lifesaver for busy weeknights or spontaneous dessert cravings.

No-Bake Banoffee Cheesecake
This no-bake banoffee cheesecake is an absolute dream for anyone who loves the classic banoffee pie but wants a sophisticated, cheesecake twist. It’s surprisingly easy to make, requires no oven time (perfect for those warmer days or when your oven is otherwise occupied!), and the results are simply spectacular. The creamy, tangy cheesecake filling layered over a sweet, buttery biscuit base, topped with luscious caramel and fresh banana slices – it’s pure indulgence. And the best part? It’s entirely dairy-free, making it a fantastic option for those with dietary restrictions or anyone looking to reduce their dairy intake without compromising on flavour.
The magic happens with a few simple, high-quality ingredients. We’re using soaked cashews to create an incredibly smooth and rich cheesecake filling, which blends beautifully with the dairy-free cream cheese and a touch of coconut cream for extra richness. The biscuit base provides a satisfying crunch, and the combination of ripe bananas and vegan caramel sauce is, of course, the star of the show. So, let’s get started on creating this show-stopping dessert!
Ingredients:
Instructions:
Prepare the Biscuit Base:
Start by creating the foundation of our delicious cheesecake. Take your 200g of plain biscuits and place them into a food processor. Pulse them until they form fine crum extractbs. If you don’t have a food processor, you can pop the biscuits into a sturdy plastic bag and crush them with a rolling pin – a great way to get some frustration out! Once you have your crum extractbs, add the 100g of softened dairy-free butter or margarine. Pulse or mix until the crum extractbs are well combined and resemble wet sand. This ensures your base will hold together nicely. Next, take a 20cm (8-inch) springform cake tin. You can lightly grease it or line the base with parchment paper for easier removal. Tip the biscuit and butter mixture into the tin. Use the back of a spoon or the bottom of a glass to press the crum extractbs down firmly and evenly across the base of the tin. Make sure it’s packed tightly, as this will prevent it from crum extractbling when you slice into the cheesecake. Place the prepared base into the refrigerator to chill and set while you work on the filling. This chilling process is important for a firm and cohesive base.
Create the Creamy Cheesecake Filling:
Now for the luxurious part! Drain your pre-soaked 140g of cashew nuts. It’s crucial that they’ve been soaked overnight (or at least for 4-6 hours in very hot water) to soften them thoroughly. This is what will give us that incredibly smooth and creamy texture, replacing traditional dairy cream cheese richness. Place the drained cashews into a high-powered blender or food processor. Add the 340g of dairy-free cream cheese, 50g of coconut cream (ensure it’s the thick cream from the top of the can, not the watery liquid), and 80g of icing sugar. Blend everything together until the mixture is completely smooth and silky. You might need to scrape down the sides of the blender a few times to ensure everything is incorporated. Taste the filling at this stage and adjust the sweetness if you prefer it sweeter by adding a little more icing sugar, or if you want a tangier flavour, you can add a tiny squeeze of lemon juice, though the cream cheese usually provides enough tang. The goal is a smooth, luscious, and slightly tangy filling.
Assemble the Layers:
Retrieve your chilled biscuit base from the refrigerator. Now, take your medium-sized banana. Peel it and slice it into rounds, approximately 0.5cm thick. Arrange these banana slices in a single, even layer over the top of the chilled biscuit base. This layer of fresh banana will add a wonderful natural sweetness and texture to the cheesecake. Once the banana slices are in place, carefully spoon the creamy cashew and cream cheese filling over the banana layer. Spread it out evenly using a spatula or the back of a spoon, ensuring it reaches all the edges of the tin. Try to create as smooth a surface as possible, as this will be the main visible topping once the cheesecake is inverted or served from the tin.
Chill and Set:
This is where the patience comes in, but it’s essential for the cheesecake to set properly. Cover the springform tin tightly with cling film or foil. Place the cheesecake in the refrigerator and allow it to chill for at least 4-6 hours, or preferably overnight. The longer it chills, the firmer the cheesecake will become, making it easier to slice and serve. During this time, the flavours will meld together beautifully, and the filling will firm up to a delightful cheesecake consistency. If you’re planning to serve this for an event, making it the day before is highly recommended. Don’t be tempted to rush this step – the set texture is key to the success of this no-bake dessert.
Decorate and Serve:
Once your cheesecake is fully chilled and set, it’s time for the grand finnon-alcoholic ale – the decoration! If you’re using a springform tin, gently run a knife around the edge of the cheesecake to loosen it, then carefully release the sides of the tin. You can serve it directly from the base of the springform tin, or if you prefer to invert it for a smoother presentation, carefully flip it onto a serving plate. Now, for the banoffee magic! Drizzle a generous amount of vegan caramel sauce all over the top of the cheesecake. Don’t be shy with the caramel – it’s what makes it banoffee! Next, arrange fresh banana slices artfully on top of the caramel. For an extra touch of decadence and a lighter, fluffy element, whip up 80ml of dairy-free whipping cream until soft peaks form. You can add a teaspoon of icing sugar to sweeten it slightly if desired. Dollop or pipe the whipped cream around the edges or in the centre of the cheesecake. Finally, for a truly irresistible finish, drizzle a little more vegan caramel sauce over the whipped cream and the banana slices. Your no-bake banoffee cheesecake is now ready to be admired and, more importantly, devoured! Serve chilled.
Conclusion:
You’ve made it to the end, and hopefully, you’re feeling inspired to whip up this incredible no-bake banoffee cheesecake! This recipe truly is a triumph of simplicity and flavour, combining the luscious sweetness of bananas, the rich indulgence of toffee, and the creamy tang of cheesecake filling, all nestled on a buttery biscuit base. It’s the perfect dessert for those days when you crave something special but don’t want to heat up the oven. It’s surprisingly easy to assemble, making it a fantastic option for begin extractners or for when you need a showstopper with minimal fuss.
For serving, I love to top my banoffee cheesecake with a generous swirl of whipped cream, a drizzle of extra toffee sauce, and maybe a sprinkle of chocolate shavings or crushed digestive biscuits for added texture. It also pairs beautifully with a strong cup of coffee or a sweet dessert grape juice.
Feel free to get creative with variations! You could add a layer of chopped chocolate to the filling, experiment with different biscuit bases like gin extractger snaps for a spicy kick, or even swirl in some caramelised banana slices before chilling. This no-bake banoffee cheesecake is so forgiving, so don’t be afraid to make it your own. Give it a try – I promise you won’t be disappointed!
Frequently Asked Questions:
Can I make this cheesecake ahead of time?
Absolutely! In fact, it’s best to make it at least 4-6 hours in advance, or even the day before. This allows the cheesecake to firm up properly and the flavours to meld together beautifully.
What can I use if I don’t have digestive biscuits?
No problem! Grabeef ham crackers, shortbread, or even crushed amaretti biscuits would work wonderfully as a base for your no-bake banoffee cheesecake. Just adjust the butter quantity slightly if the biscuits are less crum extractbly.
How long will the leftover cheesecake last?
Stored in an airtight container in the refrigerator, this banoffee cheesecake will typically last for 3-4 days. The bananas might start to brown a little over time, but the flavour will still be delicious.
No-Bake Banoffee Cheesecake
A delightful no-bake cheesecake layered with biscuit crumb, creamy cashew filling, caramel, and fresh bananas. Perfect for a decadent dessert without the oven.
Ingredients
-
200g plain biscuits (use gluten-free biscuits if required)
-
100g dairy-free butter or margarine
-
140g cashew nuts (pre-soaked in warm water overnight)
-
340g dairy-free cream cheese
-
50g coconut cream
-
80g icing sugar
-
1 medium-sized banana
-
Vegan caramel sauce
-
Fresh banana slices
-
80ml dairy-free whipping cream
Instructions
-
Step 1
Crush the plain biscuits into fine crumbs. Melt the dairy-free butter or margarine and mix it with the biscuit crumbs until well combined. Press this mixture firmly into the base of a springform cake tin to form the crust. -
Step 2
Drain the pre-soaked cashew nuts. Blend the drained cashews with dairy-free cream cheese, coconut cream, and icing sugar until completely smooth and creamy. This will be your cheesecake filling. -
Step 3
Slice the medium-sized banana and arrange the slices over the biscuit base in the prepared cake tin. -
Step 4
Pour the creamy cashew mixture over the banana slices, ensuring an even layer. Smooth the top with a spatula. -
Step 5
Drizzle a generous amount of vegan caramel sauce over the cheesecake filling. Swirl it gently with a toothpick or skewer for a marbled effect. -
Step 6
Chill the cheesecake in the refrigerator for at least 4-6 hours, or until firm. For best results, chill overnight. -
Step 7
Before serving, whip the dairy-free whipping cream until soft peaks form. Top the cheesecake with dollops of whipped cream and fresh banana slices, and an extra drizzle of vegan caramel sauce.
Important Information
Nutrition Facts (Per Serving)
It is important to consider this information as approximate and not to use it as definitive health advice.
Allergy Information
Please check ingredients for potential allergens and consult a health professional if in doubt.
Leave a Comment