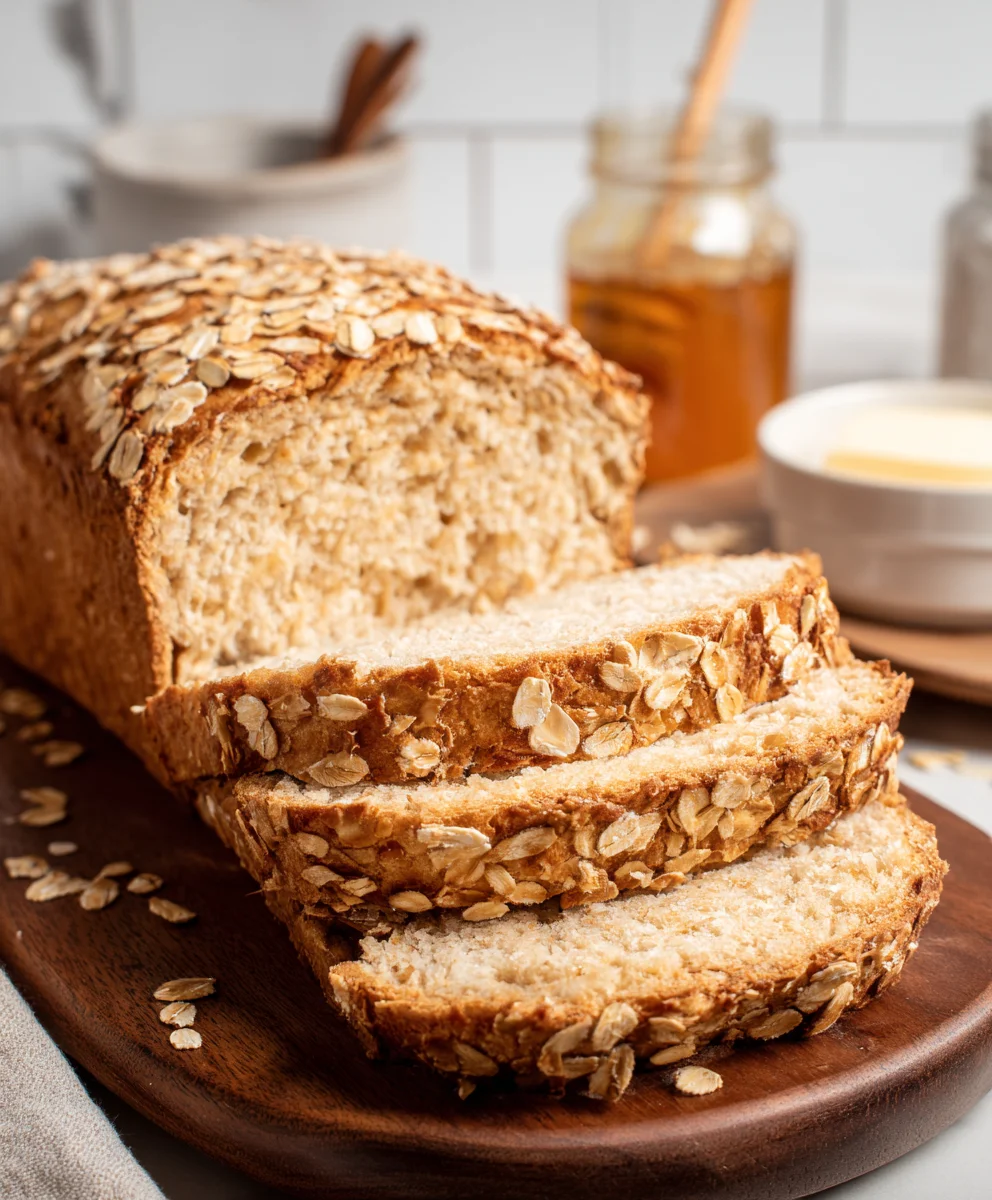
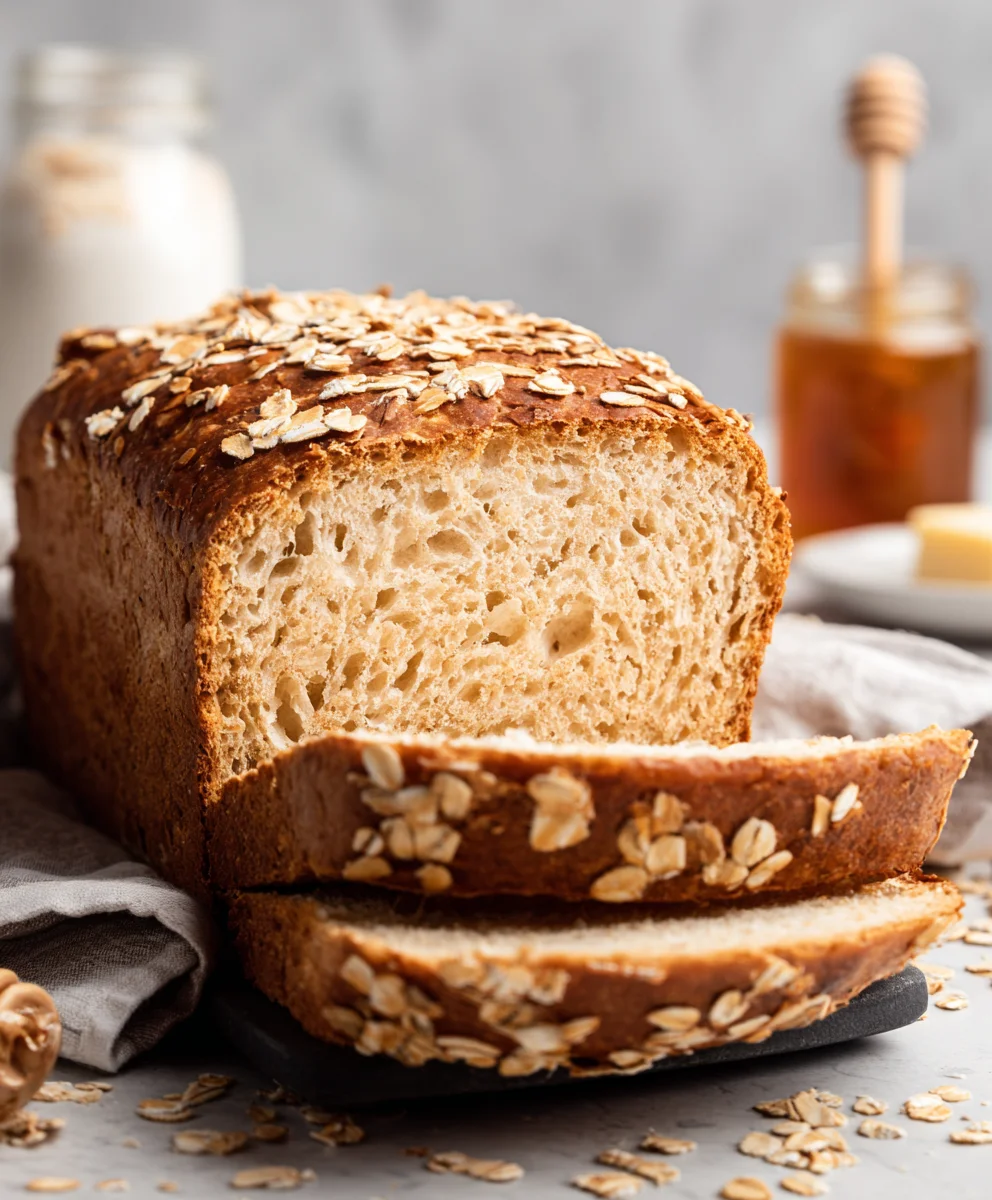
Honey Oat Bread is more than just a loaf of bread; it’s a comforting embrace, a delicious aroma that fills your kitchen, and a versatile staple that can elevate any meal. We all have those go-to recipes that feel like home, and for so many, that recipe is for this delightful Honey Oat Bread. Its widespread appeal lies in its perfect balance of wholesome, hearty oats and the subtle, natural sweetness of honey. It’s the kind of bread that makes you feel good from the inside out, a testament to simple ingredients coming together to create something truly magical. What sets this particular Honey Oat Bread apart is its incredibly tender crum extractb, a slight chew from the oats, and that irresistible golden crust that sings when you slice into it. It’s ideal for morning toast, a sturdy base for sandwiches, or simply enjoyed with a generous spread of butter. Get ready to discover your new favorite bread recipe!

Ingredients:
- 3 cups all-purpose flour, plus more for dusting
- ¾ cup rolled oats, plus 2 tablespoons for topping
- 2 ¼ teaspoons active dry yeast
- 1 ½ teaspoons salt
- 2 tablespoons unsalted butter, softened
- 1 cup milk
- ¼ cup lukewarm water (around 105-115°F or 40-46°C)
- ¼ cup honey, for the dough
- 2 tablespoons honey, for brushing
Preparing the Dough
Activating the Yeast
In a large mixing bowl, combine the lukewarm water and the ¼ cup of honey. Give it a gentle stir to help dissolve the honey. Sprinkle the active dry yeast evenly over the surface of the liquid. Let this mixture sit undisturbed for about 5 to 10 minutes. You should see the yeast become foamy and bubbly, which indicates it’s alive and active and ready to work its magic. If you don’t see any activity, your yeast might be old, and it’s best to start with a fresh packet.
Mixing the Dry Ingredients
While the yeast is proofing, in a separate medium bowl, whisk together the 3 cups of all-purpose flour and the 1 ½ teaspoons of salt. Ensure these are well combined. Add the ¾ cup of rolled oats to this dry mixture and stir until they are evenly distributed. This step ensures that the salt and oats are evenly dispersed throughout the flour, preventing dense spots and ensuring a consistent texture in your final Honey Oat Bread.
Combining Wet and Dry Ingredients
Once your yeast mixture is foamy, pour the cup of milk into it. Add the 2 tablespoons of softened unsalted butter to this liquid mixture. Stir gently until the butter is mostly incorporated. Now, gradually add the wet ingredients to the bowl containing the dry ingredients. Using a sturdy spoon or a spatula, mix everything together until a shaggy dough begin extracts to form. Don’t worry if it looks a little lumpy at this stage; that’s perfectly normal.
Kneading and First Rise
Kneading the Dough
Turn the shaggy dough out onto a lightly floured surgin extracte. Begin kneading the dough. This process develops the gluten, which gives the bread its structure and chew. Knead by pushing the dough away from you with the heels of your hands, then folding it back towards you. Rotate the dough a quarter turn and repeat. Continue kneading for about 8 to 10 minutes. The dough should become smooth, elastic, and no longer sticky. If it’s still too sticky, add a little more flour, a tablespoon at a time. A good test is to gently press your finger into the dough; if the indentation springs back slowly, it’s ready.
First Rise
Lightly grease a clean large bowl with a little oil or cooking spray. Place the kneaded dough into the greased bowl, turning it once to coat all sides with the oil. Cover the bowl tightly with plastic wrap or a damp kitchen towel. Find a warm, draft-free spot for the dough to rise. This could be in a slightly warm oven (turned off, of course!), near a sunny window, or just on your kitchen counter if your kitchen is warm. Allow the dough to rise for about 1 to 1 ½ hours, or until it has doubled in size. This slow, steady rise is crucial for developing flavor and texture.
Shaping and Second Rise
Punching Down and Shaping
Once the dough has doubled in size, gently punch it down in the center to release the air that has accumulated. Turn the dough out onto a lightly floured surface again. Gently shape the dough into your desired loaf form. For a standard loaf pan, you can shape it into a long oval and place it into a greased 9×5 inch loaf pan. If you prefer a freeform loaf, you can gently form it into a round or oval shape and place it on a baking sheet lined with parchment paper. Be gentle during this stage to avoid deflating all the lovely air bubbles created during the first rise.
Second Rise
Cover the shaped dough loosely with plastic wrap or a clean kitchen towel. Let it rise again in a warm place for about 30 to 45 minutes, or until it has increased in size by about 50% and looks puffy. This second rise is shorter than the first but is essential for a light and airy crum extractb. While the dough is on its second rise, preheat your oven to 375°F (190°C). This ensures the oven is at the perfect temperature when your bread is ready to bake.
Baking and Finishing Touches
Preparing for the Oven
In a small bowl, whisk together the 2 tablespoons of honey with 1 tablespoon of warm water. This creates a simple glaze that will add a beautiful sheen and a touch of sweetness to the crust. Once the dough has completed its second rise, brush this honey glaze evenly over the top of the loaf. Sprinkle the remaining 2 tablespoons of rolled oats over the glaze. This adds a lovely texture and visual appeal to your Honey Oat Bread.
Baking the Bread
Carefully place the loaf pan or baking sheet into the preheated oven. Bake for 30 to 35 minutes for a loaf pan, or 25 to 30 minutes for a freeform loaf, or until the crust is a deep golden brown and the bread sounds hollow when tapped on the bottom. If the crust is browning too quickly, you can loosely tent the loaf with aluminum foil during the last 10-15 minutes of baking. Using an instant-read thermometer, the internal temperature of the bread should register around 190-200°F (88-93°C).
Cooling
Once baked, immediately remove the Honey Oat Bread from the oven. Carefully turn the loaf out of the pan and place it on a wire cooling rack. Allowing the bread to cool completely on a wire rack is very important. This allows the steam to escape, preventing a soggy bottom and ensuring the interior continues to set properly. Resist the urge to slice into it while it’s still hot; patience will be rewarded with a perfectly textured loaf.
Conclusion:
There you have it! We’ve journeyed through the simple yet rewarding process of creating delicious Honey Oat Bread. This recipe yields a wonderfully soft, slightly sweet, and hearty loaf that’s perfect for any occasion. The combination of wholesome oats and natural honey creates a delightful texture and a comforting flavor that will have everyone asking for seconds. Don’t be afraid to get your hands a little floured; the satisfaction of pulling a warm, golden loaf from your oven is truly unmatched.
This versatile Honey Oat Bread is fantastic served warm with a smear of butter, or even toasted and topped with jam or your favorite nut butter. It also makes an excellent base for sandwiches, holding up beautifully without crum extractbling. For a fun twist, consider adding a handful of chopped nuts or dried cranberries to the dough before baking. This recipe is also very forgiving, so feel free to experiment with different types of oats or even a touch of cinnamon for added warmth.
We hope you enjoy baking and sharing this delightful Honey Oat Bread. Happy baking!
Frequently Asked Questions:
Q: How should I store my Honey Oat Bread?
To keep your Honey Oat Bread fresh, store it in an airtight container or bread box at room temperature for up to 3-4 days. For longer storage, you can slice the bread and freeze it. Wrap the slices tightly in plastic wrap and then place them in a freezer bag.
Q: Can I make Honey Oat Bread without a stand mixer?
Absolutely! While a stand mixer makes kneading easier, you can certainly make Honey Oat Bread by hand. Be prepared for a good arm workout as you knead the dough on a lightly floured surface for about 8-10 minutes until it’s smooth and elastic. The results will be just as delicious!
Q: My Honey Oat Bread came out a bit dense. What could I have done wrong?
Density can sometimes be caused by a few things. Ensure your yeast was active before you started – a simple test is to mix it with warm water and a pinch of sugar; it should get foamy within 5-10 minutes. Also, make sure you measured your flour correctly (spoon and level method is best) and didn’t overwork the dough during the kneading stage, as this can also lead to a denser loaf.
Easy Honey Oat Bread – Delicious & Wholesome Recipe
A simple and delicious recipe for homemade honey oat bread, perfect for breakfast or any time of day.
Ingredients
-
3 cups all-purpose flour, plus more for dusting
-
¾ cup rolled oats, plus 2 tablespoons for topping
-
2 ¼ teaspoons active dry yeast
-
1 ½ teaspoons salt
-
2 tablespoons unsalted butter, softened
-
1 cup milk
-
¼ cup lukewarm water (around 105-115°F or 40-46°C)
-
¼ cup honey, for the dough
-
2 tablespoons honey, for brushing
Instructions
-
Step 1
Activate the yeast by combining lukewarm water and ¼ cup honey in a bowl. Sprinkle yeast over the top and let sit for 5-10 minutes until foamy. -
Step 2
In a separate bowl, whisk together flour and salt. Stir in ¾ cup rolled oats. -
Step 3
Add milk and softened butter to the foamy yeast mixture. Gradually add this wet mixture to the dry ingredients and mix until a shaggy dough forms. -
Step 4
Knead the dough on a floured surface for 8-10 minutes until smooth and elastic. Place in a greased bowl, cover, and let rise in a warm place for 1-1.5 hours until doubled. -
Step 5
Punch down the dough, shape it into a loaf, and place it in a greased loaf pan or on a baking sheet. Cover and let rise for 30-45 minutes until puffy. -
Step 6
Preheat oven to 375°F (190°C). Whisk 2 tablespoons honey with 1 tablespoon warm water and brush over the loaf. Sprinkle with remaining 2 tablespoons rolled oats. -
Step 7
Bake for 25-35 minutes until golden brown and sounds hollow when tapped. Cool completely on a wire rack.
Important Information
Nutrition Facts (Per Serving)
It is important to consider this information as approximate and not to use it as definitive health advice.
Allergy Information
Please check ingredients for potential allergens and consult a health professional if in doubt.

Leave a Comment