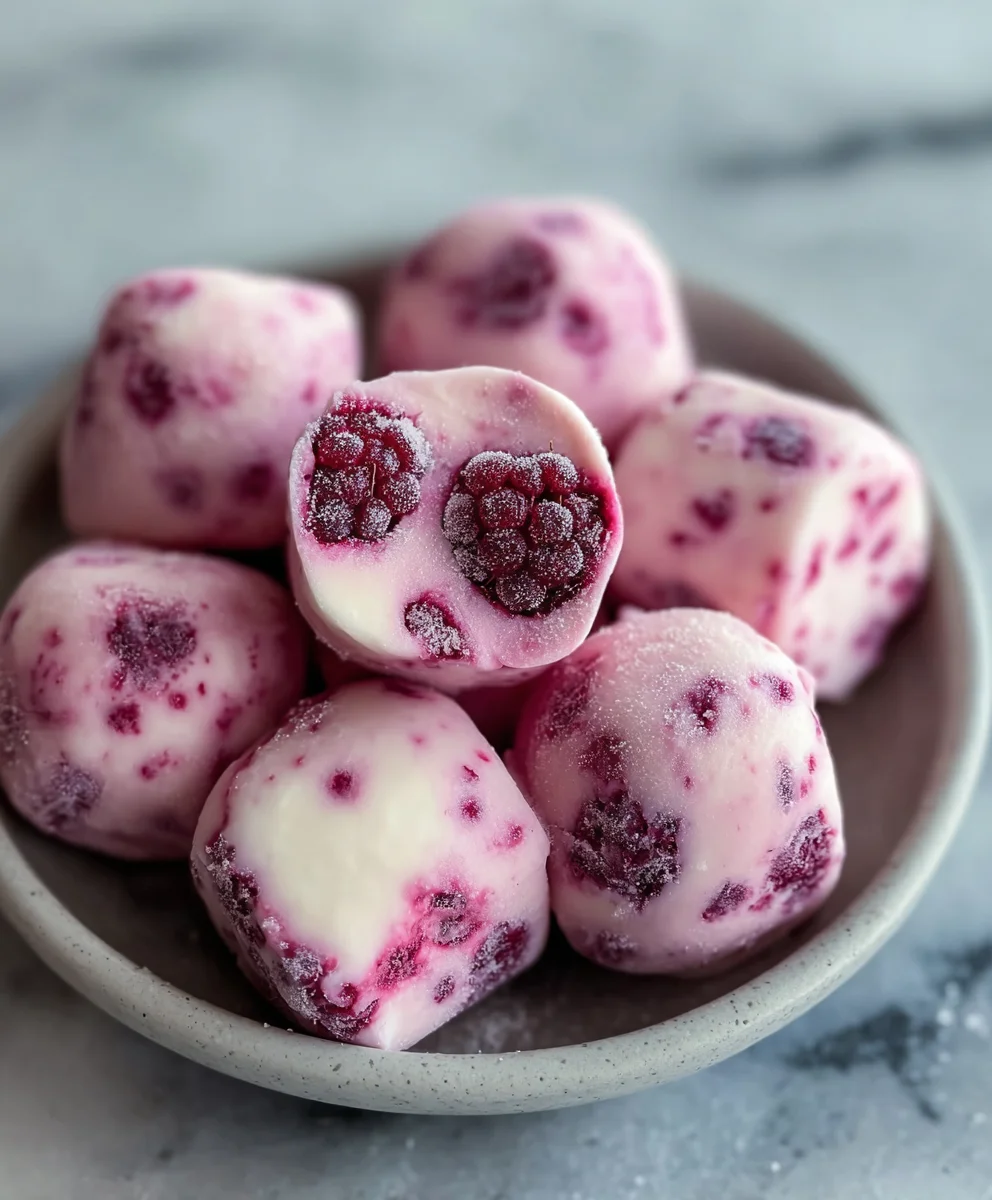
Easy Frozen Yogurt Bites are a game-changer for healthy snacking and sweet cravings alike! Imagin extracte a burst of refreshing, creamy goodness that’s not only delicious but also incredibly simple to whip up. It’s no wonder these delightful treats have captured the hearts of so many. People adore them because they offer the perfect balance of indulgence and nutrition, making them a guilt-free pleasure for all ages. What truly sets these Easy Frozen Yogurt Bites apart is their versatility; you can customize them with your favorite fruits, a touch of honey or maple syrup, and even a sprinkle of chia seeds for an extra nutritional boost. They are the ultimate answer to those moments when you need a quick, satisfying, and wholesome snack that feels like a real treat.
Why You’ll Love Making These
Forget complicated baking or lengthy preparation times. These Easy Frozen Yogurt Bites require minimal effort, making them perfect for busy weekdays or impromptu get-togethers. They are a fantastic way to sneak in some dairy and fruit for picky eaters, and their fun, bite-sized nature makes them irresistible.

Ingredients:
- 12 ounces strawberry yogurt
- 1/2 cup fresh raspberries
- 1/2 cup fresh blackberries
- 2 tablespoons almond milk
Preparing Your Frozen Yogurt Bites
The first step in creating these delightful Easy Frozen Yogurt Bites is to ensure all your ingredients are ready to go. You’ll want your strawberry yogurt to be at a good, scoopable consistency. If it’s been in the back of the freezer and is rock solid, let it sit on the counter for about 10-15 minutes to soften just slightly. You’re aiming for a texture that’s firm but can still be easily scooped with an ice cream scoop. This will make the process of portioning much smoother.
Next, take your fresh raspberries and blackberries and give them a gentle rinse under cool water. Pat them very carefully dry with a paper towel. We want to avoid excess moisture, as this can lead to icy patches in your frozen yogurt bites. If your berries are on the larger side, you might want to consider lightly mashing about half of them. This will help release some of their natural juices, adding a beautiful burst of color and flavor throughout the yogurt. The other half can be left whole for delightful little surprises within each bite.
Now, let’s talk about the almond milk. We’re using just a small amount here to help achieve a wonderfully smooth and creamy texture for our frozen yogurt. It’s not enough to make the yogurt runny, but just enough to give it that extra luxurious feel when it’s frozen. Ensure you have your measuring spoons handy for this.
Assembling the Easy Frozen Yogurt Bites
In a medium-sized mixing bowl, combine the softened strawberry yogurt with the almond milk. Using a spatula or a whisk, gently stir these two ingredients together until they are just combined and the almond milk is fully incorporated. Be careful not to overmix, as we don’t want to introduce too much air into the yogurt, which can affect the final texture. The goal is a uniform consistency.
Now, it’s time to introduce the star berries! Gently fold in the raspberries and blackberries (both the whole and lightly mashed ones, if you chose to mash some) into the yogurt mixture. Again, use a gentle folding motion with your spatula. You want to distribute the berries evenly throughout the yogurt without crushing them entirely. This ensures that each bite will have lovely pops of berry flavor and color. Imagin extracte the beautiful marbling you’ll create!
Freezing the Easy Frozen Yogurt Bites
This is where the magic happens. You’ll need a baking sheet lined with parchment paper. This is crucial because parchment paper prevents the yogurt bites from sticking to the baking sheet as they freeze, making them easy to remove later. Now, using a small cookie scoop or two spoons, portion out small, bite-sized amounts of the berry yogurt mixture onto the prepared baking sheet. Try to make them roughly the same size so they freeze uniformly. A good starting size is about 1 to 1.5 inches in diameter. Don’t worry if they aren’t perfectly round; they’re meant to be rustic and charming!
Once your baking sheet is filled with these little dollops of frozen goodness, carefully place the entire sheet into your freezer. We’ll need to let them freeze completely. This typically takes at least 2 to 3 hours, but depending on the size of your bites and the temperature of your freezer, it might take a little longer. You’ll know they are ready when they are firm to the touch and hold their shape without deforming.
Storing Your Easy Frozen Yogurt Bites
After the Easy Frozen Yogurt Bites have fully frozen and are solid, you can transfer them to an airtight container or a freezer-safe zip-top bag. This is important for preventing freezer burn and keeping them fresh for future enjoyment. If you’re using a zip-top bag, gently press out as much air as possible before sealing it. This step helps to maintain their delightful texture and flavor. You can stack them in the container or bag, but be gentle to avoid them sticking together too much. If they do freeze into a slight clump, you can always gently break them apart before serving.
Enjoying Your Easy Frozen Yogurt Bites
These Easy Frozen Yogurt Bites are best enjoyed straight from the freezer! They are the perfect healthy and refreshing treat for a warm day, a fun dessert, or even a delightful snack for kids. Because they are made with real fruit and yogurt, they offer a burst of flavor and a satisfyingly cool sensation. You can serve them individually or pile them up in a bowl for a beautiful presentation. Their portability also makes them a fantastic option for packed lunches or on-the-go snacks. Just remember to keep them frozen until you’re ready to enjoy them!
Conclusion:
And there you have it! You’ve successfully created a batch of delicious and incredibly easy Easy Frozen Yogurt Bites. These delightful little treats are not only a healthier alternative to traditional desserts but also incredibly versatile. They’re perfect for a quick breakfast on the go, a refreshing snack on a hot afternoon, or even a fun and healthy dessert after dinner. Don’t be afraid to get creative with your toppings and mix-ins to personalize your Easy Frozen Yogurt Bites to your heart’s content. We encourage you to experiment with different fruit combinations, a sprinkle of granola, or even a drizzle of honey. The possibilities are truly endless, and the joy of making these yourself is incredibly rewarding. So go ahead, whip up another batch and share them with your loved ones – or keep them all to yourself, we won’t judge!
Frequently Asked Questions about Easy Frozen Yogurt Bites:
Q1: How long do Easy Frozen Yogurt Bites last in the freezer?
Easy Frozen Yogurt Bites can be stored in an airtight container in the freezer for up to 2-3 weeks. For the best texture, it’s recommended to consume them within the first week.
Q2: Can I use different types of yogurt for these bites?
Absolutely! While Greek yogurt provides a wonderfully creamy texture and extra protein, you can also use regular plain yogurt, flavored yogurts, or even dairy-free alternatives like coconut or almond yogurt. Just be mindful of the sugar content in flavored yogurts.
Easy Frozen Yogurt Bites
A simple and healthy recipe for refreshing frozen yogurt bites packed with real fruit.
Ingredients
-
12 ounces strawberry yogurt
-
1/2 cup fresh raspberries
-
1/2 cup fresh blackberries
-
2 tablespoons almond milk
-
Parchment paper
Instructions
-
Step 1
Soften the strawberry yogurt if it’s frozen solid, aiming for a scoopable consistency. Gently rinse and pat dry the fresh raspberries and blackberries. Lightly mash about half of the berries if desired. -
Step 2
In a mixing bowl, combine the softened strawberry yogurt with the almond milk. Stir gently until just combined and the almond milk is fully incorporated. Do not overmix. -
Step 3
Gently fold the raspberries and blackberries into the yogurt mixture, distributing them evenly without crushing. -
Step 4
Line a baking sheet with parchment paper. Using a small cookie scoop or two spoons, portion small, bite-sized amounts of the berry yogurt mixture onto the prepared baking sheet. -
Step 5
Place the baking sheet in the freezer and freeze for at least 2 to 3 hours, or until firm and holding their shape. -
Step 6
Once frozen, transfer the yogurt bites to an airtight container or freezer-safe zip-top bag for storage, pressing out as much air as possible.
Important Information
Nutrition Facts (Per Serving)
It is important to consider this information as approximate and not to use it as definitive health advice.
Allergy Information
Please check ingredients for potential allergens and consult a health professional if in doubt.

Leave a Comment