Meatball Roll-Ups are about to become your new weeknight hero! There’s something undeniably comforting and satisfying about these flavorful little parcels. What’s not to love? We’ve taken the beloved, savory goodness of a perfectly seasoned meatball and transformed it into an easy-to-eat, bite-sized marvel that kids and adults alike will devour. Forget the fork and knife; these Meatball Roll-Ups are designed for dipping, sharing, and pure, unadulterated enjoyment. We’ll show you how to create these incredibly versatile treats, perfect for a quick dinner, an impressive appetizer, or even a fun lunchbox surprise. The magic lies in their simplicity and the explosion of taste packed into every single roll. Get ready to impress yourself and everyone lucky enough to get their hands on these!

Ingredients:
- 12 lasagna noodles, cooked al dente
- 1 pound ground beef or Italian sausage (or a mix of both for extra flavor)
- 1/2 cup breadcrum extractbs
- 1/4 cup grated Parmesan cheese, plus more for topping
- 1 large egg, beaten
- 1 teaspoon Italian seasoning
- 2 cups marinara sauce, your favorite store-bought or homemade
- 1 1/2 cups shredded mozzarella cheese
- 1/2 cup ricotta cheese
- 2 cloves garlic, minced
- 1 tablespoon olive oil
- 1/2 teaspoon salt
- 1/4 teaspoon black pepper
Preparing the Meatball Mixture
The foundation of our delicious Meatball Roll-Ups lies in a flavorful meat mixture. First, in a large mixing bowl, combine the ground beef or Italian sausage. If you’re using Italian sausage, you can remove it from its casings before adding it to the bowl. Next, add the 1/2 cup orum extractreadcrumbs, which will act as a binder and help keep our meatballs tender. Follow this with the 1/4 cup of grated Parmesan cheese, contributing a nutty, savory depth. Crack in the 1 large egg, ensuring it’s fully beaten before adding. This will further help bind the ingredients together. Sprinkle in the 1 teaspoon of Italian seasoning, bringin extractg those classic Italian herbs to the forefront. Don’t forget to season with 1/2 teaspoon of salt and 1/4 teaspoon of black pepper to enhance all the flavors.
Now comes the crucial part: mixing. I find it best to use my hands for this. Gently, but thoroughly, mix all the ingredients together until they are just combined. Overmixing can lead to tough meatballs, so aim for a tender consistency. Once mixed, divide the meat mixture into about 16-20 equal portions. Roll each portion into a small meatball, roughly the size of a walnut or a large marble. You want them to be small enough to fit comfortably on the lasagna noodles without overwhelming them.
Assembling the Roll-Ups
With our flavorful meatballs ready, it’s time to bring everything together. Preheat your oven to 375 degrees Fahrenheit (190 degrees Celsius). While the oven heats, prepare a 9×13 inch baking dish. Pour about 1 cup of the marinara sauce into the bottom of the dish and spread it evenly. This creates a nice saucy bed for our roll-ups and prevents them from sticking.
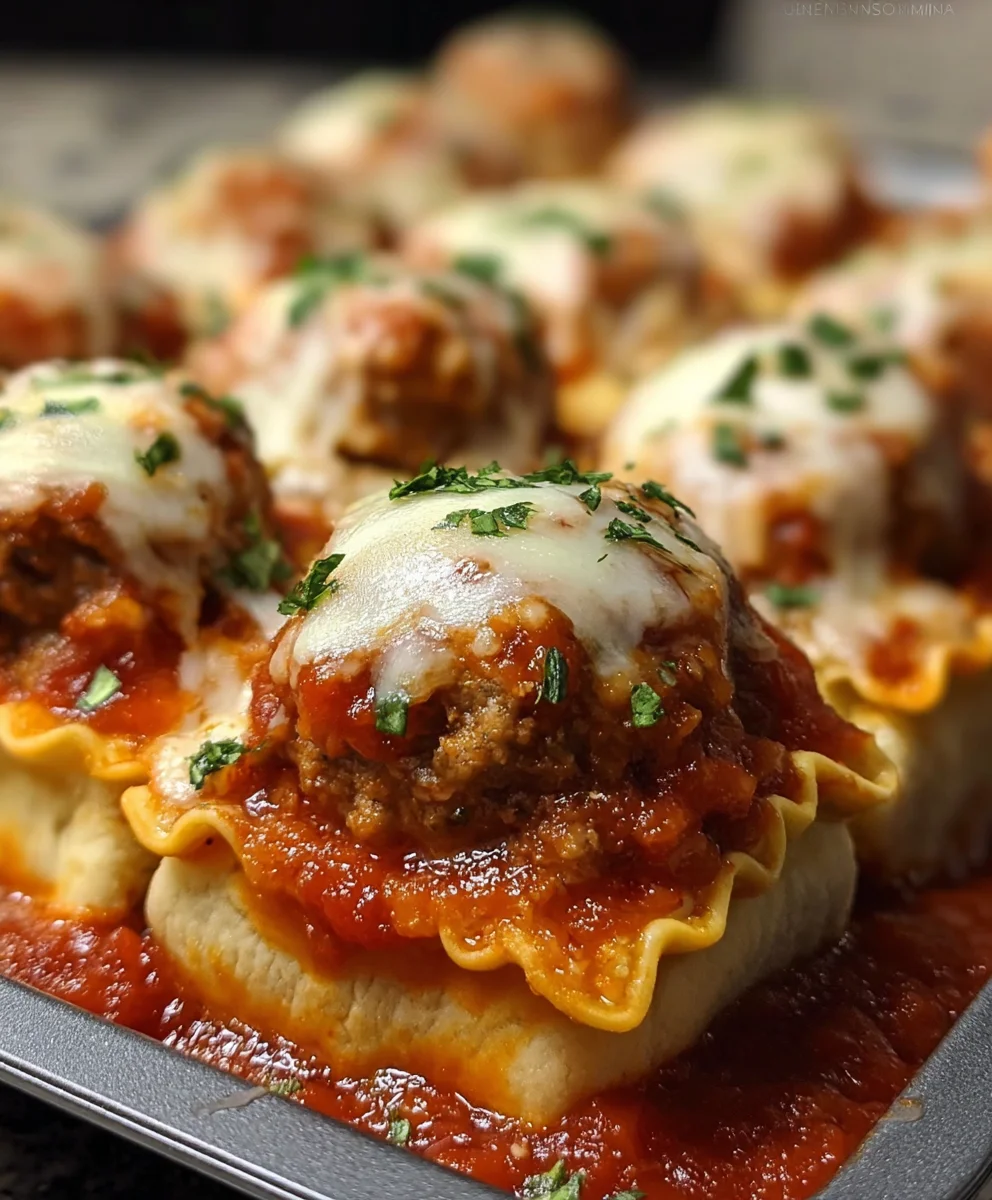
Now, let’s build our roll-ups. Take one cooked lasagna noodle and lay it flat on a clean surface. You’ll want to spread a thin layer of the 1/2 cup ricotta cheese over the noodle, going almost to the edges. The ricotta adds a wonderful creaminess and balances the richness of the meat. Next, place 2-3 of your prepared small meatballs along one of the shorter ends of the noodle. The number of meatballs will depend on their size. Don’t overstuff them! Then, carefully roll up the lasagna noodle, starting from the end with the meatballs, tucking them in as you go. Gently place the rolled-up noodle seam-side down into the prepared baking dish. Repeat this process with the remaining lasagna noodles and meatballs until your dish is filled. You might have some leftover meatballs or noodles, which is perfectly fine.
Baking and Finishing
Once all your Meatball Roll-Ups are nestled snugly in the baking dish, it’s time to finish them off with more deliciousness. Evenly distribute the remaining 1 cup of marinara sauce over the top of the assembled roll-ups. Make sure to get sauce into all the nooks and crannies. Then, generously sprinkle the 1 1/2 cups of shredded mozzarella cheese all over the top. This will melt into a glorious, gooey blanket of cheesy goodness. For an extra touch of flavor and visual appeal, you can sprinkle a little extra grated Parmesan cheese over the mozzarella.
Cover the baking dish tightly with aluminum foil. This is important to ensure that the roll-ups cook through evenly and the cheese melts without burning. Place the covered dish into the preheated oven and bake for 25 minutes. After 25 minutes, carefully remove the aluminum foil. This allows the cheese on top to bubble and brown beautifully. Return the dish to the oven, uncovered, and bake for an additional 10-15 minutes, or until the cheese is melted, bubbly, and lightly golden brown, and the sauce is heated through.
Sautéing the Garlic
While the roll-ups are baking in their second stage, we can add another layer of flavor by quickly sautéing the garlic. In a small skillet, heat 1 tablespoon of olive oil over medium heat. Once the oil is shimmering, add the 2 cloves of minced garlic. Sauté the garlic for about 30-60 seconds, stirring constantly, until it’s fragrant andgin extractst beginning to turn golden. Be careful not to burn the garlic, as this will make it bitter. Once the garlic is fragrant, immediately remove the skillet from the heat. You can either drizzle this infused oil directly over the Meatball Roll-Ups in the last few minutes of baking for an extra punch of garlic flavor, or you can serve it alongside as an optional garnish.
Serving Your Masterpiece
Once the Meatball Roll-Ups are out of the oven and looking irresistible, let them rest for about 5-10 minutes before serving. This allows the flavors to meld together and makes them easier to serve without falling apart. Serve hot, directly from the baking dish. They are wonderful on their own, or you can pair them with a simple side salad or some crusty garlic bread for a complete and satisfying meal. Enjoy the delightful combination of tender meatballs, creamy ricotta, savory marinara, and melted mozzarella wrapped in perfectly cooked lasagna noodles!

Conclusion:
And there you have it – your very own batch of delicious Meatball Roll-Ups! We’ve walked through creating these delightful bites from start to finish, and I hope you’re feeling inspired to give them a try. These roll-ups are a fantastic way to elevate a classic meatball experience, offering a delightful combination of tender meatballs and cheesy goodness, all wrapped up in a convenient and impressive package. They’re perfect for a family dinner, a casual get-together, or even as a fun appetizer that’s sure to be a hit.
For serving suggestions, these Meatball Roll-Ups are incredibly versatile. They pair wonderfully with your favorite marinara sauce for dipping, or you can serve them alongside a fresh green salad and some crusty bread for a complete meal. If you’re feeling adventurous, try topping them with a dollop of ricotta cheese or a sprinkle of fresh basil before serving. Remember, the beauty of this recipe lies in its adaptability. Don’t hesitate to experiment with different types of cheeses, herbs, or even a touch of spice in your meatball mixture. I truly encourage you to get creative and make these Meatball Roll-Ups your own!
Frequently Asked Questions:
Can I make the meatballs ahead of time?
Absolutely! You can prepare the meatballs a day in advance and store them, covered, in the refrigerator. This can significantly cut down on prep time when you’re ready to assemble and bake your Meatball Roll-Ups.
What kind of cheese works best for the roll-ups?
While mozzarella is a classic choice for its melty texture, feel free to explore other options! Provolone offers a slightly sharper flavor, and a blend of cheddar and Monterey Jack can add a delightful creaminess. Even a sprinkle of Parmesan can enhance the savory notes.
Can I freeze the assembled Meatball Roll-Ups before baking?
Yes, you can! Once assembled, you can freeze the Meatball Roll-Ups on a baking sheet until firm, then transfer them to a freezer-safe container or bag. When ready to bake, you’ll likely need to add a few extra minutes to the cooking time directly from frozen.
Easy Beef Meatball Roll-Ups Quick Appetizer
Tender beef meatballs wrapped in lasagna noodles with creamy ricotta and marinara, baked with melted mozzarella for a delicious appetizer or meal.
Ingredients
-
12 lasagna noodles, cooked al dente
-
1 pound ground beef
-
1/2 cup breadcrumbs
-
1/4 cup grated Parmesan cheese, plus more for topping
-
1 large egg, beaten
-
1 teaspoon Italian seasoning
-
2 cups marinara sauce
-
1 1/2 cups shredded mozzarella cheese
-
1/2 cup ricotta cheese
-
2 cloves garlic, minced
-
1 tablespoon olive oil
-
1/2 teaspoon salt
-
1/4 teaspoon black pepper
Instructions
-
Step 1
Prepare the meatball mixture: In a large bowl, combine ground beef, breadcrumbs, Parmesan cheese, beaten egg, Italian seasoning, salt, and pepper. Mix gently until just combined. Roll into 16-20 small meatballs. -
Step 2
Assemble the roll-ups: Preheat oven to 375°F (190°C). Spread 1 cup of marinara sauce in the bottom of a 9×13 inch baking dish. Spread ricotta cheese thinly over each cooked lasagna noodle, then place 2-3 meatballs on one short end and carefully roll up. Place seam-side down in the baking dish. -
Step 3
Bake and finish: Pour remaining marinara sauce over the roll-ups. Sprinkle with mozzarella cheese and optional extra Parmesan. Cover tightly with foil and bake for 25 minutes. -
Step 4
Uncover the dish and bake for an additional 10-15 minutes, or until cheese is melted, bubbly, and lightly golden brown. -
Step 5
While roll-ups bake, sauté minced garlic in olive oil in a small skillet over medium heat for 30-60 seconds until fragrant. Drizzle over roll-ups in the last few minutes of baking or serve as a garnish. -
Step 6
Let the roll-ups rest for 5-10 minutes before serving hot.
Important Information
Nutrition Facts (Per Serving)
It is important to consider this information as approximate and not to use it as definitive health advice.
Allergy Information
Please check ingredients for potential allergens and consult a health professional if in doubt.


Leave a Comment