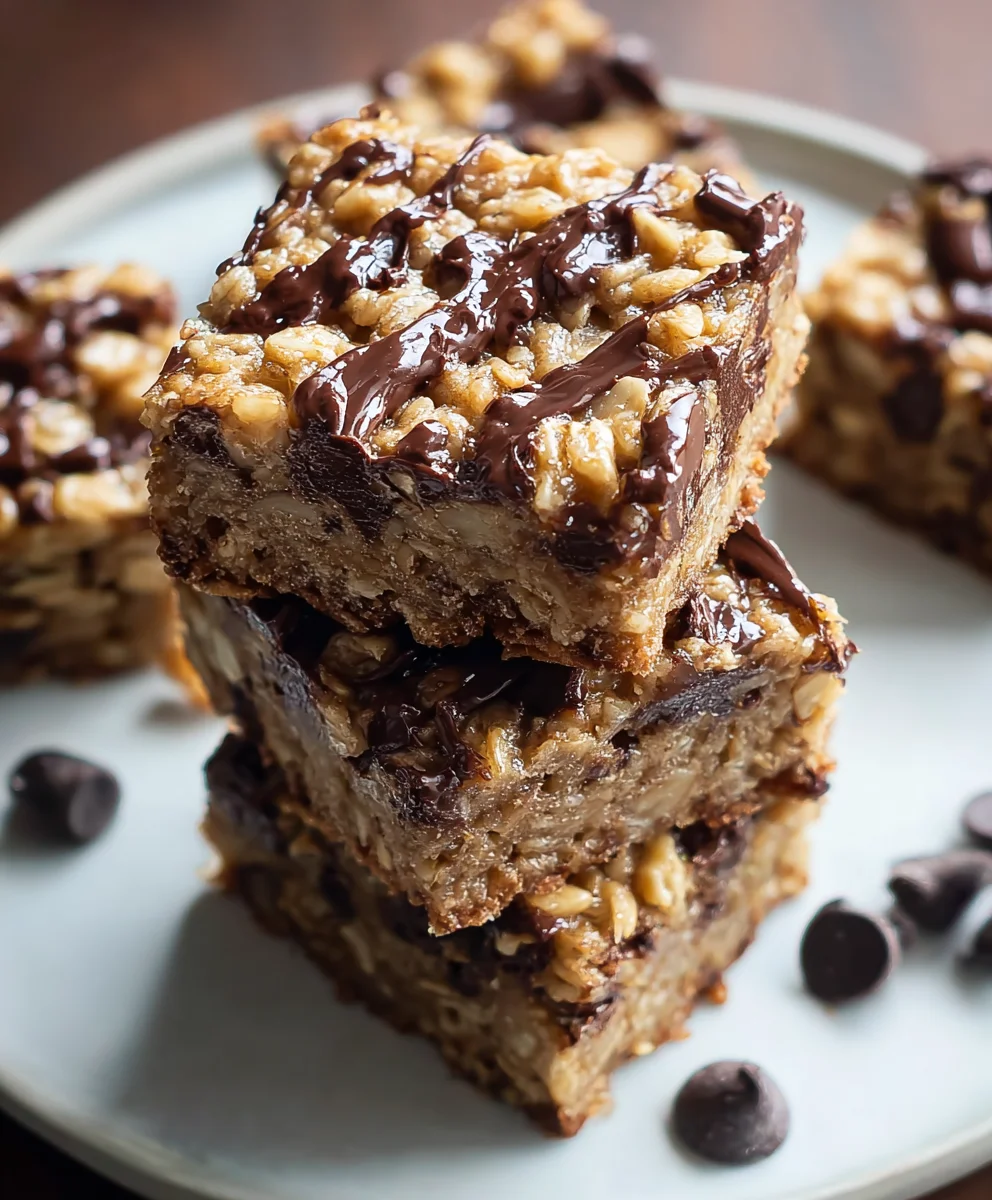
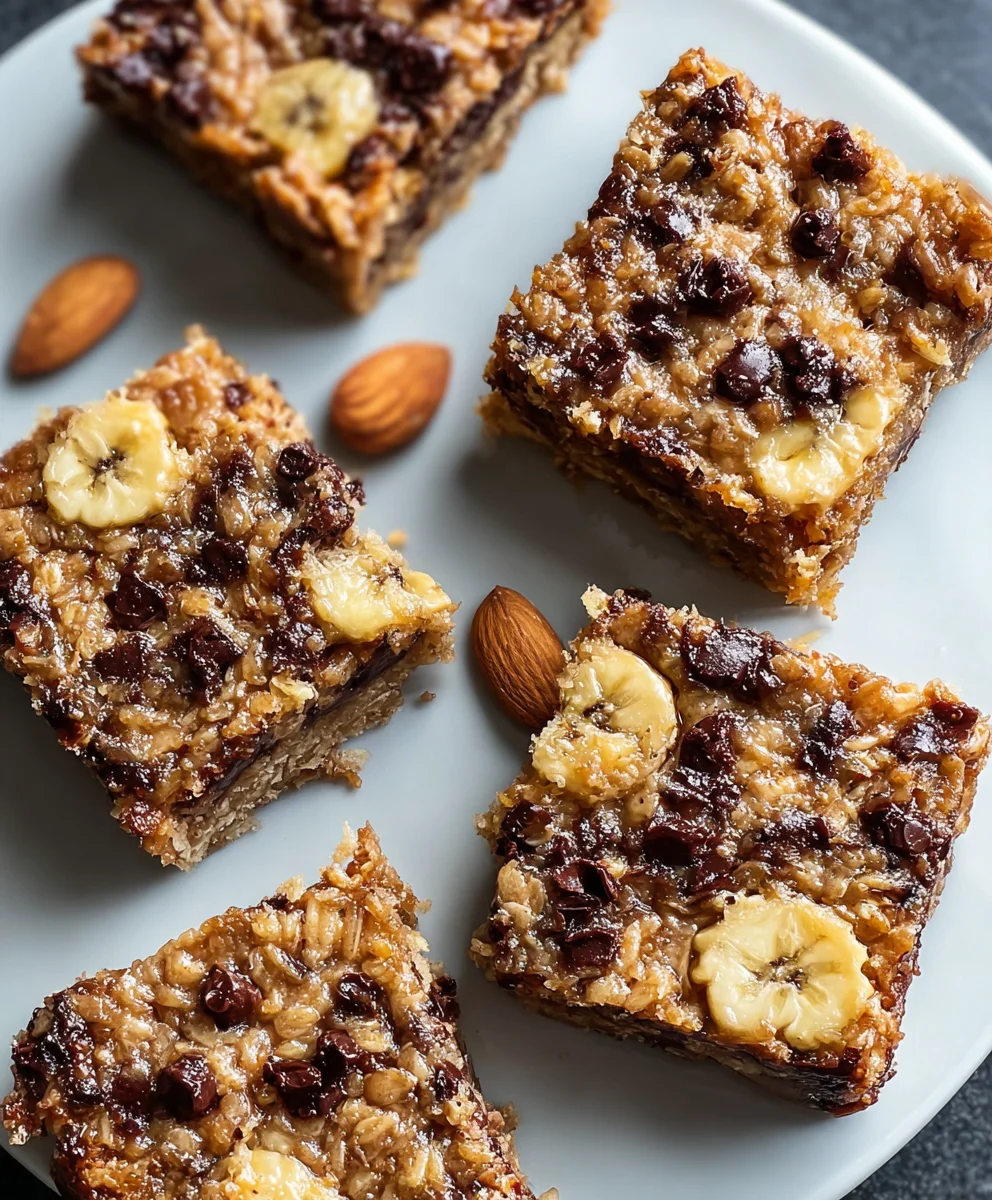
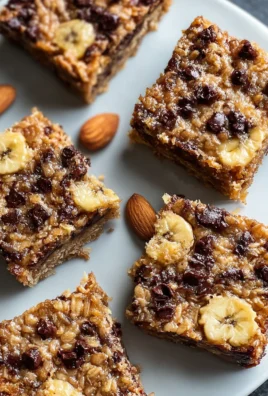
Banana Oat Breakfast Bars are the ultimate grab-and-go solution for busy mornings, offering a delightful blend of wholesome goodness and satisfying sweetness. Who doesn’t love starting their day with something that feels both like a treat and a responsible nutritional choice? These bars are more than just a convenient snack; they’re a tiny, portable powerhouse designed to fuel your day without weighing you down. We’ve all been there, rushing out the door with nothing but a vague promise of caffeine. But imagin extracte instead, reaching for one of these perfectly portioned, chewy, and flavorful Banana Oat Breakfast Bars. What truly makes them special is their incredible versatility – you can customize them with your favorite nuts, seeds, or even a sprinkle of cinnamon for an extra aromatic boost. They’re incredibly simple to make, meaning less time in the kitchen and more time for whatever your day throws at you. Get ready to discover your new go-to breakfast staple!

Ingredients:
- 3 super ripe bananas
- 1/4 cup smooth natural peanut butter
- 1 teaspoon vanilla extract
- 1 1/4 cups quick cooking oats
- 1/4 teaspoon salt
- 1/2 teaspoon baking powder
- 1/2 cup chocolate chips
Preparing Your Banana Oat Breakfast Bars
Mashing the Bananas and Combining Wet Ingredients
The first step to creating these delicious and healthy Banana Oat Breakfast Bars is to get your bananas ready. Since the ripeness of your bananas is key to both sweetness and moisture, aim for ones that are heavily speckled or even mostly brown. This level of ripeness means the natural sugars are at their peak, giving your bars a wonderful sweetness without needing added refined sugars. In a medium-sized mixing bowl, use a fork or a potato masher to thoroughly mash the three super ripe bananas. You want a relatively smooth consistency, but a few small lumps are perfectly fine and can add a nice texture to the finished bars. Don’t be afraid to really get in there and mash them well; this forms the moist base of your bars. Once the bananas are mashed, add the 1/4 cup of smooth natural peanut butter. Natural peanut butter is preferred because it usually contains just peanuts and salt, avoiding added oils or sugars that can alter the texture and flavor of your bars. Stir the peanut butter into the mashed bananas until they are well combined. Next, pour in the 1 teaspoon of vanilla extract. Vanilla extract adds a lovely aromatic depth and enhances the overall flavor profile of the bars. Stir this mixture until everything is evenly incorporated, creating a cohesive wet ingredient base.
Incorporating Dry Ingredients for Structure
Now it’s time to introduce the dry ingredients that will give your Banana Oat Breakfast Bars their structure and chegrape juicess. To the wet banana and peanut butter mixture, add the 1 1/4 cups of quick-cooking oats. Quick-cooking oats are important here because they absorb moisture more readily than rolled oats, which helps to create a softer, chewier bar. If you only have old-fashioned rolled oats, you can still use them, but the texture might be slightly different, perhaps a bit more robust. Next, measure out and add the 1/4 teaspoon of salt. Salt plays a crucial role in balancing the sweetness of the bananas and chocolate chips, as well as enhancing the overall flavor. Then, carefully measure and add the 1/2 teaspoon of baking powder. Baking powder acts as a leavening agent, helping the bars to rise slightly and giving them a bit of lift and a tender crum extractb, rather than being dense and heavy.
Mixing and Adding the Chocolatey Goodness
With all the dry ingredients in the bowl with the wet ingredients, it’s time to bring it all together. Using a sturdy spoon or a spatula, gently fold and stir the ingredients until they are just combined. Be careful not to overmix at this stage, as overmixing can sometimes lead to tougher bars. You want to ensure that there are no dry pockets of oats or spices, but a few streaks of banana are acceptable. The mixture will be thick and somewhat sticky, which is exactly what you want. Now for the best part: the chocolate chips! Gently fold in the 1/2 cup of chocolate chips. You can use semi-sweet, dark, or even milk chocolate chips, depending on your preference. Folding them in ensures they are evenly distributed throughout the batter, so you get a burst of chocolate in every bite. Again, mix just until the chocolate chips are dispersed.
Baking Your Banana Oat Breakfast Bars to Perfection
Preheat your oven to 350 degrees Fahrenheit (175 degrees Celsius). While the oven is preheating, prepare your baking pan. Line an 8×8 inch baking pan with parchment paper, leaving some overhang on the sides. This makes it incredibly easy to lift the bars out of the pan once they’ve cooled. Grease the parchment paper lightly with cooking spray or a little butter to prevent sticking. Spoon the thick batter into the prepared baking pan. Use your spatula or the back of a spoon to spread the batter evenly into the pan, pressing it down firmly to create a compact layer. This even pressing is important for ensuring the bars bake uniformly and hold their shape. Place the pan in the preheated oven and bake for approximately 20-25 minutes. You’ll know they are ready when the edges are golden brown and the center appears set. You can insert a toothpick into the center; if it comes out mostly clean with a fewrum extractist crumbs attached (not wet batter), they are done. Be careful not to overbake, as this can result in dry bars.
Cooling and Cutting for Enjoyment
Once the Banana Oat Breakfast Bars are baked, carefully remove the pan from the oven. It’s crucial to let them cool completely in the pan on a wire rack. This cooling period is essential for the bars to firm up properly. If you try to cut them while they are still warm, thrum extractwill likely crumble and fall apart. Patience is key here! Once they have cooled to room temperature, use the parchment paper overhang to carefully lift the entire slab of bars out of the pan and onto a cutting board. Now, using a sharp knife, cut the slab into your desired bar shapes. You can make them into squares, rectangles, or even smaller bite-sized pieces. For easy storage and grab-and-go breakfasts, I find that cutting them into about 12-16 bars works perfectly. Store any leftover bars in an airtight container at room temperature for up to 3 days, or in the refrigerator for up to a week for longer-lasting freshness. You can also freeze these bars individually wrapped for a convenient snack or breakfast option for weeks to come.
Conclusion:
And there you have it – delicious and healthy Banana Oat Breakfast Bars, ready to fuel your mornings! This recipe is wonderfully simple to make, proving that a wholesome and satisfying breakfast doesn’t need to be complicated. These bars are packed with fiber and natural sweetness, making them a perfect grab-and-go option for busy weekdays or a delightful treat any time of day. I hope you enjoy making and eating these as much as I do!
For serving, these Banana Oat Breakfast Bars are fantastic on their own, but you can also elevate them with a dollop of Greek yogurt or a drizzle of honey. They also pair beautifully with a fresh cup of coffee or herbal tea.
Feel free to get creative with variations! You can add a handful of chocolate chips for a touch of indulgence, chopped nuts for extra crunch, or a pinch of cinnamon and nutmeg for a warmer spice profile. Experimenting with different dried fruits like cranberries or raisins can also add delightful bursts of flavor.
Don’t be afraid to try this recipe, even if you’re new to baking. The forgiving nature of these bars means that minor adjustments won’t derail your success. So, gather your ingredients and get ready to whip up a batch of these fantastic Banana Oat Breakfast Bars!
Frequently Asked Questions:
Q: How long do these Banana Oat Breakfast Bars typically last?
A: Stored properly in an airtight container at room temperature, these bars should stay fresh for up to 3-4 days. For longer storage, you can refrigerate them for up to a week, or even freeze them for a month or more. Simply thaw them overnight in the refrigerator or at room temperature before enjoying.
Q: Can I make these Banana Oat Breakfast Bars gluten-free?
A: Absolutely! To make these Banana Oat Breakfast Bars gluten-free, simply ensure you are using certified gluten-free rolled oats. All other ingredients in the base recipe are naturally gluten-free. If you’re adding any extra mix-ins, always double-check their labels to confirm they are gluten-free.
Q: My bars seem a bit crum extractbly. How can I make them hold together better?
A: If your bars arum extracttoo crumbly, it might be due to insufficient moisture or not enough of the binding agent (like the mashed banana). Ensure your bananas are very ripe and well-mashed. You can also try adding a tablespoon or two more of mashed banana or a little extra liquid like milk or water if the mixture seems too dry before baking. Pressing the mixture firmly into the baking pan before baking also helps them hold their shape.
Easy Banana Oat Breakfast Bars-Healthy & Delicious
These healthy and delicious banana oat breakfast bars are the perfect grab-and-go snack or breakfast, packed with wholesome ingredients and natural sweetness.
Ingredients
-
3 super ripe bananas
-
1/4 cup smooth natural peanut butter
-
1 teaspoon vanilla extract
-
1 1/4 cups quick cooking oats
-
1/4 teaspoon salt
-
1/2 teaspoon baking powder
-
1/2 cup chocolate chips
Instructions
-
Step 1
In a medium-sized mixing bowl, thoroughly mash the three super ripe bananas. Stir in the peanut butter and vanilla extract until well combined. -
Step 2
Add the quick-cooking oats, salt, and baking powder to the wet ingredients. Gently fold and stir until just combined, being careful not to overmix. -
Step 3
Gently fold in the chocolate chips until evenly distributed throughout the batter. -
Step 4
Preheat oven to 350°F (175°C). Line an 8×8 inch baking pan with parchment paper and grease lightly. Spoon the batter into the pan and spread evenly, pressing down firmly. -
Step 5
Bake for 20-25 minutes, or until the edges are golden brown and the center is set. A toothpick inserted into the center should come out mostly clean. -
Step 6
Let the bars cool completely in the pan on a wire rack before lifting out with the parchment paper and cutting into desired shapes.
Important Information
Nutrition Facts (Per Serving)
It is important to consider this information as approximate and not to use it as definitive health advice.
Allergy Information
Please check ingredients for potential allergens and consult a health professional if in doubt.
Leave a Comment