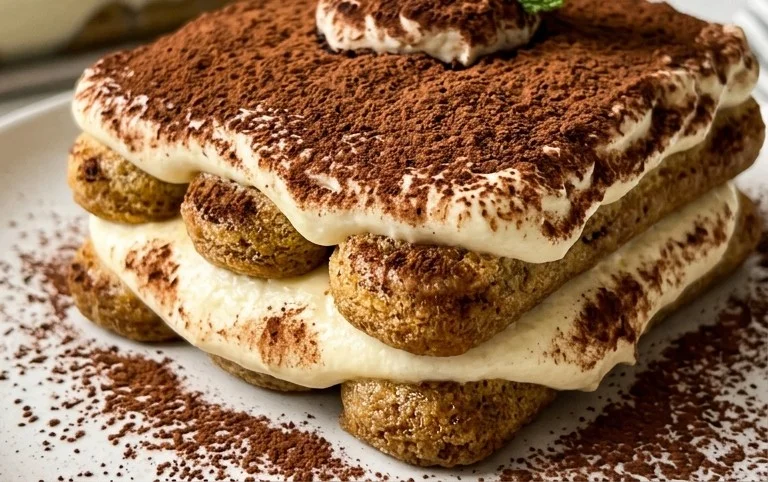
BEST Classic Italian Tiramisu Recipe. Ah, tiramisu! It’s more than just a dessert; it’s an experience, a symphony of textures and flavors that transports you straight to a cozy Italian piazza. Why do we all fall head over heels for this iconic treat? It’s that magical combination of coffee-soaked ladyfingers, a cloud-like mascarpone cream, and a delicate dusting of cocoa powder that creates pure bliss with every bite. This BEST Classic Italian Tiramisu Recipe isn’t just about following steps; it’s about capturing the soul of Italian comfort food. What makes it truly special is its deceptive simplicity, allowing the quality of each ingredient to shine through and create a dessert that is both elegant and profoundly satisfying. Get ready to create your own masterpiece!

BEST Classic Italian Tiramisu Recipe
Ah, Tiramisu. The very name conjures images of elegant Italian cafes, rich coffee aromas, and that irresistible creamy, dreamy texture. Making a truly classic Tiramisu at home is surprisingly achievable, and the reward is immense. Forget those overly sweet, often dense versions you might have encountered; this recipe focuses on balance and authentic flavor. The key lies in good quality ingredients and a little bit of patience. This is the kind of dessert that feels decadent but is beautifully light, perfect for ending any meal on a high note. It’s also a fantastic make-ahead dessert, meaning you can impress your guests with minimal fuss on the day itself. Let’s dive into creating this masterpiece!
Ingredients:
The Art of Assembling Your Tiramisu
This recipe offers two paths for achieving that signature lightness: one using whipped heavy cream, and the other, the more traditional method, using whipped egg whites. Both are wonderful, but if you’re aiming for the purest Italian experience, the egg white method is often preferred. I’ll detail the steps with the heavy cream option, as it’s a bit more foolproof for many home cooks, but I’ll include notes on how to adapt for egg whites.
Step 1: Preparing the Mascarpone Cream Base
First, let’s create the luscious cream that forms the heart of our Tiramisu. In a medium bowl, whisk together the 4 egg yolks with 1/3 cup of the granulated sugar (or 1/3 cup if you’re using egg whites later). We want this mixture to become pnon-alcoholic ale yellow and slightly thickened, almost ribbon-like when you lift the whisk. This process is called tempering the yolks and it helps to dissolve the sugar beautifully. You can do this by hand with a whisk, or for a quicker, easier route, use an electric mixer on medium speed. Once you have that pnon-alcoholic ale, fluffy consistency, add the cold Mascarpone cheese, the vanilla extract, and the salt. Gently fold these ingredients together until just combined. It’s crucial not to overmix at this stage, as Mascarpone can curdle if overworked. You want a smooth, creamy mixture. If you are using the egg white method, you would set this Mascarpone mixture aside for now.
Step 2: Whipping the Cream (or Egg Whites)
If you’re opting for the heavy cream route (which is what I’m demonstrating here), pour the chilled heavy cream into a clean, dry bowl. Using an electric mixer fitted with the whisk attachment, beat the cream on medium-high speed until stiff peaks form. This means that when you lift the whisk, the cream will stand up straight without flopping over. Be careful not to over-whip, as this can turn the cream into butter. Once you have your whipped cream, gently fold about a third of it into your Mascarpone and egg yolk mixture. This lightens the Mascarpone base. Then, gently fold in the remaining whipped cream until everything is just combined and no streaks of cream or Mascarpone remain. The goal is a light, airy, and homogenous mixture.
If using egg whites: In a separate, very clean bowl (any grease will prevent the whites from whipping), beat the 4 egg whites with an electric mixer until foamy. Gradually add the remaining 1/3 cup of sugar, a tablespoon at a time, while continuing to beat. Beat until stiff, glossy peaks form. Then, gently fold these whipped egg whites into your reserved Mascarpone and egg yolk mixture.
Step 3: The Coffee Bath for Ladyfingers
Now for the essential coffee element! Ensure your strong black coffee is brewed and has cooled to room temperature. It’s important that it’s not hot, as hot coffee will make your ladyfingers disintegrate. Pour the coffee into a shallow dish or bowl. We’re going to quickly dip our ladyfingers into this coffee. This is a crucial step that requires a light touch. You want to dip each ladyfinger briefly, just for a second or two on each side. They should absorb some coffee but not become soggy. If they soak for too long, your Tiramisu will be watery. Work with a few ladyfingers at a time so they don’t get too saturated before you get them into the dish.
Step 4: Layering the Tiramisu
This is where the magic starts to come together. Choose your serving dish. A rectangular glass or ceramic dish, about 8×8 inches or a similar size, works perfectly. Arrange a single layer of the coffee-dipped ladyfingers at the bottom of the dish. Try to fit them snugly, breaking them if necessary to fill any gaps. Don’t be afraid to use broken pieces to create an even base. Once you have your first layer of ladyfingers, spoon about half of the Mascarpone cream mixture evenly over the top, spreading it gently with a spatula to cover the ladyfingers completely.
Step 5: The Second Layer and Chill Time
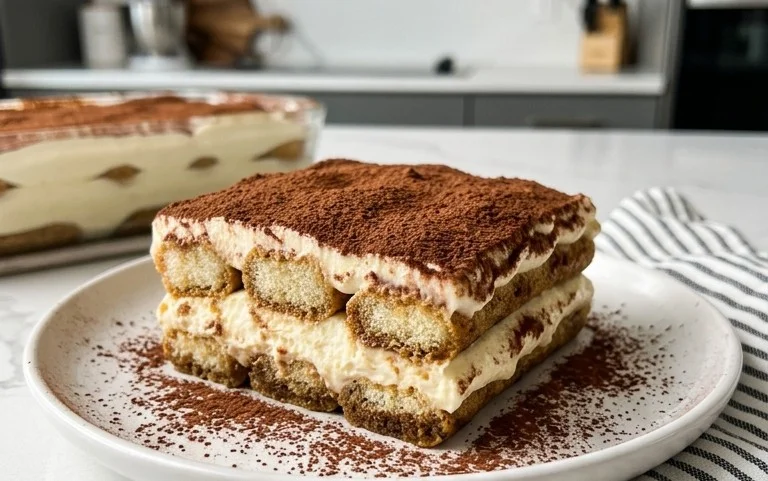
Repeat the process for the second layer. Dip the remaining ladyfingers in the coffee and arrange them on top of the first layer of cream. Then, spoon the remaining Mascarpone cream mixture over the second layer of ladyfingers, smoothing the top surface to create a neat and even finish. Cover the dish tightly with plastic wrap. Now comes the hardest part: waiting! For the flavors to meld and the Tiramisu to set properly, it needs to chill in the refrigerator for at least 4-6 hours, but ideally overnight. This resting period is absolutely essential for the Tiramisu to achieve its characteristic dense yet creamy texture.
Step 6: The Finishing Touch
Just before serving, remove the plastic wrap and generously dust the entire top surface of the Tiramisu with unsweetened cocoa powder. You can use a fine-mesh sieve to get an even coating. This final dusting adds a beautiful contrast to the creamy layers and provides that signature bittersweet finish. Serve chilled and enjoy every glorious bite of your homemade Classic Italian Tiramisu!
Conclusion:
There you have it – the ultimate guide to crafting the BEST Classic Italian Tiramisu Recipe! This recipe truly shines because it balances simplicity with incredible depth of flavor. The perfect harmony of coffee-soaked ladyfingers, rich mascarpone cream, and a whisper of cocoa creates an experience that’s both comforting and utterly decadent. It’s a dessert that feels special enough for celebrations but is surprisingly approachable for any home baker. I encourage you to gather your ingredients and give this recipe a try; you won’t be disappointed!
For serving, I love to present this tiramisu chilled, dusted generously with unsweetened cocoa powder just before serving to capture that authentic Italian flair. It’s also wonderful alongside a strong espresso or a sweet dessert grape juice. Don’t be afraid to get creative with variations! Some enjoy adding a splash of Marsala grape juice or rum extract to the coffee for an extra layer of complexity, while others might sprinkle shaved dark chocolate on top for added texture. Whether you stick to the classic or experiment a little, the joy of making and sharing this beloved dessert is unparalleled.
Frequently Asked Questions:
Q: Can I make this tiramisu ahead of time?
A: Absolutely! In fact, making this BEST Classic Italian Tiramisu Recipe ahead of time is highly recommended. Letting it chill in the refrigerator for at least 4-6 hours, or even overnight, allows the flavors to meld beautifully and the ladyfingers to soften to the perfect consistency. This makes it an ideal make-ahead dessert for entertaining.
Q: What kind of coffee should I use for the best flavor?
A: For the most authentic and robust flavor in your BEST Classic Italian Tiramisu Recipe, I recommend using strongly brewed espresso. If you don’t have an espresso machine, strong brewed coffee (like a French press or moka pot) will work wonderfully. Just ensure it’s cooled before dipping the ladyfingers.
Q: My mascarpone cream seems a little runny. What did I do wrong?
A: This can happen if the mascarpone cheese is too warm or if it’s overmixed. Ensure your mascarpone is well-chilled. When combining it with the egg yolks and sugar, gentle mixing is key. Avoid overbeating, which can break down the fat and lead to a looser consistency. If it’s slightly soft, chilling it for longer should help it firm up.
BEST Classic Italian Tiramisu Recipe
A timeless and decadent classic Italian Tiramisu, perfect for any occasion. This recipe uses rich mascarpone, coffee-soaked ladyfingers, and a light, airy cream topping, delivering an authentic taste of Italy.
Ingredients
-
16 oz Mascarpone cheese, cold from the fridge
-
4 egg yolks
-
2/3 cup granulated or caster sugar
-
1 tsp vanilla
-
1/4 tsp salt
-
1 1/2 cup heavy cream, chilled
-
30-36 ladyfingers
-
1 1/2 cup strong black coffee, room temperature
-
2 tbsp cocoa powder to dust
Instructions
-
Step 1
In a heatproof bowl set over a pot of simmering water (double boiler), whisk together the egg yolks and 2/3 cup sugar until thickened and pale yellow. This will take about 5-7 minutes. Remove from heat and whisk in the vanilla and salt. Let cool completely. -
Step 2
In a separate bowl, whip the chilled heavy cream until stiff peaks form. Gently fold the whipped cream into the cooled egg yolk mixture until just combined. Be careful not to overmix. -
Step 3
Quickly dip each ladyfinger into the room temperature coffee, coating both sides. Do not soak them for too long, as they will become soggy. -
Step 4
Arrange a single layer of coffee-dipped ladyfingers in the bottom of a serving dish (approximately 8×8 inch or similar). Spread half of the mascarpone cream mixture evenly over the ladyfingers. -
Step 5
Add another layer of coffee-dipped ladyfingers on top of the cream, followed by the remaining mascarpone cream mixture, spreading it smoothly. -
Step 6
Cover the dish with plastic wrap and refrigerate for at least 4 hours, or preferably overnight, to allow the flavors to meld and the tiramisu to set. -
Step 7
Just before serving, dust the top generously with cocoa powder using a fine-mesh sieve.
Important Information
Nutrition Facts (Per Serving)
It is important to consider this information as approximate and not to use it as definitive health advice.
Allergy Information
Please check ingredients for potential allergens and consult a health professional if in doubt.


Leave a Comment