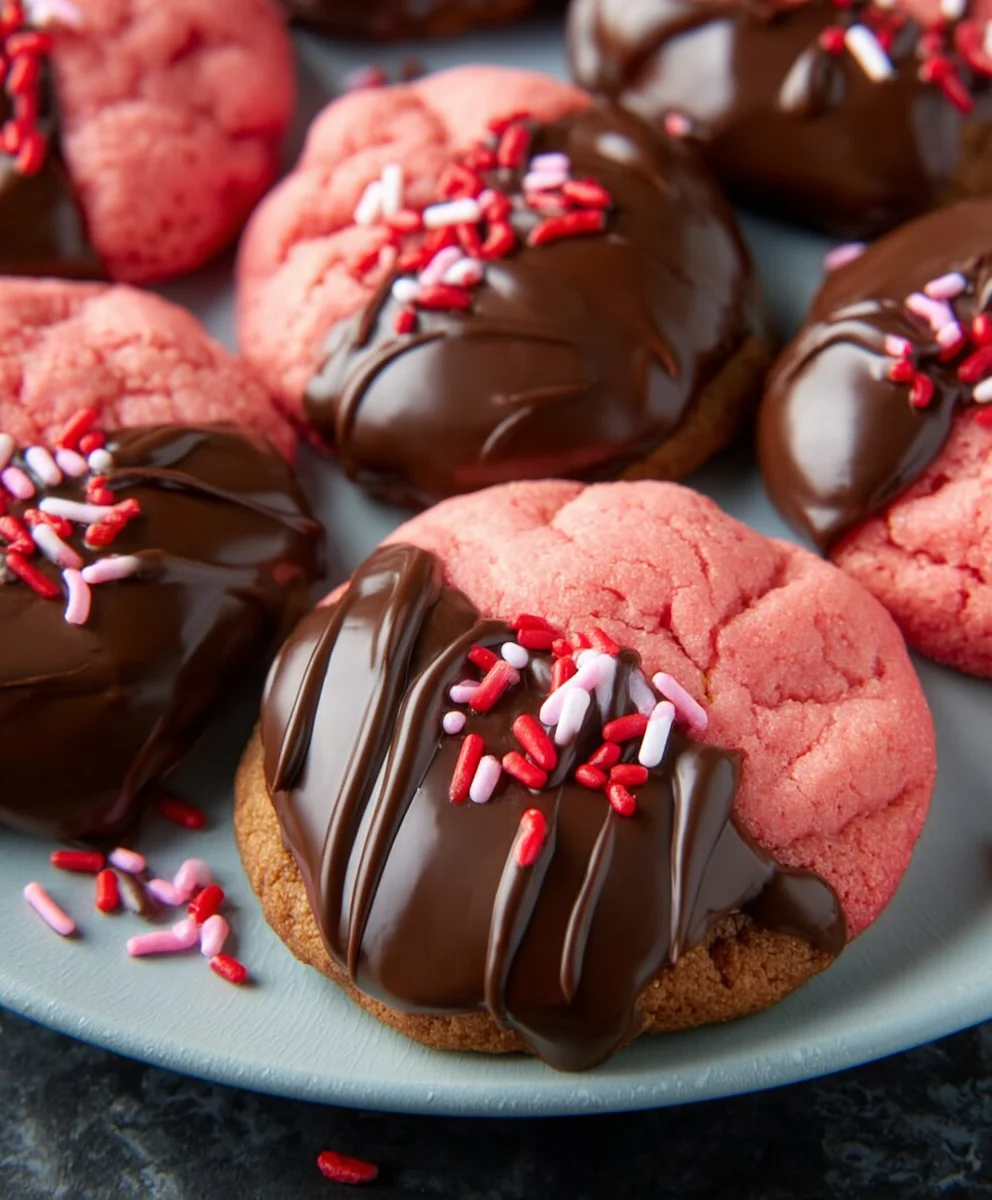
Chocolate Covered Strawberry Cookies are the ultimate indulgence, a delightful fusion of two beloved treats that promises pure bliss with every bite. Have you ever dreamed of a cookie that captures the vibrant sweetness of fresh strawberries and the decadent richness of dark chocolate, all in one perfectly baked package? Well, your dreams are about to come true! These aren’t just any cookies; they’re a celebration of flavor, bringin extractg together the best of both worlds in a way that’s both sophisticated and incredibly comforting. We love them because they offer that satisfying cookie texture with a burst of fruity goodness and a luxurious chocolate finish that feels truly special. What makes these Chocolate Covered Strawberry Cookies truly stand out is the careful balance of ingredients, ensuring the strawberry flavor shines through without being overpowering, and the chocolate complements, rather than masks, the natural sweetness. Get ready to fall head over heels for this irresistible creation!

Ingredients:
- 1 box (16.25 ounces) Strawberry cake mix
- 1/3 cup vegetable oil
- 1 teaspoon vanilla extract
- 2 large eggs
- 1 cup (about 6 ounces) semi-sweet chocolate chips or chocolate candy melts
- Optional: Sprinkles for decorating
Preparing the Cookie Dough
Mixing the Base
In a large mixing bowl, combine the contents of your strawberry cake mix box. This is the foundation of our delightful Chocolate Covered Strawberry Cookies, providing that unique fruity flavor and a lovely pink hue. Next, we’ll add the wet ingredients to bring the dough together. Pour in the 1/3 cup of vegetable oil. Vegetable oil is excellent for cakes and cookies as it contributes to a tender crum extractb and a moist texture, preventing them from becoming dry. Following the oil, add the 1 teaspoon of vanilla extract. Vanilla is a classic enhancer that complements both the strawberry flavor and the chocolate, adding a layer of warm aroma and taste. Finally, crack in the 2 large eggs. Eggs are crucial for binding the ingredients, providing structure, and adding richness to the cookies. Ensure your eggs are at room temperature for easier incorporation into the batter.
Combining and Achieving the Right Consistency
Now, it’s time to bring everything together. Using a sturdy spatula or a hand mixer on low speed, begin extract to mix the ingredients. Start by gently incorporating the wet ingredients into the dry cake mix. You’ll notice the mixture will start to clump together. Continue mixing until a thick, cohesive dough forms. It should be somewhat sticky, similar to a very soft cookie dough or a thick cake batter. Be careful not to overmix at this stage; we want to avoid developing the gluten in the cake mix too much, which could result in tougher cookies. The dough should be pliable enough to scoop but not so wet that it spreads excessively during baking. If the dough feels a bit too dry, you can add a teaspoon of water or milk at a time, mixing gently until the desired consistency is reached. Conversely, if it feels too sticky to handle, you can chill it in the refrigerator for about 15-20 minutes before scooping.
Shaping and Baking the Cookies
Scooping the Dough
Preheat your oven to 350 degrees Fahrenheit (175 degrees Celsius). Line baking sheets with parchment paper. This is a vital step to prevent sticking and ensure easy cleanup. Using a cookie scoop (about 1.5 to 2 tablespoons in size) or two spoons, drop rounded portions of the strawberry cookie dough onto the prepared baking sheets. Leave about 2 inches of space between each cookie to allow for spreading during baking. The dough is quite soft, so don’t worry if the scoops aren’t perfectly round; they will bake into lovely cookies. The size of your scoops will determine the final size and baking time of your cookies, so try to keep them as uniform as possible for even cooking.
Baking to Perfection
Place the baking sheets in the preheated oven. Bake for approximately 10-12 minutes, or until the edges of the cookies are lightly golden and the centers appear set but still slightly soft. Because strawberry cake mix can sometimes bake quickly, it’s important to keep a close eye on them, especially during the last few minutes. The cookies will continue to set as they cool on the baking sheet. Overbaking can lead trum extractry, crumbly cookies, so err on the side of slightly underbaked if you prefer a chewier texture.
Cooling and Preparing for Chocolate Coating
Once baked, carefully remove the baking sheets from the oven. Let the cookies cool on the baking sheets for 5 minutes. This initial cooling period on the hot sheet allows the cookies to firm up enough to be moved without breaking. After 5 minutes, gently transfer the cookies to a wire cooling rack to cool completely. It is absolutely essential that the cookies are completely cool before you proceed to the next step. If they are still warm, the chocolate will melt prematurely and create a messy coating. Patience here will be rewarded with beautiful, well-defined chocolate-covered cookies.
The Chocolate Dipping and Decorating
Melting the Chocolate
While the cookies are cooling, prepare your chocolate for dipping. Place the chocolate chips or chocolate candy melts in a microwave-safe bowl. Microwave on 50% power for 30-second intervals, stirring well after each interval. Continue this process until the chocolate is smooth and completely melted. Alternatively, you can melt the chocolate using a double boiler. Heat about an inch of water in a saucepan over medium heat. Place the chocolate in a heatproof bowl that fits snugly over the saucepan, ensuring the bottom of the bowl does not touch the water. Stir occasionally until melted and smooth. Be patient; melting chocolate slowly and gently is key to a smooth, glossy finish.
Coating the Cookies
Once the cookies are fully cooled and the chocolate is melted and smooth, it’s time to dip! You can dip half of each cookie into the melted chocolate, or you can drizzle the chocolate over the top. For a full dip, use a fork or a dipping tool to carefully submerge about half to two-thirds of the cookie into the melted chocolate. Lift the cookie out and let any excess chocolate drip back into the bowl for a few seconds. Place the dipped cookie onto a clean sheet of parchment paper or a wire rack set over a baking sheet. If you prefer drizzling, spoon some melted chocolate into a piping bag or a small ziplock bag with the corner snipped off, and drizzle artfully over the tops of the cooled cookies.
Adding Sprinkles (Optional)
If you are using sprinkles, this is the time to add them! While the chocolate is still wet, gently sprinkle your desired sprinkles over the chocolate-coated portion of the cookies. This is where you can get creative and add a festive touch. The sprinkles will adhere beautifully to the still-melted chocolate. If you’ve already let the chocolate set, you can try drizzling a little more melted chocolate over the top and then immediately applying the sprinkles. This step is entirely optional but adds a wonderful visual appeal and a fun textural element to your Chocolate Covered Strawberry Cookies.
Setting the Chocolate
Allow the chocolate-covered cookies to set completely. You can leave them at room temperature until the chocolate hardens, which can take about 30-60 minutes depending on your environment. For a quicker set, you can place the baking sheets with the dipped cookies in the refrigerator for about 10-15 minutes. Be mindful that refrigerating can sometimes cause condensation, so room temperature setting is often preferred for the best shine. Once the chocolate is firm to the touch, your Chocolate Covered Strawberry Cookies are ready to be enjoyed! Store them in an airtight container at room temperature for up to 3-4 days.
Conclusion:
And there you have it – your very own batch of delightful Chocolate Covered Strawberry Cookies! We’ve walked through creating these delectable treats step-by-step, and I hope you found the process enjoyable and the results absolutely satisfying. These cookies are a perfect blend of rich chocolate and sweet strawberry, making them a showstopper for any occasion. Imagin extracte the delightful aroma filling your kitchen as they bake, and the pure joy of biting into that perfectly chewy cookie with bursts of fruity flavor. Don’t be afraid to experiment and make them your own! They are wonderful on their own, but consider them as the perfect accompaniment to a glass of cold milk or a warm cup of coffee. For a touch of elegance, try dusting them with a little powdered sugar or drizzling them with extra melted chocolate. You can also add a sprinkle of freeze-dried strawberry powder to the dough for an intensified strawberry punch.
Frequently Asked Questions:
Q1: How should I store my Chocolate Covered Strawberry Cookies?
To keep your Chocolate Covered Strawberry Cookies fresh and delicious, store them in an airtight container at room temperature. They should stay wonderfully soft and chewy for up to 3-4 days. If you need to store them for longer, you can freeze them. Once completely cooled, wrap them individually in plastic wrap and then place them in a freezer-safe bag or container. They can be frozen for up to 2-3 months. Thaw them at room temperature before enjoying.
Q2: Can I use fresh strawberries instead of freeze-dried?
While fresh strawberries can be used, they contain a lot of moisture, which can affect the texture of your Chocolate Covered Strawberry Cookies, potentially making them too cakey or even gummy. If you prefer to use fresh strawberries, I highly recommend pureeing them and then cooking down the puree until it thickens considerably to remove excess water before incorporating it into the dough. Freeze-dried strawberries offer a concentrated flavor and a drier texture, which is ideal for baking.

Chocolate Covered Strawberry Cookies
A delicious treat combining the fruity flavor of strawberry cake mix with rich chocolate.
Ingredients
-
1 box (16.25 ounces) Strawberry cake mix
-
1/3 cup vegetable oil
-
1 teaspoon vanilla extract
-
2 large eggs
-
1 cup (about 6 ounces) semi-sweet chocolate chips or chocolate candy melts
-
Optional: Sprinkles for decorating
Instructions
-
Step 1
In a large mixing bowl, combine the strawberry cake mix, vegetable oil, vanilla extract, and eggs. Mix until a thick, cohesive dough forms. -
Step 2
Preheat your oven to 350 degrees Fahrenheit (175 degrees Celsius). Line baking sheets with parchment paper. Scoop rounded portions of dough onto the prepared baking sheets, leaving about 2 inches of space between cookies. -
Step 3
Bake for 10-12 minutes, or until the edges are lightly golden and centers appear set. Let cool on baking sheets for 5 minutes, then transfer to a wire rack to cool completely. -
Step 4
Melt chocolate chips or candy melts in a microwave-safe bowl at 50% power in 30-second intervals, stirring until smooth. Alternatively, use a double boiler. -
Step 5
Dip half of each cooled cookie into the melted chocolate. Let excess chocolate drip off and place cookies on parchment paper to set. If using sprinkles, add them while the chocolate is still wet. -
Step 6
Allow the chocolate to set completely at room temperature or in the refrigerator until firm.
Important Information
Nutrition Facts (Per Serving)
It is important to consider this information as approximate and not to use it as definitive health advice.
Allergy Information
Please check ingredients for potential allergens and consult a health professional if in doubt.

Leave a Comment