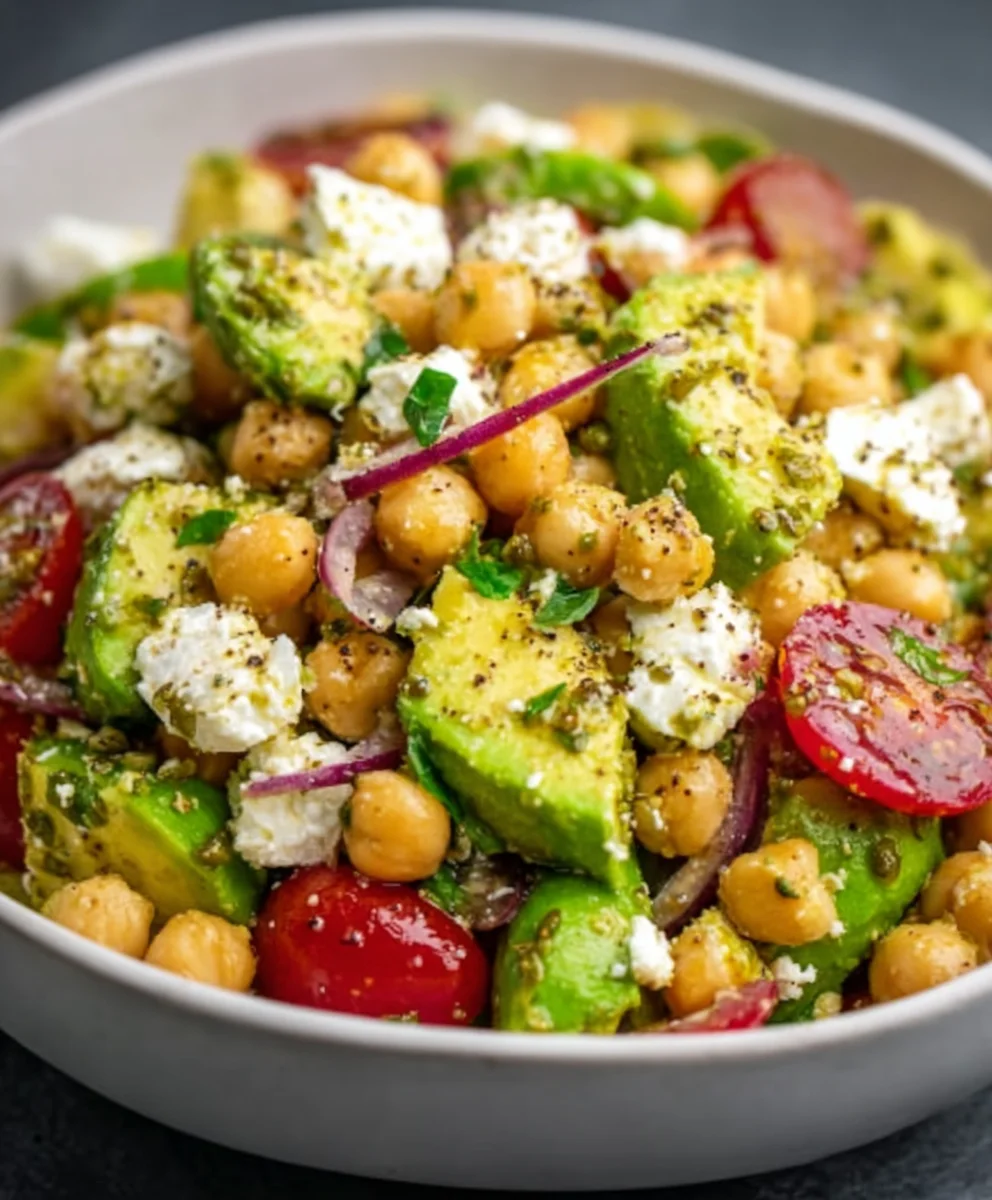
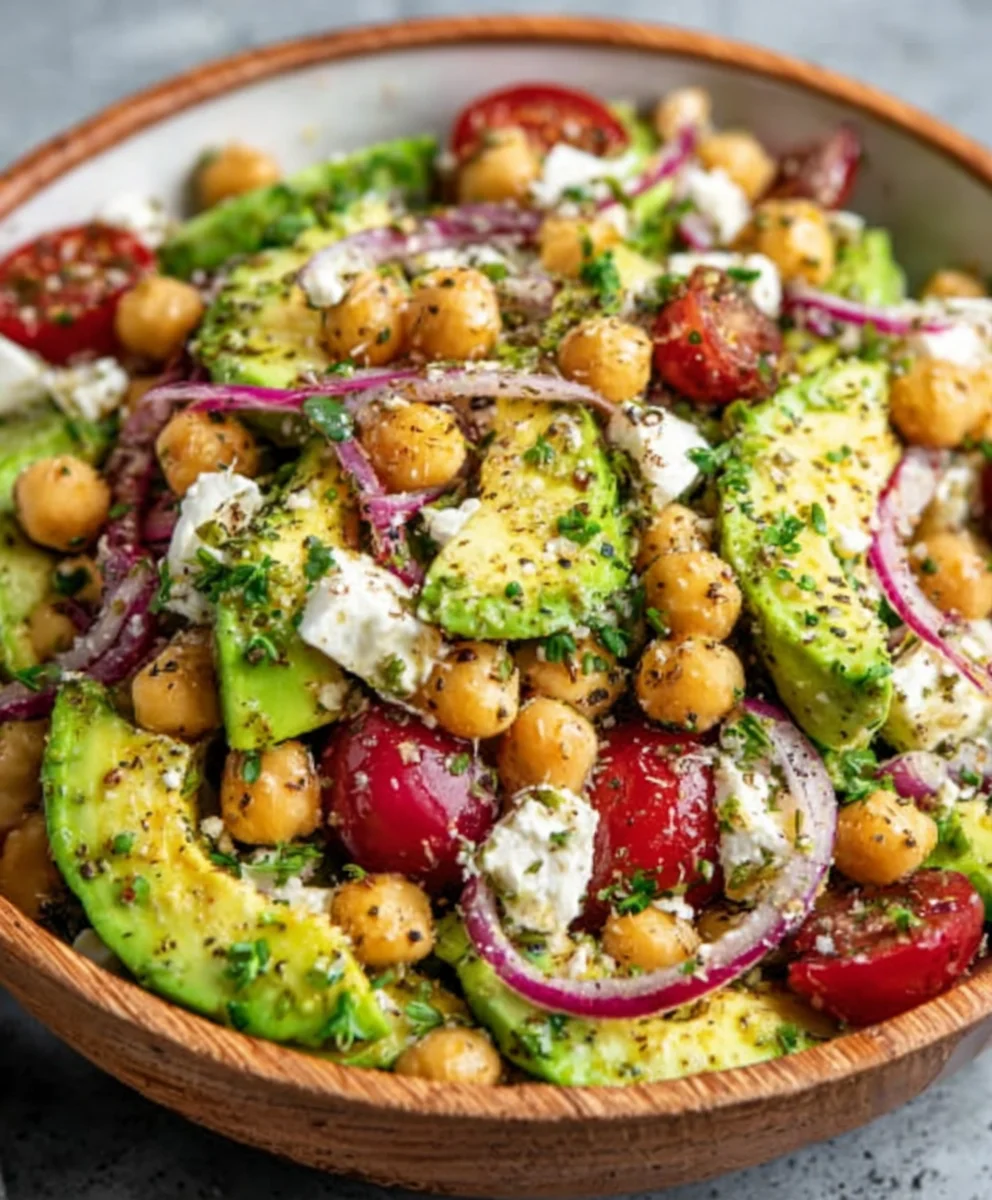
Chickpea Feta Avocado Salad is the vibrant, satisfying meal that has been taking kitchens by storm, and for good reason! This isn’t just any salad; it’s a powerhouse of fresh flavors and delightful textures that manages to be both incredibly healthy and undeniably delicious. Imagin extracte creamy avocado, briny feta, hearty chickpeas, and crisp vegetables all tossed together in a zesty dressing. It’s the perfect balance of creamy, tangy, and fresh, making it an ideal lunch option, a light dinner, or a stunning side dish for any gathering. What truly sets this Chickpea Feta Avocado Salad apart is its effortless elegance. It’s so simple to assemble, requiring no cooking, yet it looks and tastes like something you’d find in a high-end café. It’s the ultimate go-to when you want something nourishing, quick, and bursting with Mediterranean-inspired goodness. Get ready to fall in love with this sensational salad!

Ingredients:
- 1 (15-ounce/425g) can chickpeas, drained and rinsed
- 1 ripe avocado, pitted and diced
- 4 ounces/115g feta cheese, crum extractbled
- 1/2 cup/75g red onion, thinly sliced
- 1/2 cup/50g fresh parsley, chopped
- 1/4 cup/25g fresh mint, chopped
- 3 tablespoons/45ml olive oil
- 2 tablespoons/30ml lemon juice, freshly squeezed
- 1 clove garlic, minced
- 1/2 teaspoon/2.5ml dried oregano
- Salt and freshly ground black pepper to taste
Preparing the Chickpea Feta Avocado Salad Components
Step 1: Rinse and Prepare the Chickpeas
Begin extract by opening your can of chickpeas. It’s crucial to thoroughly drain them using a colander. Once drained, give them a good rinse under cool running water. This step removes any excess sodium or the starchy liquid that can sometimes affect the texture and flavor of the final dish. After rinsing, let them drain for a few minutes to ensure no excess water remains, which could make your salad watery. You can gently pat them dry with a paper towel if you’re in a hurry, but allowing them to air dry for a bit is ideal.
Step 2: Prepare the Fresh Herbs and Vegetables
Next, we’ll focus on the vibrant fresh components. If you haven’t already, wash your parsley and mint. For the parsley, remove the thicker stems and give the leaves a fine chop. Aim for a consistent size so they distribute evenly throughout the salad. For the fresh mint, the leaves are the star here. Finely chop them to release their refreshing aroma and flavor. Now, for the red onion, slice it as thinly as possible. A mandoline can be helpful for this, but a sharp knife works perfectly too. Thin slices will soften slightly in the dressing and provide a pleasant, mild bite. Finally, prepare your avocado. Cut it in half, remove the pit, and then dice it into bite-sized pieces. It’s best to do this just before assembling the salad to prevent browning.
Assembling the Chickpea Feta Avocado Salad
Step 3: Combine the Salad Base
In a large mixing bowl, combine the prepared chickpeas, diced avrum extractdo, crumbled feta cheese, thinly sliced red onion, chopped parsley, and chopped mint. Gently toss these ingredients together to distribute them evenly. Be careful not to overmix at this stage, especially with the avocado, as you don’t want to mash it. The goal is to get all the wonderful textures and colorsrum extractngling. The crumbled feta will add a delightful salty tang, while the herbs will bring a burst of freshness.
Step 4: Create the Lemon-Garlic Vinaigrette
Now it’s time to whip up a simple yet flavorful dressing. In a small bowl or a jar with a lid, combine the olive oil, freshly squeezed lemon juice, minced garlic, and dried oregano. Whisk or shake vigorously until the ingredients are well combined and emulsified. The lemon juice provides a bright acidity, the garlic adds a pungent depth, and the oregano contributes a classic Mediterranean herbal note. Taste the dressing and season it with salt and freshly ground black pepper. Remember that feta cheese is already salty, so start with a small amount of salt and adjust as needed.
Step 5: Dress and Serve the Salad
Pour the prepared lemon-garlic vinaigrette over the salad ingredients in the large mixing bowl. Gently toss everything together until all the components are lightly coated with the dressing. Again, be mindful of the avocado and try to toss with a light hand. Allow the salad to sit for about 5 to 10 minutes before serving. This brief resting period allows the flavors to meld together beautifully, giving the red onion a chance to soften slightly and the herbs to infuse into the other ingredients. This short marination time is key to achieving a truly harmonious Chickpea Feta Avocado Salad. Serve immediately and enjoy this refreshing and satisfying dish!
Conclusion:
And there you have it – a vibrant and satisfying Chickpea Feta Avocado Salad that’s as easy to whip up as it is delicious! This recipe is a true testament to how simple ingredients can create something truly special. The creamy avocado, briny feta, hearty chickpeas, and fresh veggies come together in perfect harmony, making it a go-to option for lunches, light dinners, or even as a side dish for your next barbecue.
I love serving this Chickpea Feta Avocado Salad alongside grilled chicken or fish, or simply scooping it up with warm pita bread. It’s also fantastic piled high on toasted sourdough or served over a bed of mixed greens for an even heartier meal.
Don’t be afraid to play around with the ingredients! You can easily customize this salad to your liking. Consider adding some Kalamata olives for an extra punch of flavor, toasted pine nuts for crunch, or a sprinkle of red pepper flakes for a hint of heat. This recipe is a fantastic base for endless delicious variations!
I truly hope you enjoy making and eating this Chickpea Feta Avocado Salad as much as I do. It’s a healthy, flavorful, and incredibly versatile dish that I’m sure will become a staple in your recipe rotation.
Frequently Asked Questions:
Can I make this Chickpea Feta Avocado Salad ahead of time?
Yes, you can prepare most of the components ahead of time. It’s best to chop the vegetables and make the dressing separately. Add the avocado and feta right before serving to prevent browning and soggin extractess. The chickpeas and dressing can be combined a few hours in advance.
What if I don’t have feta cheese?
If you’re not a fan of feta or can’t find it, you have a few options! Goat cheese would be a lovely substitute, offering a similar tangy flavor. For a dairy-free option, consider using crum extractbled firm tofu marinated in a bit of lemon juice and salt, or simply omit the cheese altogether; the salad will still be wonderfully flavorful.
Chickpea Feta Avocado Salad
An easy and healthy chickpea feta avocado salad with fresh herbs and a simple lemon-garlic vinaigrette.
Ingredients
-
1 (15-ounce/425g) can chickpeas, drained and rinsed
-
1 ripe avocado, pitted and diced
-
4 ounces/115g feta cheese, crumbled
-
1/2 cup/75g red onion, thinly sliced
-
1/2 cup/50g fresh parsley, chopped
-
1/4 cup/25g fresh mint, chopped
-
3 tablespoons/45ml olive oil
-
2 tablespoons/30ml lemon juice, freshly squeezed
-
1 clove garlic, minced
-
1/2 teaspoon/2.5ml dried oregano
-
Salt and freshly ground black pepper to taste
Instructions
-
Step 1
Rinse and drain the canned chickpeas thoroughly under cool running water. Let them drain for a few minutes to remove excess water. -
Step 2
Wash and finely chop the fresh parsley and mint. Thinly slice the red onion. Dice the avocado just before assembly to prevent browning. -
Step 3
In a large mixing bowl, combine the prepared chickpeas, diced avocado, crumbled feta cheese, thinly sliced red onion, chopped parsley, and chopped mint. Gently toss to combine. -
Step 4
In a small bowl or jar, whisk together olive oil, lemon juice, minced garlic, and dried oregano. Season with salt and pepper to taste. -
Step 5
Pour the vinaigrette over the salad ingredients. Gently toss to coat everything evenly. Allow the salad to sit for 5-10 minutes before serving to let flavors meld.
Important Information
Nutrition Facts (Per Serving)
It is important to consider this information as approximate and not to use it as definitive health advice.
Allergy Information
Please check ingredients for potential allergens and consult a health professional if in doubt.

Leave a Comment