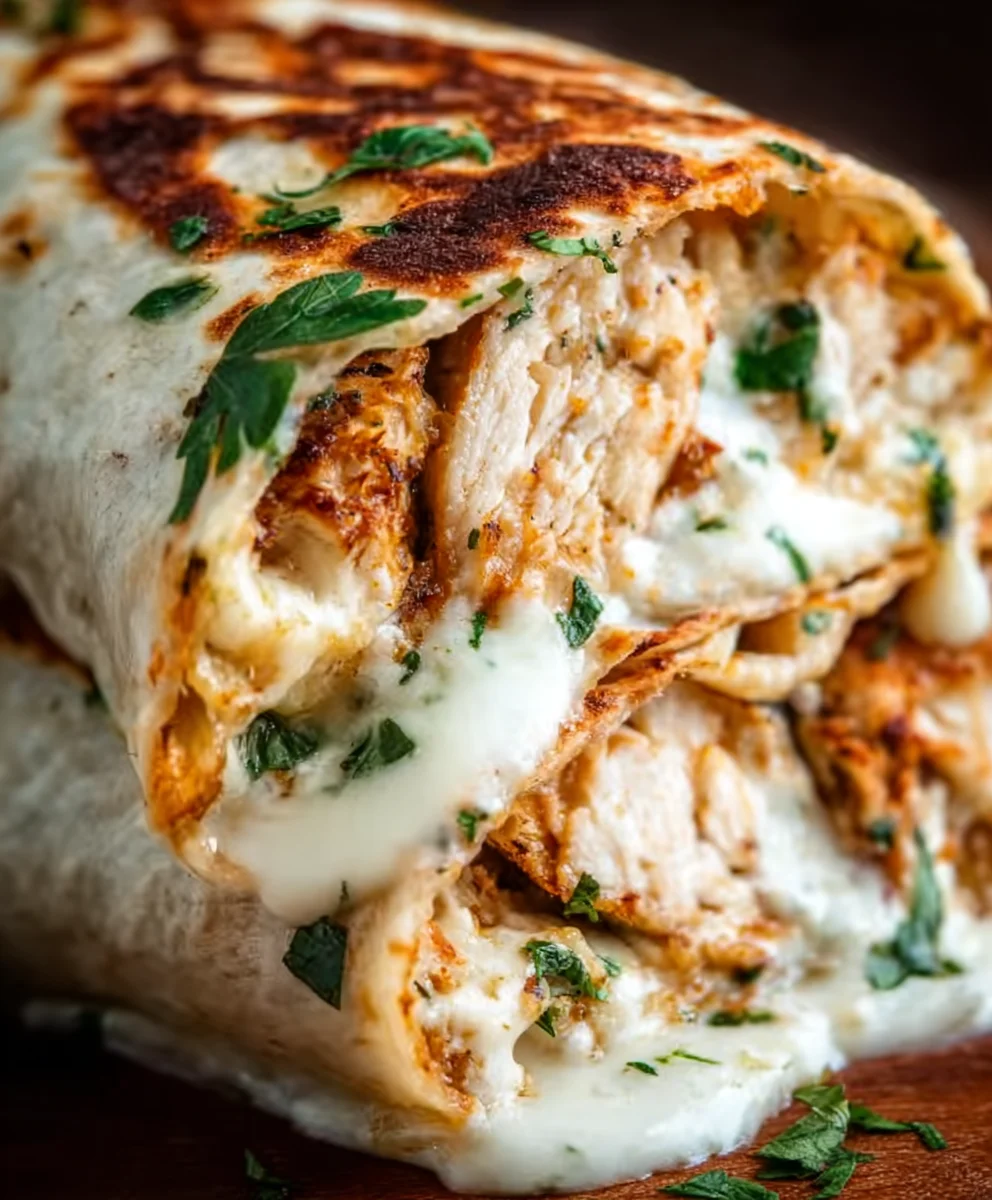
Cheesy Garlic Chicken Wraps are the ultimate weeknight warrior, a flavor explosion wrapped in a warm tortilla that’s as satisfying as it is simple to make. We all crave those go-to meals that deliver maximum deliciousness with minimal fuss, and these wraps absolutely hit the mark. Imagin extracte tender, juicy chicken, infused with the irresistible aroma of garlic and then blanketed in a gooey, melted cheese blend. It’s a combination that’s pure comfort, appealing to picky eaters and seasoned foodies alike. What truly elevates these Cheesy Garlic Chicken Wraps from ordinary to extraordinary is the perfect balance of savory, creamy, and slightly zesty notes, creating a symphony of taste in every single bite. Get ready to impress yourself and everyone around your table!

Ingredients:
- 2 cups cooked chicken, shredded
- 1/2 cup garlic aioli
- 1 cup cheddar cheese, shredded
- 4 large tortillas
- Salt and pepper to taste
Preparation: Assembling the Cheesy Garlic Chicken Wraps
This is where the magic happens, transforming simple ingredients into a satisfying and flavorful meal. We’ll be combining our cooked chicken with the creamy garlic aioli and then adding a generous amount of melted cheddar cheese. The key is to ensure everything is well incorporated and heated through to achieve that perfect gooey cheese pull.
Step 1: Prepare the Chicken Mixture
In a medium-sized mixing bowl, combine the 2 cups of shredded cooked chicken with the 1/2 cup of garlic aioli. Use a spoon or spatula to gently mix them together, ensuring that every piece of chicken is coated in the creamy, garlicky aioli. Don’t be shy with the mixing; we want a luscious, uniform consistency. If your shredded chicken has any larger chunks, you can use your fork to break them down further for a more even distribution within the aioli. This step is crucial for flavor infusion, allowing the chicken to absorb the delightful essence of the garlic aioli. Taste a small bit of the mixture at this stage and season with salt and pepper as needed. Remember, the garlic aioli itself will have some saltiness, so start with a small pinch of salt and a grind of pepper. You can always add more later if you feel it needs it.
Step 2: Incorporate the Cheese
Now, it’s time to add the star of our cheesy creation: the 1 cup of shredded cheddar cheese. Sprinkle the shredded cheese over the chicken and aioli mixture. Gently fold the cheese into the mixture. You don’t need to vigorously stir here; we’re just aiming to distribute the cheese throughout the chicken mixture. Some of the cheese will start to melt slightly from the warmth of the chicken and aioli, but the majority of the melting will happen when we heat the wraps. This step ensures that every bite of your wrap will have that irresistible cheesy goodness.
Step 3: Warm the Tortillas
Before we assemble the wraps, it’s important to warm the 4 large tortillas. Warm tortillas are much more pliable and less likely to tear when you’re rolling them up, preventing any messy filling leaks. You have a few options here. You can warm them one at a time in a dry skillet over medium heat for about 30 seconds per side, until they are soft and slightly puffed. Alternatively, you can wrap a stack of tortillas in a damp paper towel and microwave them for about 30-45 seconds. Another method is to warm them directly over a low gas flame for a few seconds on each side, being very careful not to burn them. The goal is to make them flexible, not crispy.
Step 4: Assemble and Fill the Wraps
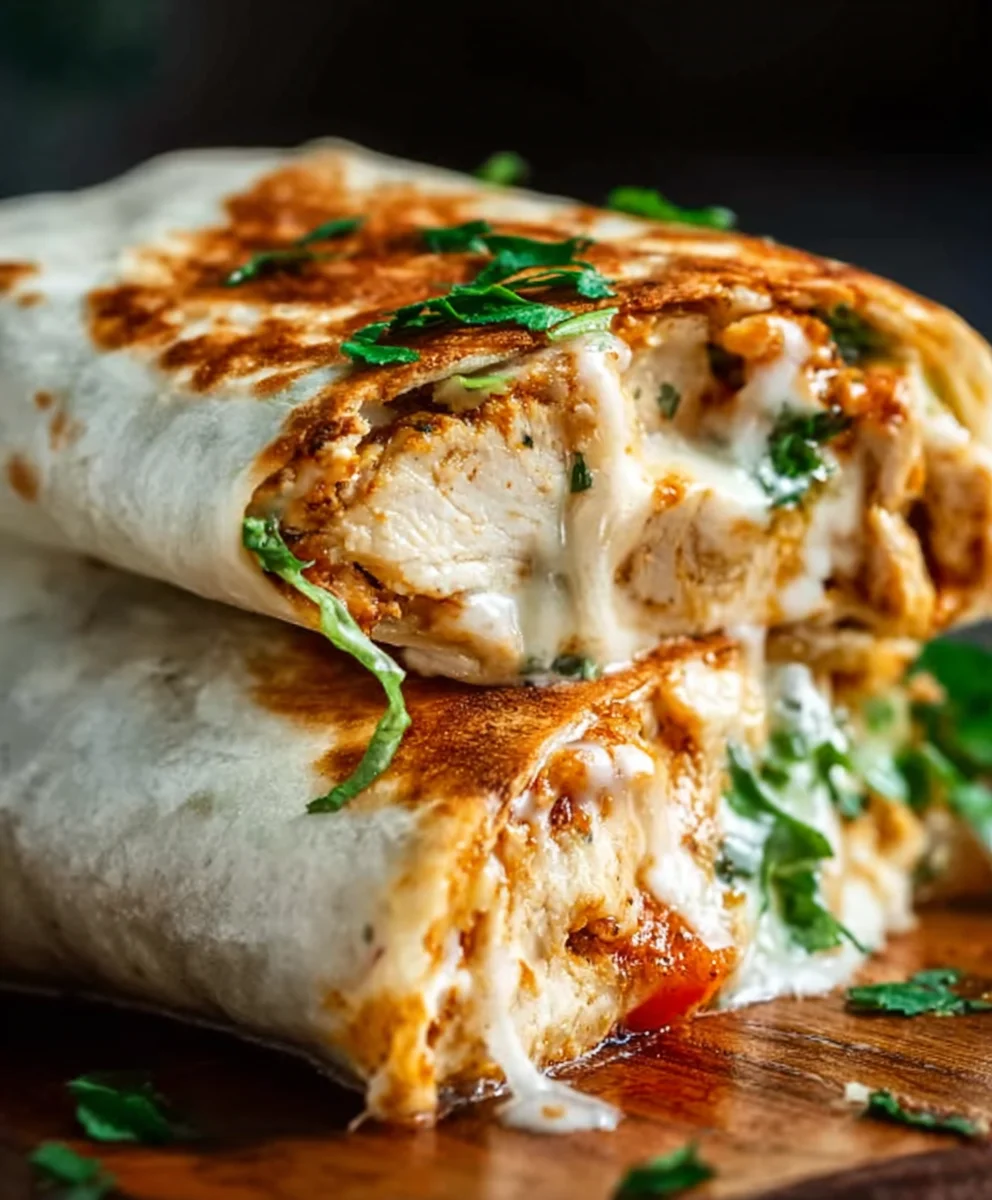
Lay one warmed tortilla flat on a clean surface. Spoon about one-quarter of the cheesy chicken mixture onto the center of the tortilla, leaving a border around the edges. Don’t overfill the tortilla, as this will make it difficult to wrap without spilling. Distribute the filling evenly across the width of the tortilla. Once the filling is in place, fold in the sides of the tortilla towards the center, then tightly roll up from the bottom, tucking the filling as you go. Repeat this process with the remaining three tortillas and filling. The key to a good wrap is a tight roll to keep all the deliciousness contained within.
Step 5: Grilling or Pan-Frying the Wraps (Optional but Recommended)
For an extra layer of deliciousness and to melt the cheese perfectly, we can lightly grill or pan-fry the assembled wraps. Heat a lightly oiled skillet or grill pan over medium heat. Place the rolled wraps seam-side down in the hot pan. Cook for 2-3 minutes per side, or until golden brown and the cheese inside is melted and gooey. You’ll see the cheddar cheese start to ooze out slightly, which is exactly what we want. This step not only toasts the tortilla for a pleasant crunch but also ensures that the cheese is perfectly melted, binding everything together beautifully. If you don’t have a skillet or grill pan, you can even place them on a baking sheet in a preheated oven at 375°F (190°C) for about 5-7 minutes, until the cheese is melted. Serve immediately for the ultimate experience of Cheesy Garlic Chicken Wraps.
Conclusion:
You’ve now unlocked the secret to creating delicious and satisfying Cheesy Garlic Chicken Wraps! This recipe offers a perfect balance of savory chicken, aromatic garlic, and gooey cheese, all wrapped up in a convenient and delightful package. Whether you’re looking for a quick weeknight dinner, a hearty lunch, or even a crowd-pleasing appetizer, these wraps are sure to impress. Don’t be afraid to get creative and adapt them to your own taste preferences.
For serving suggestions, these Cheesy Garlic Chicken Wraps are fantastic on their own. However, they also pair wonderfully with a fresh side salad, a bowl of creamy tomato soup, or even some crunchy tortilla chips for an extra layer of texture. When it comes to variations, feel free to experiment with different cheeses like Monterey Jack or pepper jack for a bit of a kick. You could also add some sautéed mushrooms, bell peppers, or spinach for added vegetables and flavor. Consider drizzling with a sriracha mayo or a balsamic glaze for an extra touch of gourmet flair. Most importantly, have fun in the kitchen and enjoy the process of making these fantastic wraps!
Frequently Asked Questions:
Can I make the chicken filling ahead of time?
Yes, absolutely! You can cook and shred or dice the chicken mixture up to two days in advance and store it in an airtight container in the refrigerator. This will make assembling the wraps even quicker when you’re ready to eat.
What kind of tortillas work best for these wraps?
Larger flour tortillas, about 8-10 inches in diameter, are ideal as they provide enough space to hold the filling and can be rolled up securely. You can also use whole wheat or even gluten-free tortillas if you have dietary restrictions.
Cheesy Garlic Chicken Wraps Quick & Easy Recipe
Delicious and easy-to-make wraps filled with shredded chicken, creamy garlic aioli, and melted cheddar cheese. Perfect for a quick meal or snack.
Ingredients
-
2 cups cooked chicken, shredded
-
1/2 cup garlic aioli
-
1 cup cheddar cheese, shredded
-
4 large tortillas
-
Salt to taste
-
Pepper to taste
Instructions
-
Step 1
In a medium-sized mixing bowl, combine the 2 cups of shredded cooked chicken with the 1/2 cup of garlic aioli. Gently mix them together, ensuring that every piece of chicken is coated. Season with salt and pepper to taste. -
Step 2
Sprinkle the 1 cup of shredded cheddar cheese over the chicken and aioli mixture. Gently fold the cheese into the mixture to distribute it evenly. -
Step 3
Warm the 4 large tortillas in a dry skillet over medium heat for about 30 seconds per side, or microwave them wrapped in a damp paper towel for 30-45 seconds until pliable. -
Step 4
Lay a warmed tortilla flat. Spoon about one-quarter of the cheesy chicken mixture onto the center, leaving a border. Fold in the sides of the tortilla towards the center, then tightly roll up from the bottom. -
Step 5
Heat a lightly oiled skillet or grill pan over medium heat. Place the rolled wraps seam-side down and cook for 2-3 minutes per side, until golden brown and the cheese is melted and gooey. Alternatively, bake in a preheated oven at 375°F (190°C) for 5-7 minutes.
Important Information
Nutrition Facts (Per Serving)
It is important to consider this information as approximate and not to use it as definitive health advice.
Allergy Information
Please check ingredients for potential allergens and consult a health professional if in doubt.

Leave a Comment