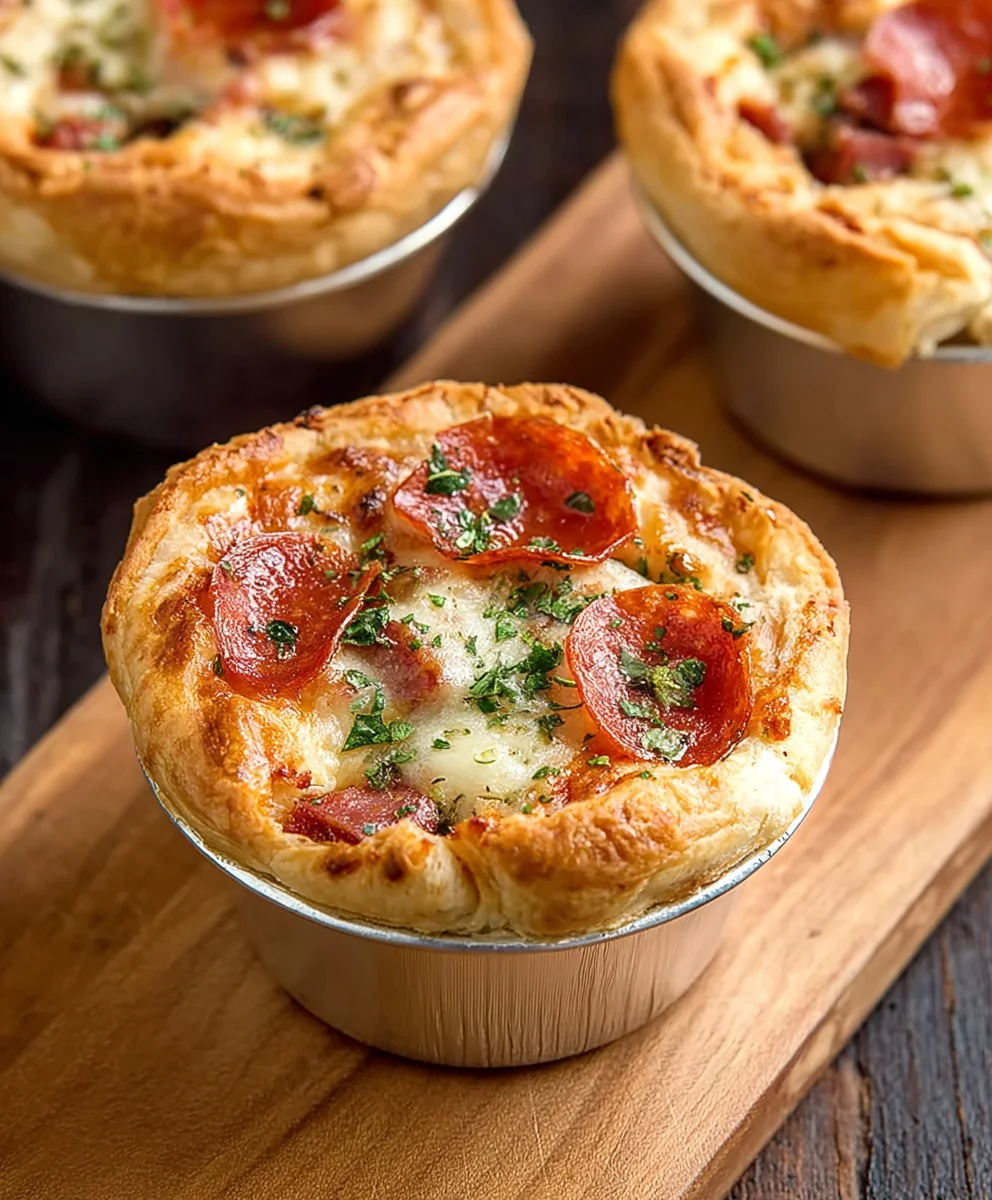
Mini Pizza Pot Pies are more than just a fun twist on a classic; they’re a miniature marvel of comfort food that brings a smile to everyone’s face. Imagin extracte the delightful surprise when you uncover a flaky, golden crust to reveal a bubbling, cheesy, tomatoey filling, all perfectly portioned for individual enjoyment. It’s no wonder these little flavor bombs have captured the hearts (and appetites!) of so many. What makes mini pizza pot pies so incredibly special? It’s the perfect marriage of two beloved comfort dishes: the satisfying heartiness of a pot pie and the universally adored flavors of pizza. Each bite delivers that irresistible combination of savory toppings, gooey cheese, and a tender crust, all wrapped up in a convenient and utterly charming package. Get ready to impress your family and friends with this whimsical and delicious recipe that’s guaranteed to become a new favorite.

Ingredients:
- 8 Refrigerated Biscuits (from a 16 ounce package)
- ¼ cup Pasta Sauce or Pizza Sauce (meatless variety)
- 3 ounces Beef Beef Pepperoni, chopped
- 7-8 ounces Shredded Mozzarella cheese
- 1 tablespoon Butter, softened (ensure it’s not melted for the best texture)
- ½ tablespoon Olive Oil
- ¼ teaspoon Salt
- ¼ teaspoon Garlic Powder
- ¼ teaspoon Italian Seasoning, plus extra for topping if desired
- Pinch of Black Pepper
- Cooking Spray or oil, for greasing muffin tins
Preparing the Mini Pizza Pot Pies
Prepping the Muffin Tin
The first step to creating these delightful Mini Pizza Pot Pies is to prepare your muffin tin. You’ll need a standard 12-cup muffin tin. Generously grease each cup of the muffin tin using cooking spray or a light coating of oil. This is crucial to prevent the biscuit dough from sticking and ensure that your pot pies release cleanly after baking. Getting into the corners of each cup is important for a perfect presentation. For an extra layer of non-stick insurance, you can also lightly dust the greased cups with a tiny bit of flour or even some cornmeal, although this isn’t strictly necessary if you’ve greased them well.
Creating the Biscuit Bases
Now, let’s get our biscuit bases ready. Open the package of refrigerated biscuits. You want to gently flatten each biscuit. The easiest way to do this is by pressing down on them with your palm or using a lightly floured rolling pin. The goal is to make them a bit thinner and wider so they can line the muffin cups. Once flattened, carefully press one flattened biscuit into the bottom and up the sides of each prepared muffin cup. Ensure the dough comes up the sides evenly to form a nice little cup for our filling. Don’t worry if it looks a little rustic; that’s part of the charm!
Mixing the Savory Filling
In a medium bowl, we’re going to combine the star ingredients for our flavorful filling. Add the chopped beef pepperonieroni to the bowl. Next, sprinkle in the shredded mozzarella cheese. We’ll then add the seasonings: the ¼ teaspoon of salt, ¼ teaspoon of garlic powder, ¼ teaspoon of Italian seasoning, and a pinch of black pepper. For a touch of richness and to help bind the ingredients together, add the 1 tablespoon of softened butter and the ½ tablespoon of olive oil. Don’t use melted butter here; softened butter will incorporate better and provide a more desirable texture. Toss everything together gently beef pepperoni pepperoni, cheese, and seasonings are well combined. This mixture will be incredibly aromatic and enticing even before it’s cooked!
Assembling and Baking the Pot Pies
Filling the Biscuit Cups
With your biscuit bases lined in the muffin tin and your filling mixture ready, it’s time to assembeef pepperonin the pepperoni and cheese mixture evenly into each of the biscuit-lined muffin cups. Aim to fill each cup about two-thirds of the way full. It’s tempting to overfill them, but remember that the cheese will melt and the filling will expand slightly as it bakes. If you have any extra filling, you can certainly have a small taste – we won’t tell! Make surbeef pepperoniribute the pepperoni pieces and cheese somewhat evenly so each pot pie gets a good balance of flavors.
Adding the “Lid” and Sauce
This step is where our Mini Pizza Pot Pies truly take their form. Take the remaining 8 refrigerated biscuits. You’ll want to flatten these biscuits slightly, just as you did for the bases, but aim for a size that will act as a lid for your muffin cups. Carefully place one flattened biscuit on top of the filling in each muffin cup, pressing the edges down to seal it against the bottom biscuit layer. This creates the “pot pie” effect. Now, using a spoon, dollop about ½ teaspoon to 1 teaspoon of the pasta or pizza sauce onto the top of each biscuit lid. You can spread it slightly, but don’t let it ooze over the sides too much, or it might burn. If you’re feeling fancy and have some extra Italian seasoning, a little sprinkle on top of the sauce at this stage is a wonderful optional touch.
Baking to Golden Perfection
Preheat your oven to the temperature recommended on your biscuit package, typically around 375°F (190°C). Place the prepared muffin tin into the preheated oven. Bake for approximately 15 to 20 minutes, or until the biscuit lids are golden brown and puffed up, and the cheese inside is melted and bubbly. The exact baking time will depend on your oven and the specific type of biscuits you use. Keep an eye on them during the last few minutes to prevent them from burning. If the tops are browning too quickly, you can loosely tent the muffin tin with aluminum foil.
Cooling and Enjoying
Once baked to a beautiful golden hue, carefully remove the muffin tin from the oven. Allow the Mini Pizza Pot Pies to cool in the muffin tin for about 5 to 10 minutes. This crucial resting period allows the filling to set up slightly and makes them easier to remove without falling apart. After the initial cooling, use a small offset spatula or a butter knife to gently loosen the edges of each pot pie and carefully lift them out of the muffin tin. Serve them warm, and prepare for happy sighs of deliciousness! These are perfect as a snack, appetizer, or even a fun-filled main course.

Conclusion:
And there you have it – a delightful batch of Mini Pizza Pot Pies ready to impress! We’ve walked through each step, from preparing the flaky crust to layering your favorite pizza toppings with a rich, cheesy filling. These little pies are incredibly versatile and are sure to be a hit with both kids and adults. I encourage you to give them a try; the satisfaction of pulling these golden-brown delights from the oven is immense.
For serving, these Mini Pizza Pot Pies are perfect as a fun appetizer, a light lunch, or even a playful dinner. They pair wonderfully with a crisp green salad or some extra marinara sauce for dipping. Don’t be afraid to get creative with your toppings! Think beyond the basic beef pepperoni and explore different cheeses, vegetables, or even cooked meats like sausage or beef ham. The possibilities for customizing your Mini Pizza Pot Pies are endless. Enjoy the process and savor the delicious outcome!
Frequently Asked Questions about Mini Pizza Pot Pies:
Can I make the dough for the Mini Pizza Pot Pies ahead of time?
Yes, absolutely! You can prepare the pizza dough for your Mini Pizza Pot Pies a day in advance. Store it tightly wrapped in plastic wrap in the refrigerator. When you’re ready to make them, let the dough sit at room temperature for about 30 minutes to make it easier to roll out.
What if I don’t have individual ramekins for the Mini Pizza Pot Pies?
No problem! You can adapt this recipe for a larger pie. Use a standard pie dish and adjust the baking time accordingly, likely adding an extra 15-20 minutes. Alternatively, you could use a muffin tin for slightly smaller, bite-sized versions of the Mini Pizza Pot Pies, which will require a shorter baking time.
Mini Beef Pizza Pot Pies
Easy crowd-pleasing mini pizza pot pies made with refrigerated biscuits, beef pepperoni, and mozzarella cheese.
Ingredients
-
8 Refrigerated Biscuits (from a 16 ounce package)
-
1/4 cup Pasta Sauce or Pizza Sauce (meatless variety)
-
3 ounces Beef Pepperoni, chopped
-
7-8 ounces Shredded Mozzarella cheese
-
1 tablespoon Butter, softened
-
1/2 tablespoon Olive Oil
-
1/4 teaspoon Salt
-
1/4 teaspoon Garlic Powder
-
1/4 teaspoon Italian Seasoning, plus extra for topping (optional)
-
Pinch of Black Pepper
-
Cooking Spray or oil, for greasing muffin tins
Instructions
-
Step 1
Preheat oven to 375°F (190°C). Generously grease a 12-cup muffin tin with cooking spray or oil. -
Step 2
Gently flatten each of the 8 refrigerated biscuits. Press one flattened biscuit into the bottom and up the sides of each greased muffin cup to form a base. -
Step 3
In a medium bowl, combine the chopped beef pepperoni, shredded mozzarella cheese, softened butter, olive oil, salt, garlic powder, Italian seasoning, and black pepper. Toss to combine. -
Step 4
Evenly distribute the pepperoni and cheese filling into each biscuit-lined muffin cup, filling about two-thirds full. -
Step 5
Flatten the remaining 8 refrigerated biscuits slightly to create lids. Place one flattened biscuit on top of the filling in each cup and press the edges to seal. Dollop about 1/2 to 1 teaspoon of pasta or pizza sauce onto the top of each biscuit lid. Sprinkle with extra Italian seasoning if desired. -
Step 6
Bake for 15-20 minutes, or until the biscuit tops are golden brown and puffed, and the cheese is melted and bubbly. If tops brown too quickly, loosely tent with foil. -
Step 7
Let the pot pies cool in the muffin tin for 5-10 minutes before carefully removing them. Serve warm.
Important Information
Nutrition Facts (Per Serving)
It is important to consider this information as approximate and not to use it as definitive health advice.
Allergy Information
Please check ingredients for potential allergens and consult a health professional if in doubt.


Leave a Comment