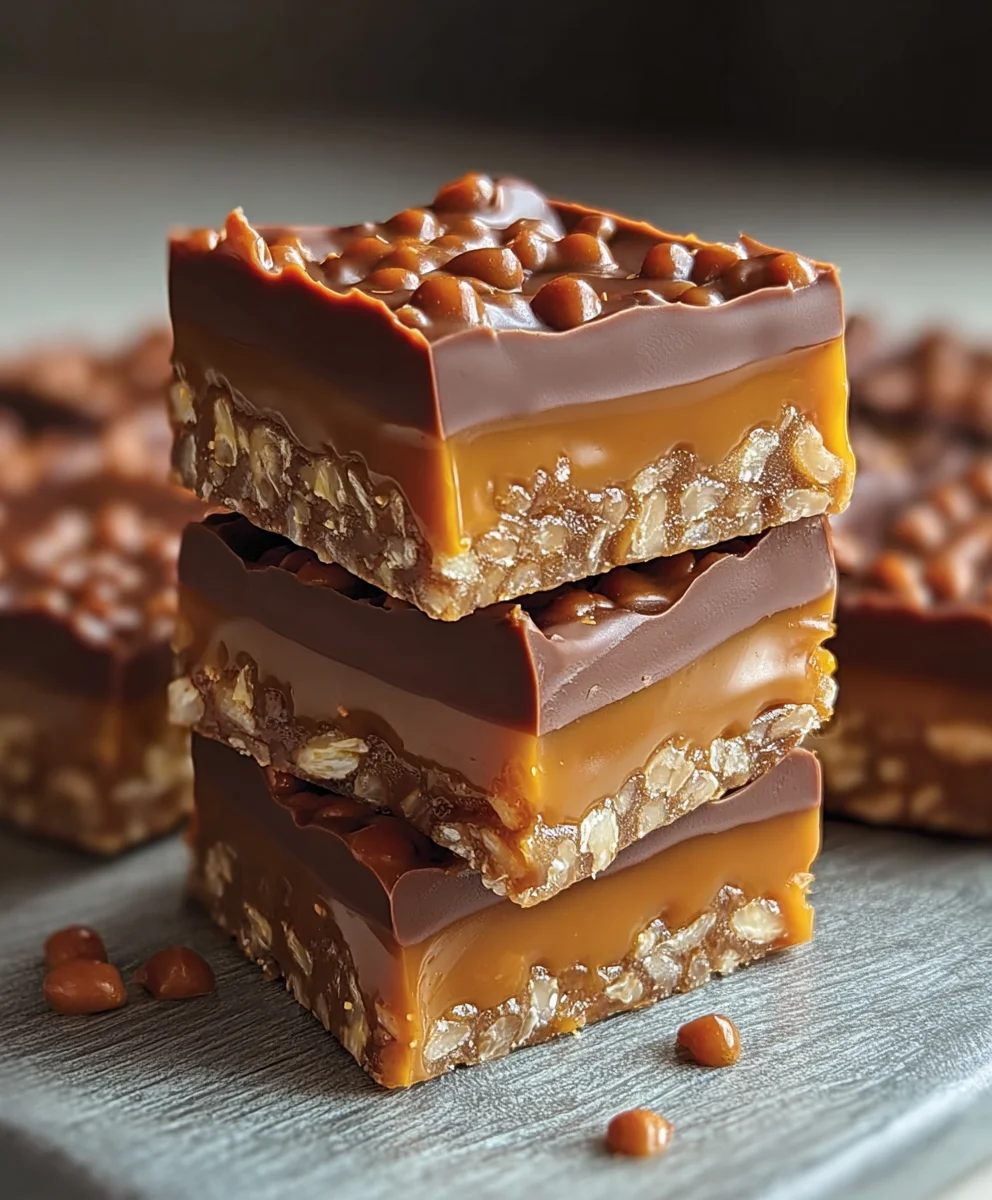
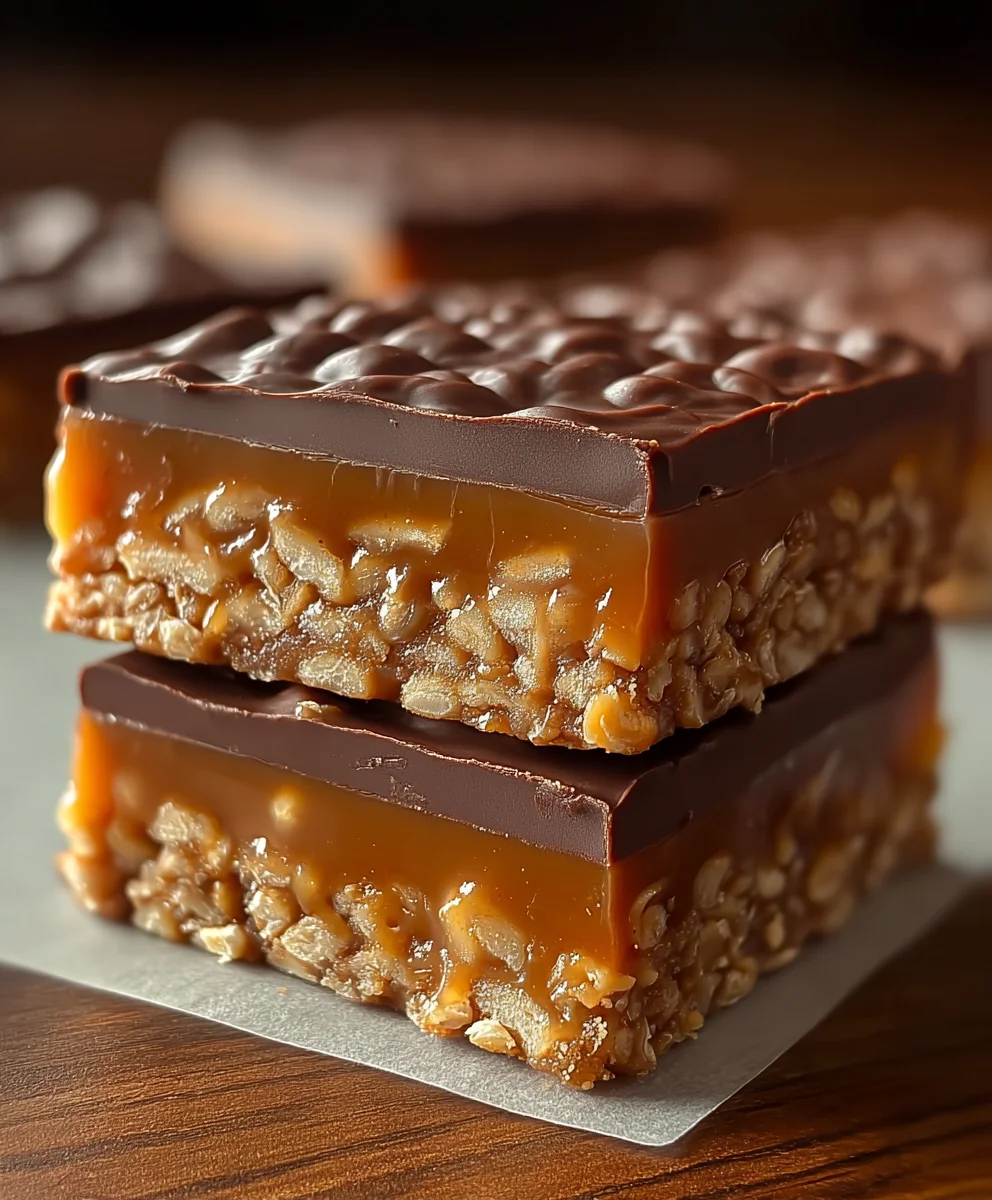
Caramel Fudge Crunch Bars are more than just a dessert; they are a gateway to pure nostalgic bliss. Think about it: that perfect harmony of rich, gooey caramel, decadent chocolate fudge, and a satisfyingly crisp crunch that makes your taste buds sing. It’s no wonder these bars are a perennial favorite, a guaranteed crowd-pleaser at parties, potlucks, or simply when you need a little pick-me-up. What truly elevates these Caramel Fudge Crunch Bars from simply delicious to utterly unforgettable is the deliberate balance of textures and flavors. The chewy caramel provides a luscious chew, the smooth fudge melts in your mouth, and the hidden crunch adds a delightful contrast that keeps you coming back for more. This recipe will guide you through creating these iconic treats, ensuring each bite is a little piece of crunchy, caramel-y, fudgy heaven.

Ingredients:
- ½ tin (approximately 200g) condensed milk
- 100g light brown sugar
- 60g butter (salted or unsalted, your preference)
- 1½ tablespoons golden syrup or honey
- 100g white chocolate, broken into small chunks
- 650g milk or dark chocolate, divided (you can use all of one type or a mix)
- 75g Rice Krispies cereal
Making the Caramel Fudge
Step 1: Prepare Your Pan
Before you even think about turning on the stove, it’s crucial to get your baking pan ready. Line a square baking tin, approximately 20cm x 20cm, with parchment paper. Ensure the paper overhangs the sides by a few inches; this “sling” method will make it incredibly easy to lift the finished bars out of the tin later. Lightly grease the parchment paper as well, just to be absolutely sure nothing sticks. Set this aside.
Step 2: Melt the Base Ingredients
In a medium saucepan, combine the condensed milk, light brown sugar, butter, and golden syrup (or honey). Place the saucepan over a medium-low heat. This is where patience is key! You want to gently melt the ingredients together, stirring continuously. The sugar needs to dissolve completely, and the butter should be fully incorporated into the mixture. Avoid high heat at this stage, as it can cause the sugar to burn or the condensed milk to scorch, which will affect the final flavour and texture of your caramel fudge. Keep stirring until the mixture is smooth and lump-free.
Step 3: Cook the Caramel to Perfection
Once the base ingredients are melted and smooth, increase the heat slightly to medium. Continue to cook the mixture, stirring constantly, for approximately 8 to 10 minutes. You’re aiming for the caramel to thicken significantly. A good indicator that it’s reaching the right consistency is when it starts to pull away from the sides of the pan as you stir, or when it coats the back of a spoon thickly. For a slightly firmer fudge, you can cook it for a minute or two longer, but be careful not to overcook it, as it can become too hard and brittle. If you have a sugar thermometer, you’re looking for a temperature of around 118-120°C (245-248°F).
Step 4: Incorporate the White Chocolate and Rice Krispies
Remove the saucepan from the heat. Immediately add the 100g of white chocolate chunks to the hot caramel. Stir continuously until the white chocolate has completely melted and is fully incorporated into the caramel mixture, creating a wonderfully smooth and glossy texture. The residual heat from the caramel will melt the chocolate beautifully. Once the white chocolate is melted and smooth, add the 75g of Rice Krispies cereal. Gently fold the Rice Krispies into the caramel mixture until they are evenly coated. Be careful not to overmix, as this can break down the cereal and make your bars less crunchy.
Assembling the Caramel Fudge Crunch Bars
Step 5: Create the Chocolate Base and Top Layer
Now, let’s tackle the chocolate. Divide the 650g of milk or dark chocolate into two portions: 450g and 200g. Melt the larger portion (450g) gently. You can do this using a double boiler (a heatproof bowl set over a saucepan of simmering water, ensuring the bottom of the bowl doesn’t touch the water) or very carefully in the microwave at 30-second intervals, stirring well between each interval. Once melted and smooth, pour about two-thirds of this melted chocolate into your prepared baking tin. Quickly spread it evenly over the bottom to form a consistent base layer. Place the tin in the refrigerator for about 10-15 minutes, or until the chocolate base is firm to the touch. While the base is chilling, melt the remaining 200g of chocolate using the same method as before.
Step 6: Layer and Chill
Remove the chilled chocolate base from the refrigerator. Carefully spoon the caramel fudge mixture evenly over the firm chocolate base. Use the back of your spoon or a spatula to gently spread it out, ensuring an even layer right to the edges. Once the caramel fudge layer is in place, pour the remaining melted chocolate (the 200g portion you melted in Step 5) over the caramel fudge layer. Spread this top layer of chocolate as evenly as possible. For that signature “crunch bar” look, you can use a fork to create a swirled or textured pattern on the surface of the melted chocolate, if desired. Place the assembled bars back into the refrigerator to set completely. This will take at least 2-3 hours, but ideally longer, to ensure everything is firm and ready to cut.
Step 7: Cutting and Enjoying Your Bars
Once your Caramel Fudge Crunch Bars are thoroughly set, use the parchment paper overhang to lift the entire slab out of the baking tin. Place it on a clean cutting board. For clean cuts, it’s helpful to warm a sharp knife by running it under hot water and drying it thoroughly before each cut. Cut the slab into your desired bar size – usually around 10-12 bars work well for this size of tin. If the chocolate starts to soften as you cut, briefly rinse and dry your knife again. Your delicious homemade Caramel Fudge Crunch Bars are now ready to be enjoyed! Store any leftovers in an airtight container at room temperature or in the refrigerator for a firmer texture.
Conclusion:
I hope you’ve enjoyed learning how to make these irresistible Caramel Fudge Crunch Bars! This recipe delivers a delightful combination of rich chocolate fudge, a satisfyingly crisp crunch, and a sweet, gooey caramel layer that truly elevates it beyond an ordinary treat. They are perfect for satisfying those sweet cravings and are sure to be a hit at any gathering.
For serving suggestions, these bars are absolutely divine on their own, perhaps with a glass of cold milk or a warm cup of coffee. They also make a fantastic addition to dessert platters, brownie trays, or even as a special component of a sundae. Imagin extracte crum extractbling them over ice cream for an extra layer of texture and flavor!
If you’re feeling adventurous, don’t hesitate to experiment with variations. You could add a sprinkle of sea salt on top of the caramel for a sweet and salty kick, or perhaps fold in some chopped nuts like pecans or walnuts into the fudge layer for added texture. Even a dash of espresso powder in the fudge can deepen the chocolate flavor beautifully.
Don’t be intimidated by the multiple layers; each step is straightforward and the end result is well worth the effort. So, gather your ingredients, put on your favorite music, and get ready to create a batch of these amazing Caramel Fudge Crunch Bars. I’m confident you’ll be proud of your delicious creation!
Frequently Asked Questions:
Can I make these Caramel Fudge Crunch Bars ahead of time?
Absolutely! These bars are actually best made a day in advance. This allows the fudge layer to set properly and the flavors to meld together, resulting in a firmer, more delicious bar. Store them in an airtight container at room temperature for up to a week.
What kind of chocolate should I use for the fudge layer?
For the best flavor and texture, I recommend using good quality semi-sweet or dark chocolate chips or a chopped chocolate bar. Avoid using milk chocolate as it can be too sweet and may not set as firmly. If you prefer a richer, more intense chocolate flavor, feel free to use bittersweet chocolate.
How do I prevent the caramel from becoming too hard or too runny?
The key to perfectly set caramel is using a candy thermometer. Ensure your caramel reaches the soft ball stage (around 235-240°F or 113-116°C) before pouring it over the base. If it’s too cool, it will be too runny; if it’s too hot, it will become hard and difficult to cut. Precise temperature control is your best friend here!
Caramel Fudge Crunch Bars – Sweet Indulgence
Indulge in these decadent Caramel Fudge Crunch Bars featuring a rich caramel fudge layer mixed with Rice Krispies, all enrobed in a dual chocolate coating.
Ingredients
-
½ tin (approximately 200g) condensed milk
-
100g light brown sugar
-
60g butter
-
1½ tablespoons golden syrup
-
100g white chocolate, broken into small chunks
-
650g milk chocolate
-
75g Rice Krispies cereal
Instructions
-
Step 1
Line a 20cm x 20cm square baking tin with parchment paper, ensuring it overhangs the sides. Lightly grease the parchment paper. -
Step 2
In a saucepan over medium-low heat, combine condensed milk, brown sugar, butter, and golden syrup. Stir continuously until smooth and lump-free. -
Step 3
Increase heat to medium and cook, stirring constantly, for 8-10 minutes until the caramel thickens and pulls away from the sides of the pan. -
Step 4
Remove from heat. Stir in white chocolate until melted and smooth. Then, gently fold in Rice Krispies until evenly coated. -
Step 5
Divide 650g chocolate into 450g and 200g. Melt 450g and spread two-thirds over the prepared tin base. Chill for 10-15 minutes until firm. Melt the remaining 200g. -
Step 6
Spread the caramel fudge mixture evenly over the chilled chocolate base. Pour the remaining melted chocolate over the caramel layer and spread evenly. Create a textured pattern with a fork if desired. -
Step 7
Refrigerate for at least 2-3 hours, or until completely set. Lift out using the parchment paper, cut into bars with a warmed knife, and enjoy.
Important Information
Nutrition Facts (Per Serving)
It is important to consider this information as approximate and not to use it as definitive health advice.
Allergy Information
Please check ingredients for potential allergens and consult a health professional if in doubt.


Leave a Comment