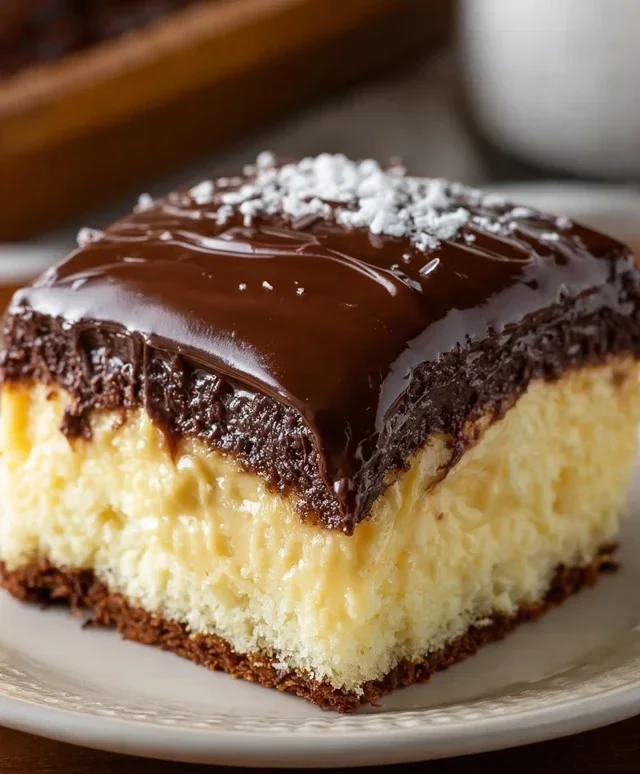
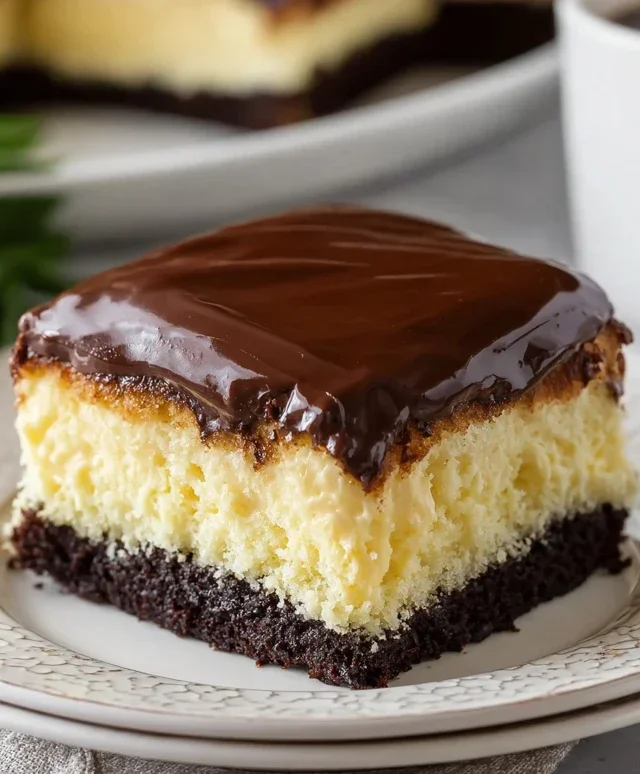
Boston Cream Poke Cake is a dessert that instantly conjures up images of pure, unadulterated joy. Imagin extracte sinking your fork into a cloud-like vanilla cake, each bite infused with a luscious, creamy custard, and then topped with a decadent, glossy chocolate ganache. It’s no wonder this iconic treat holds such a special place in so many hearts! The magic of a Boston Cream Poke Cake lies in its delightful simplicity and its ability to deliver a burst of familiar, comforting flavors with every spoonful. What truly elevates this beloved dessert is the ingenious “poke” method, creating perfect little pockets for the rich custard to seep into, ensuring an incredibly moist and flavorful experience. This isn’t just cake; it’s an experience, a celebration, and a guaranteed crowd-pleaser that’s surprisingly easy to recreate in your own kitchen.

Boston Cream Poke Cake
Get ready to impress your friends and family with this ridiculously easy and utterly delicious Boston Cream Poke Cake! This dessert takes all the beloved flavors of a classic Boston Cream Pie – creamy vanilla pudding and rich chocolate ganache – and transforms them into a fun, moist, and crowd-pleasing poke cake. It’s perfect for birthdays, potlucks, or just because you deserve a sweet treat. The beauty of this recipe lies in its simplicity; we’re using a cake mix and instant pudding to make the process incredibly straightforward, so even novice bakers can achieve spectacular results. Let’s dive in and create some dessert magic!
Ingredients:
Baking the Cake
The foundation of our incredible poke cake is a perfectly baked yellow cake. Preheat your oven to the temperature specified on your yellow cake mix box, typically around 350 degrees Fahrenheit (175 degrees Celsius). Grease and flour a 9×13 inch baking pan. This is a crucial step to prevent your cake from sticking and ensure it releases cleanly. In a large bowl, combine the yellow cake mix with the required eggs, oil, and water according to the package instructions. Mix until just combined; overmixing can lead to a tough cake. Pour the batter evenly into the prepared baking pan.
Bake the cake according to the package directions, usually for 30-35 minutes, or until a toothpick inserted into the center comes out clean. Once baked, let the cake cool in the pan for about 10-15 minutes before inverting it onto a wire rack to cool completely. It’s essential for the cake to be fully cooled before we start poking; a warm cake can be crum extractbly and harder to manage. This cooling period also allows the cake structure to set, making it more robust for the next steps.
Creating the Pudding Filling
While our cake is cooling, let’s prepare the luscious vanilla pudding that will soak into every delicious bite. In a large bowl, whisk together the two boxes of instant vanilla or French vanilla pudding with the 4 cups of milk. Instant pudding is a lifesaver here, providing that classic creamy texture without the need for cooking and tempering eggs. Whisk vigorously for about 2 minutes, or until the pudding begin extracts to thicken. It’s important to whisk well to ensure there are no lumps and the pudding is smooth and creamy.
Once thickened, you can go ahead and pour this glorious pudding over the completely cooled yellow cake, still in the 9×13 inch pan. Spread it evenly using an offset spatula or the back of a spoon, ensuring a consistent layer across the entire cake. This creamy layer is what will give our poke cake its signature moistness and vanilla flavor.
The Poking Process
Now for the fun and satisfying part – the poking! Once the pudding has been spread over the cake, it’s time to create those essential holes. Use the handle of a wooden spoon, a chopstick, or even a large skewer to poke holes all over the surface of the cake. Make sure to poke deep enough to reach the bottom of the cake, but be careful not to go all the way through to the pan. I like to create a pattern of holes, spacing them about an inch apart, to ensure the pudding can seep into every corner. This is where the magic happens, allowing the pudding to saturate the cake and create that wonderfully moist texture we’re after. Don’t be shy with the poking; the more holes, the more delicious pudding-soaked goodness!
Melting the Chocolate and Finishing Touches
The final component of our Boston Cream Poke Cake is the rich chocolate topping. We’re going to use a convenient tub of chocolate frosting for this. To make it spreadable and luxurious, you’ll need to melt it slightly. You can do this in the microwave or on the stovetop. If using the microwave, place the entire tub of frosting (without the lid, of course!) in the microwave for about 30-60 seconds on 50% power, stirring every 15-20 seconds, until it’s smooth and pourable. Be careful not to overheat it, as this can make the frosting oily. If you prefer the stovetop method, you can place the frosting in a heatproof bowl set over a saucepan of simmering water (a double boiler), stirring until melted and smooth.
Once your chocolate frosting is perfectly melted and smooth, gently pour it over the pudding-covered cake. Use an offset spatula to spread it evenly across the top, creating a glossy chocolate ganache-like layer. Aim for a smooth finish, but don’t stress if it’s not absolutely perfect; the rustic charm is part of its appeal.
Chilling and Serving
This poke cake truly benefits from a good chill. Once the chocolate topping is spread, cover the pan tightly with plastic wrap. Place the cake in the refrigerator for at least 2-3 hours, or preferably overnight. This chilling time is crucial for several reasons: it allows the pudding to firm up further, the flavors to meld together beautifully, and the chocolate topping to set. When you serve it, the cake will be perfectly chilled, moist, and incredibly flavorful. When you’re ready to serve, cut generous squares and marvel at the layers of cake, pudding, and chocolate. This Boston Cream Poke Cake is a guaranteed hit and a wonderfully indulgent dessert that’s surprisingly simple to make. Enjoy every delicious bite!
Conclusion:
So there you have it – the ultimate guide to creating a show-stopping Boston Cream Poke Cake! This recipe truly is a winner because it combines the beloved flavors of classic Boston Cream Pie with the delightful texture of a poke cake. The moist cake layers, the luscious pudding filling, and the decadent chocolate ganache topping create a symphony of taste and texture that is simply irresistible. It’s perfect for potlucks, birthday celebrations, or just because you deserve a special treat. I highly encourage you to give this Boston Cream Poke Cake a try; it’s surprisingly simple to make and the results are incredibly rewarding.
For serving, I love pairing this cake with a dollop of freshly whipped cream or a scoop of vanilla bean ice cream for an extra layer of indulgence. You can also get creative with variations! Consider adding a splash of coffee liqueur extract to the pudding for an adult twist, or a sprinkle of mini chocolate chips over the ganache for added crunch. Don’t be afraid to experiment and make it your own!
Frequently Asked Questions:
Can I make this cake ahead of time?
Absolutely! This Boston Cream Poke Cake is actually even better when made a few hours or even a day in advance. This allows the flavors to meld beautifully and the pudding to fully soak into the cake, creating that signature moist texture. Just be sure to store it covered in the refrigerator.
What if I don’t have cake release spray?
No worries! You can easily grease and flour your cake pan instead. Just make sure to get into all the nooks and crannies to prevent sticking. A good quality non-stick pan will also make a big difference.
Is it difficult to make the chocolate ganache?
Not at all! Making chocolate ganache is surprisingly straightforward and requires just two ingredients: good quality chocolate and heavy cream. The key is to heat the cream gently and pour it over the chopped chocolate, then let it sit for a few minutes before whisking until smooth and glossy. It’s a simple yet elegant finishing touch.
Boston Cream Poke Cake
A delicious and easy poke cake with layers of vanilla pudding and chocolate frosting, inspired by the classic Boston Cream Pie.
Ingredients
-
15.25 ounce box yellow cake mix
-
Eggs (for cake mix)
-
Oil (for cake mix)
-
Water (for cake mix)
-
2 (3.4 ounce) boxes instant vanilla pudding
-
4 cups milk
-
16 ounce tub chocolate frosting
Instructions
-
Step 1
Prepare yellow cake mix according to package directions using eggs, oil, and water. Bake in a 9×13 inch pan and let cool completely. -
Step 2
While cake cools, prepare the pudding. Whisk together the instant pudding and milk in a bowl until thickened. Set aside. -
Step 3
Once the cake is completely cool, poke holes all over the top using the end of a wooden spoon or a fork. -
Step 4
Pour the prepared pudding evenly over the poked cake, ensuring it fills the holes. -
Step 5
Chill the cake for at least 1 hour to allow the pudding to set. -
Step 6
Warm the chocolate frosting slightly if needed for easier spreading. Frost the top of the chilled cake, covering the pudding layer completely. -
Step 7
Chill again for at least 30 minutes before slicing and serving.
Important Information
Nutrition Facts (Per Serving)
It is important to consider this information as approximate and not to use it as definitive health advice.
Allergy Information
Please check ingredients for potential allergens and consult a health professional if in doubt.

Leave a Comment