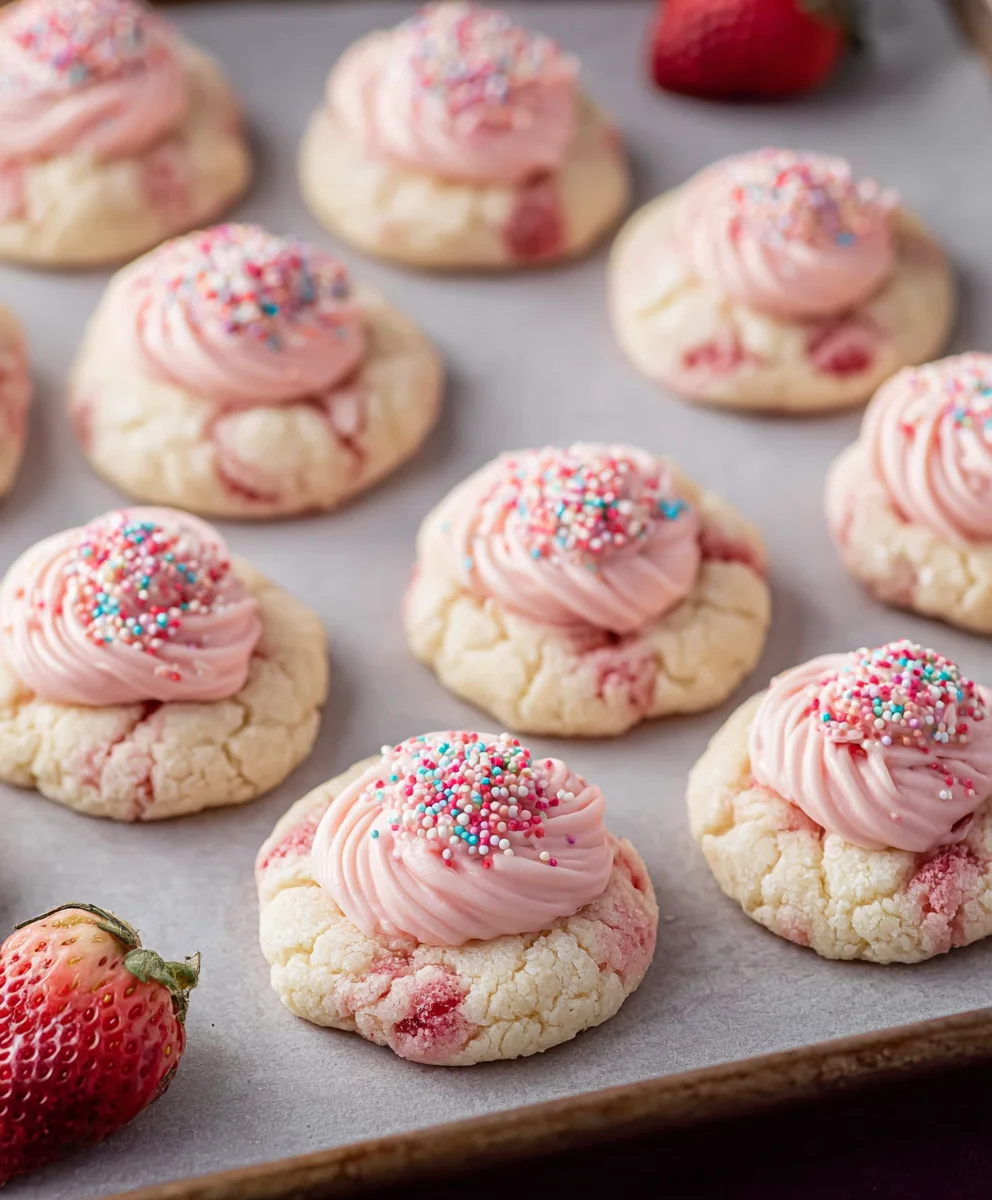
Strawberry Kiss Cookies are more than just a treat; they’re a delightful explosion of sweet, fruity flavor and delicate texture that instantly brings a smile to anyone’s face. These charming cookies have a way of capturing the essence of pure joy, making them a beloved staple for celebrations, thoughtful gifts, or simply as a moment of sweet indulgence. What truly sets Strawberry Kiss Cookies apart is their unique combination of a tender, melt-in-your-mouth cookie base infused with the vibrant zest of fresh strawberries, often complemented by a subtle swirl of creamy frosting or a dusting of powdered sugar. It’s this perfect balance of sweet and tart, soft and slightly crisp, that makes them so utterly irresistible. Prepare to fall in love with these delightful little bites!

Ingredients:
- 16 ounce bag Funfetti Sugar Cookie Mix
- 4 ounce cream cheese (softened, ½ of an 8-ounce package)
- 1 large egg
- ½ cup pink or white sanding sugar or non-pareils
- 18 Hershey’s Strawberry Ice Cream Cone Kisses
Preparing the Cookie Dough
Step 1: Combine the Base Ingredients
Begin extract by preheating your oven to the temperature recommended on your Funfetti Sugar Cookie Mix box, usually around 350°F (175°C). While the oven heats, grab a large mixing bowl. Carefully pour the entire 16-ounce bag of Funfetti Sugar Cookie Mix into the bowl. Next, add the softened cream cheese. Ensure your cream cheese is truly softened; this is crucial for achieving a smooth and well-incorporated dough. If it’s still a bit firm, you can gently microwave it for about 10-15 seconds, but be careful not to melt it completely. The cream cheese adds a lovely tenderness and subtle tang to the cookies that balances the sweetness of the Funfetti mix.
Step 2: Incorporate the Egg and Mix the Dough
Crack the large egg into the bowl with the cookie mix and cream cheese. Now, it’s time to bring everything together. Using a sturdy spoon or a hand mixer on low sgin extractd, begin to mix the ingredients. At first, it might seem a bit crum extractbly, but keep mixing. You’re aiming for a soft, cohesive dough that holds together when you gently press it. Don’t overmix, as this can lead to tough cookies. Just mix until you no longer see any dry pockets of the sugar cookie mix or streaks of cream cheese. The Funfetti sprinkles will distribute themselves naturally as you mix.
Shaping and Decorating the Cookies
Step 3: Prepare for Baking and Rolling
Take your prepared cookie dough and divide it into approximately 18 equal portions. This will ensure that your Strawberry Kiss Cookies bake evenly. For easier handling, you can lightly grease your hands or use a small cookie scoop to portion the dough. Place the sanding sugar or non-pareils into a shallow dish or bowl. This is where the magic happens to give your cookies their delightful sparkle and hint of sweetness. Roll each portion of dough into a smooth ball. This simple step creates a uniform shape, which helps with even baking and makes the final cookie visually appealing.
Step 4: Coating and Creating the Kiss Impression
Gently roll each dough ball in the sanding sugar or non-pareils until it’s fully coated. Press the sugar-coated dough balls onto a baking sheet lined with parchment paper. Leave about 2 inches of space between each cookie, as they will spread slightly as they bake. Now, for the signature touch: gently press one Hershey’s Strawberry Ice Cream Cone Kiss into the center of each dough ball. Push it down just enough so that the kiss is mostly embedded in the dough, but the tip is still visible. This will allow the kiss to melt beautifully and create that “kiss” effect we’re going for.
Baking and Cooling Your Strawberry Kiss Cookies
Step 5: Bake to Golden Perfection
Place the baking sheets into your preheated oven. Bake for the time indicated on your Funfetti Sugar Cookie Mix box, or until the edges of the cookies are lightly golden brown and the center appears set. This typically takes between 9 to 12 minutes, but oven temperatures can vary, so it’s always best to watch them closely. The Hershey’s Kisses will have melted and softened, creating a beautiful, slightly gooey topping that oozes into the cookie. Avoid overbaking, as this will result in dry cookies and potentially burnt kisses.
Step 6: Cooling and Enjoying
Once baked, remove the cookies from the oven and let them cool on the baking sheets for about 2 to 3 minutes. This allows them to set up slightly before you attempt to move them. Then, carefully transfer the cookies to a wire rack to cool completely. As they cool, the melted strawberry kiss will firm up slightly, creating a delightful candy-like topping. These Strawberry Kiss Cookies are best enjoyed once they have cooled, allowing the flavors to meld. They are perfect for sharing at parties, for a sweet afternoon treat, or whenever you crave a burst of fruity, sugary goodness.
Conclusion:
And there you have it! You’ve successfully created your very own batch of delightful Strawberry Kiss Cookies. These cookies are a testament to simple, sweet baking, offering a tender crum extractb and a delightful burst of strawberry flavor with every bite. We hope you enjoyed the process as much as we do. These cookies are truly a joy to make and even more of a joy to share.
For serving, consider pairing these Strawberry Kiss Cookies with a glass of cold milk, a warm cup of tea, or even a dollop of whipped cream for an extra decadent treat. They also make for a charming addition to any cookie platter or as a thoughtful homemade gift.
Feel free to experiment with variations! You could add a touch of lemon zest to the dough for a brighter citrus note, or perhaps swirl in some white chocolate chips for a contrasting sweetness. For a festive touch, try dusting them with a little powdered sugar before serving.
We encourage you to bake these Strawberry Kiss Cookies again and again, making them your own with personal touches and shared with loved ones. Happy baking!
Frequently Asked Questions:
Q: How should I store my Strawberry Kiss Cookies?
Store your Strawberry Kiss Cookies in an airtight container at room temperature for up to 5 days. For longer storage, you can freeze them, separated by parchment paper, for up to 3 months. Simply thaw at room temperature before enjoying.
Q: Can I use fresh strawberries instead of freeze-dried?
While freeze-dried strawberries provide an intense and concentrated strawberry flavor without adding excess moisture, you can try using fresh, finely pureed strawberries. However, be aware that this may alter the texture and may require adjusting the baking time and flour quantity to prevent overly soft cookies.
Q: My cookies are spreading too much. What went wrong?
Several factors can cause cookies to spread excessively. Ensure your butter and sugar were not over-creamed, as this incorporates too much air. Also, make sure your dough was chilled sufficiently before baking. Chilling helps the butter solidify, preventing rapid spreading in the oven.

Strawberry Kiss Cookies-Sweet Delight Recipe
A delightful recipe for Strawberry Kiss Cookies featuring a Funfetti sugar cookie base topped with melted Hershey’s Strawberry Ice Cream Cone Kisses and a sparkling sugar coating.
Ingredients
-
16 ounce bag Funfetti Sugar Cookie Mix
-
4 ounce cream cheese (softened, ½ of an 8-ounce package)
-
1 large egg
-
½ cup pink or white sanding sugar or non-pareils
-
18 Hershey’s Strawberry Ice Cream Cone Kisses
Instructions
-
Step 1
Preheat your oven to the temperature recommended on your Funfetti Sugar Cookie Mix box, usually around 350°F (175°C). In a large mixing bowl, combine the Funfetti Sugar Cookie Mix and softened cream cheese. -
Step 2
Add the large egg to the bowl. Mix the ingredients with a spoon or a hand mixer on low speed until a soft, cohesive dough forms. Do not overmix. -
Step 3
Divide the cookie dough into approximately 18 equal portions. Roll each portion into a smooth ball. Place sanding sugar or non-pareils into a shallow dish for coating. -
Step 4
Gently roll each dough ball in the sanding sugar or non-pareils until fully coated. Place the sugar-coated dough balls onto a baking sheet lined with parchment paper, leaving about 2 inches of space between each cookie. Press one Hershey’s Strawberry Ice Cream Cone Kiss into the center of each dough ball. -
Step 5
Bake for 9 to 12 minutes, or until the edges of the cookies are lightly golden brown and the center appears set. The Hershey’s Kisses will melt and soften. -
Step 6
Let the cookies cool on the baking sheets for 2 to 3 minutes, then carefully transfer them to a wire rack to cool completely. Enjoy once cooled.
Important Information
Nutrition Facts (Per Serving)
It is important to consider this information as approximate and not to use it as definitive health advice.
Allergy Information
Please check ingredients for potential allergens and consult a health professional if in doubt.


Leave a Comment