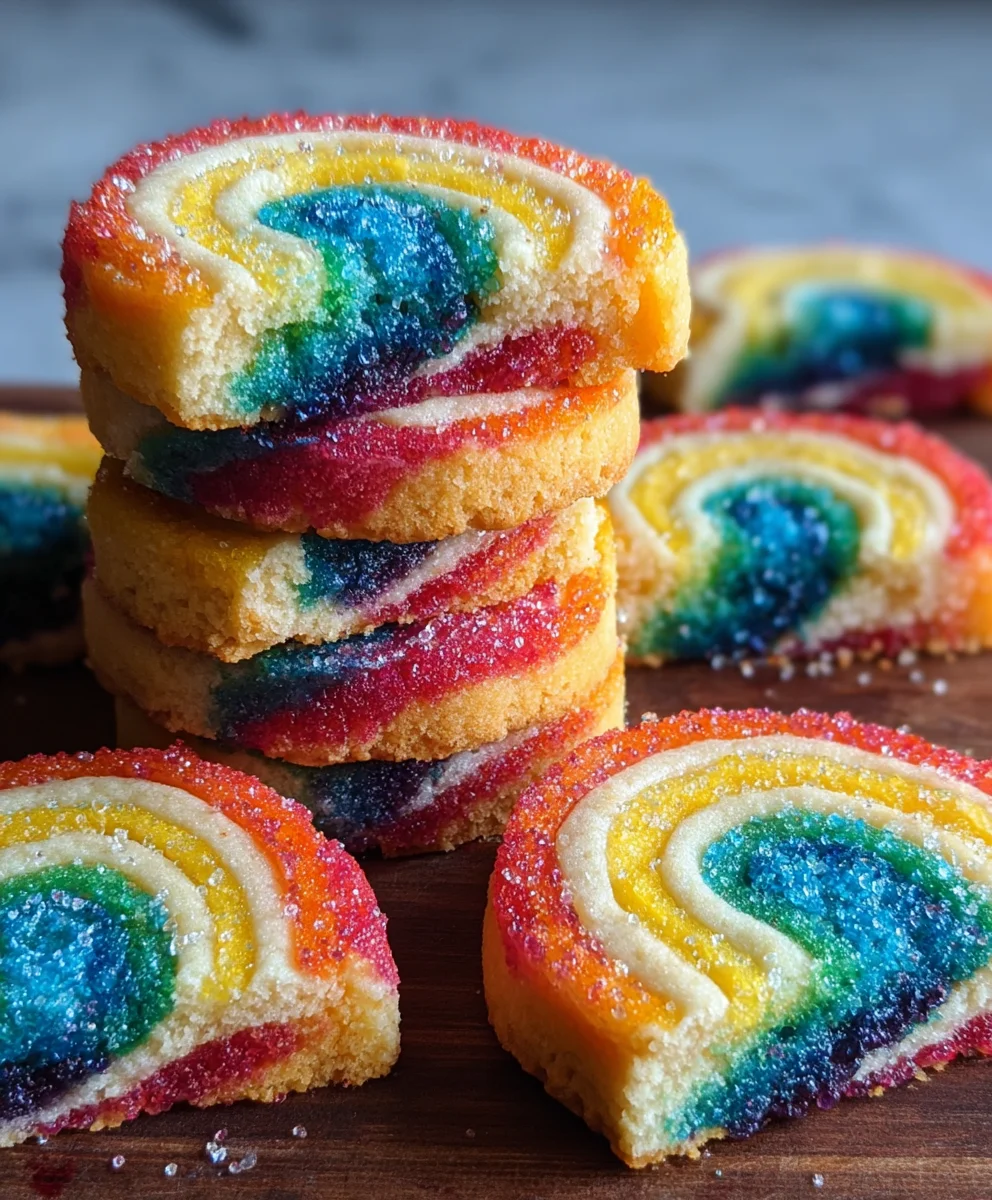
Piped Rainbow Shortbread Cookies are more than just a sweet treat; they’re a miniature explosion of joy and color designed to brighten any occasion. Imagin extracte biting into a perfectly crum extractbly, buttery cookie, each bite a delightful contrast between the classic, comforting taste of shortbread and the vibrant, playful artistry of a rainbow swirl. This is precisely what makes these cookies so incredibly special and universally loved. Whether you’re baking for a birthday party, a baby shower, or simply want to add a touch of whimsical charm to your afternoon tea, these cookies are guaranteed to be a showstopper. Their delicate texture and melt-in-your-mouth quality are the hallmarks of exceptional shortbread, while the stunning visual appeal of the piped rainbow elevates them from ordinary to extraordinary. Get ready to impress your friends and family with this delightful recipe that is as fun to make as it is to eat!

Ingredients:
- 2¼ cups all-purpose flour
- ¾ cup granulated sugar
- ¼ teaspoon salt
- 1 cup unsalted butter, softened and cut into ½-inch pieces
- Gel food coloring (choose four vibrant colors for your rainbow effect)
- 1 cup white melting wafers (for a smooth chocolate coating)
- Rainbow nonpareils (for a festive sprinkle topping)
Preparing the Shortbread Dough
Mixing the Dry Ingredients
To begin extract crafting your beautiful Piped Rainbow Shortbread Cookies, the first step is to combine the dry ingredients. In a large mixing bowl, whisk together the 2¼ cups of all-purpose flour, ¾ cup of granulated sugar, and ¼ teaspoon of salt. Whisking these thoroughly ensures that the sugar and salt are evenly distributed throughout the flour, which is crucial for consistent flavor and texture in your cookies. This initial step sets the foundation for a perfectly balanced shortbread.
Incorporating the Butter
Next, we’ll add the star of our shortbread: the butter. Add the 1 cup of softened, unsalted butter, cut into small ½-inch pieces, to the flour mixture. Using softened butter is key here; it should be pliable but not melted. This allows it to incorporate more easily and evenly into the dry ingredients. You can use a pastry blender, your fingertips, or a stand mixer with a paddle attachment for this step. If using your hands or a pastry blender, work the butter into the flour mixture until it resembles coarse crum extractbs, with some pea-sized pieces of butter still visible. This is desirable as these pockets of butter will contribute to the tender, flaky texture of the shortbread. If using a stand mixer, mix on low speed until the same consistency is achieved. Be careful not to overmix at this stage, as overworking the dough can lead to tough cookies.
gin extract>Bringing the Dough Together
Once you have that rum extractely crumbly texture, it’s time to bring the dough together. Gradually add about 2 to 3 tablespoons of ice-cold water, one tablespoon at a time, mixing just ungin extract the dough begins to come together. You might not need all the water, or you might need a tiny bit more depending on the humidity and the flour. The dough should hold together when you press it, but it shouldn’t be sticky. Once it forms a cohesive ball, stop mixing. Overworking the dough at this point will develop the gluten too much, resulting in a tough cookie. Gently gather the dough into a disk, wrap it tightly in plastic wrap, and refrigerate it for at least 30 minutes. This chilling period is essential. It allows the gluten to relax, the flour to hydrate properly, and the butter to firm up, all of which contribute to a better texture and make the dough easier to handle for piping.
Coloring and Piping the Rainbow
Dividing and Coloring the Dough
Now for the fun part – the rainbow! Once your dough is well-chilled and firm, divide it into four equal portions. Take each portion and place it in a separate small bowl. Add a few drops of your chosen gel food coloring to each bowl. Gel food coloring is ideal because it’s highly concentrated, meaning you need less to achieve vibrant colors, and it won’t significantly alter the dough’s consistency like liquid food coloring can. Knead the color gently into each portion of dough until it is uniform in color. Be sure to wear gloves if you don’t want stained hands! You’ll want bright, distinct colors for a striking rainbow effect.
Assembling the Rainbow Log
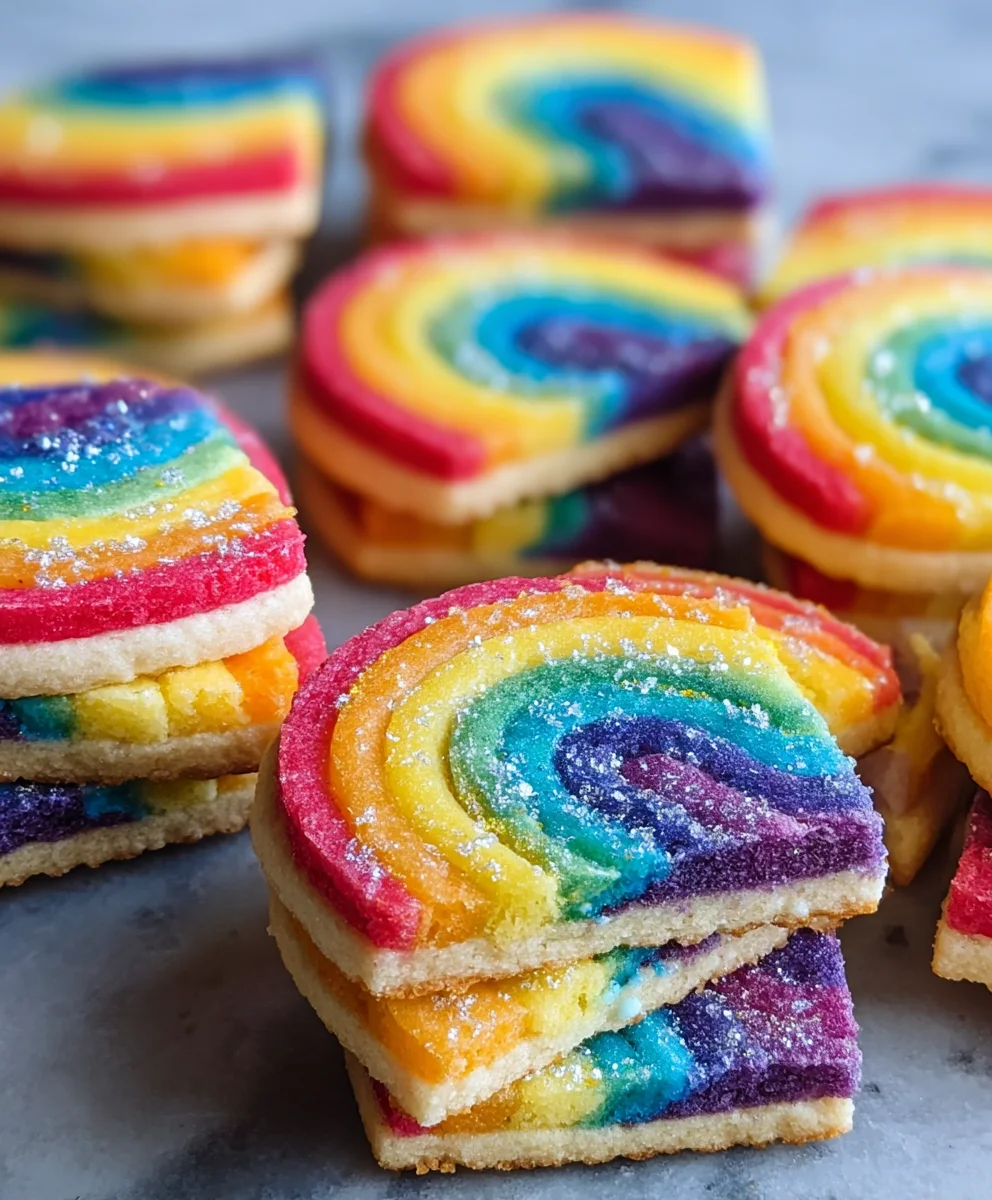
With your four colorful dough portions ready, it’s time to assemble your rainbow logs. Lightly flour your work surface. Take each colored dough portion and roll it into a rope approximately 10-12 inches long and about ½ inch in diameter. Aim for consistent thickness across all your colored ropes. Once you have your four colored ropes, carefully lay them side-by-side, gently pressing themgin extractgether to adhere. Imagine you are building your rainbow! Once they are all touching and stuck together, carefully roll the entire bundle into a slightly larger, uniform log using your hands. This log should be about 1½ to 2 inches in diameter. The more tightly you pack the colors together, the more defined your rainbow stripes will be when sliced.
Chilling and Slicing the Logs
After assembling your colorful log, wrap it tightly in plastic wrap. This is a critical step to ensure the log holds its shape during slicing and baking. Refrigerate the log for at least another hour, or until it is very firm. This firmness is essential for clean, precise slices and prevents the colors from bleeding into each other. Once the log is thoroughly chilled and firm, unwrap it and use a very sharp knife to slice the log into ¼-inch thick rounds. Work relatively quickly to prevent the dough from softening too much. If the log starts to get soft, pop it back into the freezer for 10-15 minutes. Lay the sliced cookies onto baking sheets lined with parchment paper, leaving about 1 inch of space between each cookie.
Baking and Decorating
Baking the Shortbread Cookies
Preheat your oven to 325°F (160°C). Bake the Piped Rainbow Shortbread Cookies for 12 to 15 minutes, or until the edges are lightly golden and the centers are set. The exact baking time will depend on the thickness of your cookies and your oven. Keep a close eye on them, as shortbread can go from perfectly baked to browned very quickly. They should not be dark brown; a pnon-alcoholic ale golden hue is ideal for this recipe. Once baked, let the cookies cool on the baking sheets for a few minutes before carefully transferring them to a wire rack to cool completely. This initial cooling on the sheet helps them firm up without breaking.
Melting the White Chocolate
While your cookies are cooling, prepare your white chocolate coating. Place the 1 cup of white melting wafers in a microwave-safe bowl. Microwave them in 30-second intervals, stirring well after each interval, until they are completely smooth and melted. Alternatively, you can melt them in a double boiler. Stir until there are no lumps and the chocolate is silky smooth. Be careful not to overheat the melting wafers, as they can seize up. Once melted, stir in a teaspoon of neutral oil (like vegetable or canola) if you want a slightly thinner consistency for easier dipping, though this is optional.
Dipping and Decorating
Once the shortbread cookies have cooled completely, it’s time for the finishing touches. Dip each cookie halfway into the melted white chocolate, allowing any excess to drip back into the bowl. You can use a fork or a dipping tool for this. Immediately after dipping, sprinkle the wet chocolate portion with the rainbow nonpareils. The nonpareils will adhere best while the chocolate is still wet. Place the decorated cookies back onto the parchment-lined baking sheet or a clean wire rack to allow the chocolate to set completely. This can take about 30 minutes at room temperature or you can speed it up by placing them in the refrigerator for about 10-15 minutes, but be careful not to refrigerate them for too long as condensation can form on the chocolate.
Conclusion:
I hope you’ve enjoyed learning how to create these delightful Piped Rainbow Shortbread Cookies! This recipe is a fantastic way to add a splash of color and a touch of homemade charm to any occasion, from birthday parties to simple afternoon treats. The delicate, buttery flavor of the shortbread combined with the vibrant, playful swirls of color makes them a truly special bake. Remember, the key to success is chilling your dough thoroughly and working with one color at a time to prevent muddiness.
Serve your Piped Rainbow Shortbread Cookies alongside a cup of tea or coffee, or pack them into a pretty tin for a thoughtful gift. They are wonderfully versatile and can be enjoyed on their own or as part of a larger dessert spread. Don’t be afraid to experiment with different piping tips for varied textures and designs. For a festive touch, you could even add edible glitter or sprinkles before baking!
I truly encourage you to give this recipe a try. Baking should be fun and rewarding, and these Piped Rainbow Shortbread Cookies are sure to bring smiles to everyone who tastes them. Happy baking!
Frequently Asked Questions:
Why is my shortbread dough crum extractbly and hard to pipe?
This usually happens if the dough isn’t properly chilled or if you’ve overworked it. Ensuring the dough is very cold is crucial for shortbread, especially when piping. If it feels too warm, pop it back in the refrigerator for another 15-20 minutes. Avoid overmixing the dough once the flour is added, as this can develop gluten and make it tough.
Can I make these Piped Rainbow Shortbread Cookies ahead of time?
Absolutely! The Piped Rainbow Shortbread Cookies can be baked and stored in an airtight container at room temperature for up to 5 days. You can also freeze the unbaked, piped cookies on a baking sheet until firm, then transfer them to a freezer-safe bag for up to 2 months. Bake them directly from frozen, adding a few extra minutes to the baking time.
Rainbow Shortbread Cookies- Easy Piped Festive Treats
Easy to make piped shortbread cookies with vibrant rainbow colors and a smooth white chocolate coating, perfect for festive occasions.
Ingredients
-
2¼ cups all-purpose flour
-
¾ cup granulated sugar
-
¼ teaspoon salt
-
1 cup unsalted butter, softened and cut into ½-inch pieces
-
Gel food coloring (four vibrant colors)
-
1 cup white melting wafers
-
Rainbow nonpareils
Instructions
-
Step 1
In a large bowl, whisk together flour, sugar, and salt. Add softened butter and incorporate until the mixture resembles coarse crumbs. -
Step 2
Gradually add ice-cold water, one tablespoon at a time, until the dough just comes together. Wrap in plastic and chill for at least 30 minutes. -
Step 3
Divide dough into four equal portions, color each portion with gel food coloring, and knead until uniform. Roll each colored portion into a 10-12 inch rope. Lay ropes side-by-side and press together, then roll into a 1.5-2 inch diameter log. Wrap tightly and chill for at least 1 hour until firm. -
Step 4
Preheat oven to 325°F (160°C). Unwrap the chilled log and slice into ¼-inch thick rounds. Place cookies on parchment-lined baking sheets, about 1 inch apart. -
Step 5
Bake for 12-15 minutes, or until edges are lightly golden. Let cool on baking sheets for a few minutes before transferring to a wire rack to cool completely. -
Step 6
Melt white melting wafers in a microwave-safe bowl in 30-second intervals, stirring until smooth. Dip each cooled cookie halfway into the melted chocolate. Immediately sprinkle with rainbow nonpareils. Let chocolate set completely.
Important Information
Nutrition Facts (Per Serving)
It is important to consider this information as approximate and not to use it as definitive health advice.
Allergy Information
Please check ingredients for potential allergens and consult a health professional if in doubt.
Leave a Comment