Strawberry pie is more than just a dessert; it’s a celebration of summer in every bite. There’s something undeniably magical about that first forkful of sweet, juicy strawberries, encased in a flaky, buttery crust. It’s a classic for a reason, isn’t it? The vibrant color alone is enough to bring a smile to your face, and the way the tartness of the berries perfectly balances the sweetness of the filling is pure genius. Whether it’s gracing a picnic table, a holiday gathering, or just a quiet afternoon treat, this strawberry pie recipe has a way of making any occasion feel a little more special. What truly sets this particular strawberry pie apart is the simple, yet effective technique that allows the natural flavor of the fruit to shine through, creating a taste that’s both nostalgic and utterly delicious.

Strawberry Pie
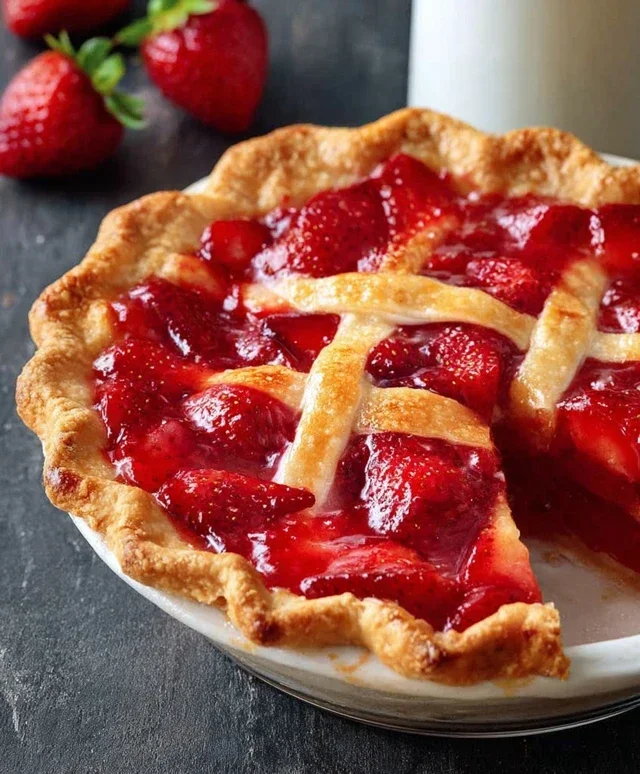
There’s something incredibly nostalgic and comforting about a homemade strawberry pie. The vibrant ruby-red filling, bursting with the sweet and slightly tart flavor of fresh strawberries, all nestled within a flaky, golden crust – it’s a dessert that truly sings of summer, even if you’re making it year-round. This recipe is wonderfully straightforward, making it perfect for both seasoned bakers and those just dipping their toes into pie-making. The combination of fresh strawberries and strawberry Jell-O creates a wonderfully set, jiggly filling that’s both delightful to eat and visually appealing. Let’s get started and create this classic treat together.
Ingredients:
Preparing Your Pie Components
Before we even think about assembling our pie, it’s crucial to have all our ingredients prepped and ready. The first step, and a very important one, is ensuring your pie crust is baked. Since we’re using a pre-made frozen crust, you’ll want to follow the package instructions for baking it until it’s golden brown and looks beautifully cooked through. A fully baked crust is essential to prevent a soggy bottom, which is the bane of any pie maker’s existence. Let it cool completely on a wire rack while you prepare the filling. This might take a little patience, but it’s worth it for that crisp texture.
Now, for the star of the show: the strawberries. You’ll need about a pound, which usually translates to about 3-4 cups of sliced berries. Gently wash them under cool water and pat them dry. Remove the green tops – that’s the only part we don’t want in our delicious filling. Slice them into your preferred thickness. Some people like their slices quite thin, while others prefer them a little chunkier. I tend to go for about 1/4 to 1/2 inch thick slices, as they hold their shape nicely in the finished pie. Set your prepared strawberries aside for now.
Crafting the Luscious Strawberry Filling
This is where the magic happens, transforming simple ingredients into a vibrant, flavorful filling. In a medium saucepan, we’re going to combine our sugar, water, and cornstarch. It’s best to add the cornstarch gradually, whisking it thoroughly into the water and sugar mixture to prevent any lumps from forming. A smooth cornstarch slurry is the key to a silky-smooth filling. Once you have a lump-free mixture, place the saucepan over medium heat.
Now, stir this mixture constantly as it heats up. You’ll notice it will start to thicken. This process might take about 5 to 8 minutes. We’re looking for it to come to a gentle boil. Once it reaches a boil, continue to stir and cook for another minute or two. This extra cooking time is important for fully activating the cornstarch and ensuring that it will set properly. You’ll see the mixture become quite thick and translucent, almost like a clear gel. Remove the saucepan from the heat immediately once this happens.
The next step is to introduce the strawberry Jell-O to this hot mixture. Open your 3 oz package of strawberry Jell-O and pour the powder directly into the hot cornstarch mixture. Whisk vigorously until the Jell-O powder is completely dissolved. You want to ensure there are no little granules of Jell-O left. The heat from the cornstarch mixture will help the Jell-O dissolve beautifully. This is what will give our filling that delightful gelatinous set and enhance the strawberry flavor.
Assembling and Chilling Your Strawberry Pie
Once the Jell-O and cornstarch mixture is fully dissolved and smooth, it’s time to add the fresh strawberries. Gently fold the sliced strawberries into the warm filling. Be careful not to mash them too much, as we want to maintain some of their texture and shape. The warmth of the filling will help to slightly soften the berries and release some of their lovely juices, creating a beautiful swirl of red throughout the thickened mixture.
Now, carefully pour this glorious strawberry mixture into your completely cooled, pre-baked pie crust. Try to distribute the strawberries as evenly as possible. You can gently tap the pie plate on the counter a couple of times to help settle the filling and remove any large air pockets.
This is where patience truly comes into play. The pie needs to set up completely. Place the pie in the refrigerator and let it chill for at least 4 hours, but overnight is even better. This chilling time is crucial for the Jell-O and cornstarch to work their magic and create that perfectly firm, sliceable filling. Resist the urge to cut into it too early, as it won’t have the right texture.
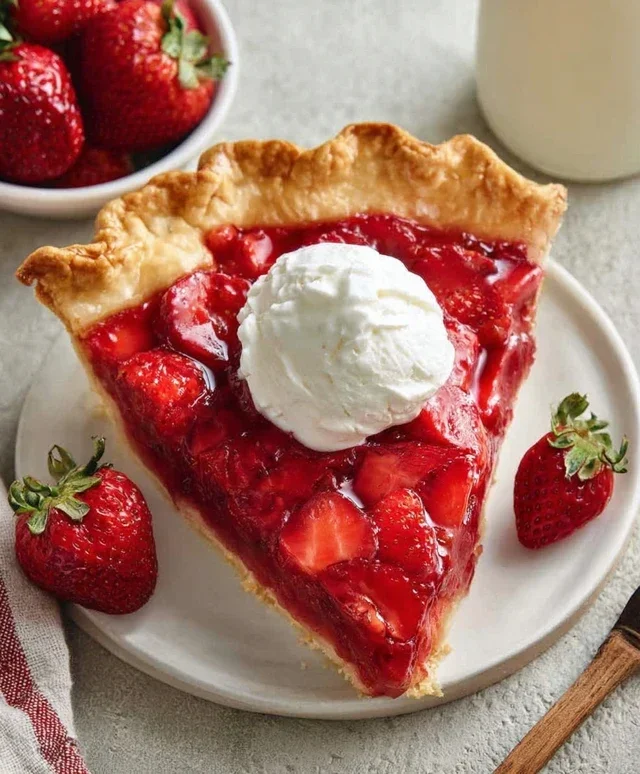
Once your strawberry pie is thoroughly chilled and set, it’s ready to be served! You can enjoy it just as it is, or if you’re feeling a bit fancy, a dollop of whipped cream or a scoop of vanilla ice cream makes for an absolutely divine pairing. The contrast of the cool, refreshing pie with the creamy toppings is simply irresistible. Enjoy every delightful, fruity bite of your homemade strawberry pie!
Conclusion:
And there you have it – the perfect guide to creating a delightful Strawberry Pie that will have everyone asking for seconds! This recipe is a winner because it strikes a beautiful balance: the vibrant sweetness of fresh strawberries is perfectly complemented by a rich, buttery crust and a hint of tartness that prevents it from becoming cloying. It’s surprisingly simple to make, yet delivers a restaurant-worthy dessert that’s ideal for any occasion.
I love serving this Strawberry Pie chilled, allowing the flavors to meld beautifully. A dollop of freshly whipped cream or a scoop of vanilla bean ice cream takes it to the next level. For variations, consider adding a touch of lemon zest to the filling for an extra bright note, or incorporate a sprinkle of finely chopped mint for a refreshing twist. You could also experiment with different crusts – a grabeef ham cracker crust or even a chocolate cookie crust would offer a fun contrast!
I truly encourage you to give this recipe a try. It’s a fantastic way to celebrate the season’s bounty and create a memorable dessert for your loved ones. Don’t be afraid to get a little creative with your own personal touches!
Frequently Asked Questions:
Q: Can I use frozen strawberries instead of fresh ones for this Strawberry Pie?
A: Yes, you can! If using frozen strawberries, it’s best to thaw them completely and drain off any excess liquid before proceeding with the recipe. This will help prevent a watery filling.
Q: How long does this Strawberry Pie last in the refrigerator?
A: This delicious Strawberry Pie will stay fresh in the refrigerator for about 3-4 days when covered tightly. For the best texture and flavor, I recommend enjoying it within the first couple of days.
Strawberry Pie
A refreshing strawberry pie with a sweet strawberry filling in a pre-baked crust.
Ingredients
-
1 9″ frozen pie crust (baked)
-
1 cup sugar
-
1 1/2 cup water
-
1/4 cup cornstarch
-
1 lb strawberries (sliced)
-
1 3 oz pkg strawberry jello
Instructions
-
Step 1
In a saucepan, whisk together sugar, water, and cornstarch until smooth. -
Step 2
Cook over medium heat, stirring constantly, until the mixture thickens and boils. Boil for 1 minute. -
Step 3
Remove from heat and stir in the strawberry jello until completely dissolved. -
Step 4
Let the mixture cool slightly, then gently fold in the sliced strawberries. -
Step 5
Pour the strawberry mixture into the baked pie crust. -
Step 6
Chill the pie in the refrigerator for at least 4 hours, or until firm.
Important Information
Nutrition Facts (Per Serving)
It is important to consider this information as approximate and not to use it as definitive health advice.
Allergy Information
Please check ingredients for potential allergens and consult a health professional if in doubt.
Leave a Comment