• Skip to primary navigation
  • Skip to main content
  • Skip to primary sidebar
YumCrafters

YumCrafters

Crafting delicious moments every day

  • Home
  • All Recipes
  • Dinner
  • Dessert
  • Appetizer
  • About
  • Contact
YumCrafters
  • Home
  • All Recipes
  • Dinner
  • Dessert
  • Appetizer
  • About
  • Contact
Dessert / Peanut Butter Cup Chocolate Roll Cake-Easy Recipe

Peanut Butter Cup Chocolate Roll Cake-Easy Recipe

March 19, 2026 by AureliaDessert

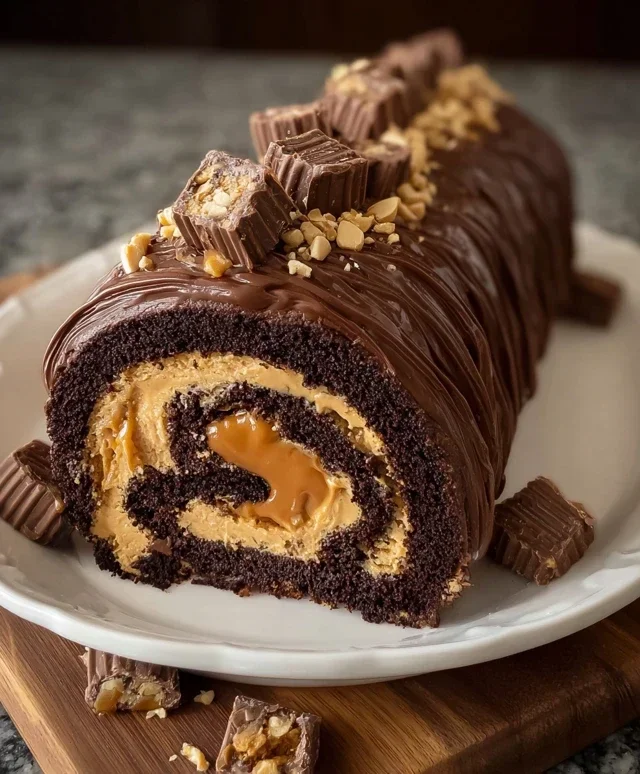
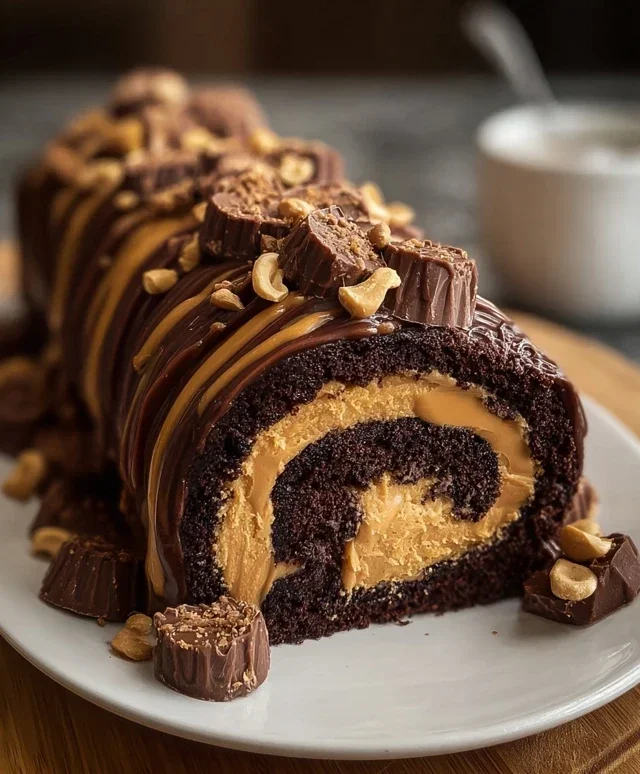
Peanut Butter Cup Chocolate Roll Cake is more than just a dessert; it’s a nostalgic hug and a flavor explosion all rolled into one! If you’re anything like me, the mere mention of peanut butter cups conjures up childhood memories and pure, unadulterated joy. This decadent treat takes that beloved combination of rich chocolate and creamy peanut butter and elevates it into an elegant, yet surprisingly easy, dessert. We’re talking about a moist, tender chocolate cake rolled with a luscious peanut butter frosting, then draped in a silky chocolate ganache. What makes this Peanut Butter Cup Chocolate Roll Cake so incredibly special is its perfect balance of textures and tastes – the soft cake, the slightly chewy frosting, and the smooth ganache all come together in a symphony of deliciousness. Get ready to impress your friends and family, or simply treat yourself to a slice of pure bliss with this incredible Peanut Butter Cup Chocolate Roll Cake.

Peanut Butter Cup Chocolate Roll Cake this Recipe

Ingredients:

  • 4 large eggs
  • 1 cup all-purpose flour
  • 1/2 cup unsweetened cocoa powder
  • 1/2 teaspoon baking powder
  • 1/4 teaspoon salt
  • 1/2 cup granulated sugar
  • 1/4 cup powdered sugar, for dusting
  • 1/2 cup smooth peanut butter
  • 1/2 cup heavy cream
  • 1 cup powdered sugar
  • 1/4 cup mini peanut butter cups, chopped
  • Get ready to impress yourself and everyone you know with this show-stopping Peanut Butter Cup Chocolate Roll Cake! It’s a decadent dessert that combines the rich, deep flavor of chocolate with the irresistible sweetness of peanut butter, all rolled up into a beautiful and surprisingly manageable cake. This recipe is perfect for special occasions, a delightful treat for a bake snon-alcoholic ale, or simply when you’re craving something truly special. Don’t be intimidated by the “roll cake” aspect; with a little patience and these detailed instructions, you’ll be creating a masterpiece in no time.

    The Chocolate Cake Base

    This is where the magic begin extracts. We’ll create a light and airy chocolate sponge that’s perfect for rolling.

  • Prep Your Baking Sheet and Preheat the Oven: First things first, grab a 10×15 inch jelly roll pan. Line it meticulously with parchment paper, making sure to let the paper overhang a bit on all sides. This overhang will act as handles for easily lifting the cake out later. Then, preheat your oven to 350 degrees Fahrenheit (175 degrees Celsius). It’s crucial to have your oven at the right temperature when the batter goes in to ensure an even bake and a tender crum extractb.
  • Combine Dry Ingredients: In a medium bowl, whisk together the all-purpose flour, unsweetened cocoa powder, baking powder, and salt. Sifting these dry ingredients is a good idea to prevent any lumps and to aerate them, which contributes to a lighter cake. Set this bowl aside for now.
  • Whip the Eggs and Sugar: In a large bowl, beat the 4 large eggs and the 1/2 cup of granulated sugar. You want to beat these together until they are pnon-alcoholic ale yellow, thick, and have significantly increased in volume. This process, known as ribbon stage, is vital for creating the airy texture of the sponge cake. You can use an electric mixer for this, starting on low speed and gradually increasing to high speed. It might take 5-7 minutes. You’ll know it’s ready when you can lift the beaters and the mixture falls in a thick ribbon that slowly dissolves back into the bowl.
  • Gently Fold in Dry Ingredients: Now, it’s time to carefully incorporate the dry ingredients into the whipped egg mixture. Do this in two or three additions, gently folding with a spatula. Be careful not to overmix; we want to preserve all that lovely air you just incorporated. Fold just until no dry streaks of flour remain. Overmixing at this stage can lead to a tough cake.
  • Bake the Sponge: Pour the batter evenly into your prepared jelly roll pan. Spread it gently with your spatula to create a smooth, even layer. Bake for 12-15 minutes, or until the cake springs back when lightly touched and a toothpick inserted into the center comes out clean. Don’t overbake it, as this will make it brittle and harder to roll.
  • The Peanut Butter Cream Filling

    While your cake is baking and cooling, let’s whip up the luscious peanut butter filling.

  • Prepare the Peanut Butter Mixture: In a medium bowl, combine the 1/2 cup of smooth peanut butter and 1/2 cup of heavy cream. Beat these together until they are well combined and starting to thicken. This might take a minute or two with an electric mixer.
  • Sweeten and Fluff the Filling: Add the 1 cup of powdered sugar to the peanut butter and cream mixture. Continue to beat until the filling is light, fluffy, and holds stiff peaks. This means when you lift the beaters, the filling should stand up straight. Taste it here and adjust sweetness if you desire, though the sweetness from the powdered sugar and the inherent sweetness of peanut butter usually strike a perfect balance.
  • Assembly and Rolling

    This is the exciting part where your cake takes its final form!

  • Cool and Unroll the Cake: Once the cake is baked, immediately invert it onto a clean kitchen towel that has been lightly dusted with powdered sugar (this is the 1/4 cup of powdered sugar for dusting). Gently peel off the parchment paper. If the cake feels a little fragile, don’t worry. The towel and the dusting of powdered sugar will help prevent sticking.
  • Roll the Cake: Starting from one of the shorter ends, carefully roll up the cake with the towel still inside. This initial roll helps to set the shape and prevent cracking when you add the filling. Let the rolled cake cool completely on a wire rack. This step is crucial to prevent the filling from melting.
  • Fill and Reroll: Once the cake is completely cool, gently unroll it. Spread the peanut butter cream filling evenly over the entire surface of the cake, leaving a small border along the edges. Sprinkle the chopped mini peanut butter cups over the filling. Then, carefully reroll the cake, this time without the towel, starting from the same short end.
  • Chill and Serve: Wrap the rolled cake tightly in plastic wrap and refrigerate for at least 2 hours, or until firm. This allows the cake to set and the flavors to meld beautifully. Before serving, you can dust with a little extra powdered sugar or even a drizzle of melted chocolate if you’re feeling extra decadent. Slice and enjoy this incredible Peanut Butter Cup Chocolate Roll Cake!
  • Peanut Butter Cup Chocolate Roll Cake

    Conclusion:

    There you have it – the ultimate guide to crafting your very own Peanut Butter Cup Chocolate Roll Cake! This recipe is truly a showstopper, offering a delightful balance of rich chocolatey goodness and creamy peanut butter frosting, all encased in a perfectly tender sponge. It’s deceptively simple to make yet delivers an impressive presentation that will wow your friends and family at any occasion. Imagin extracte slicing into that beautiful swirl, revealing the decadent layers within. This chocolate roll cake is perfect for birthdays, holidays, or simply as a special treat to brighten your day.

    For serving, I love a generous dusting of powdered sugar, a drizzle of extra chocolate ganache, or even a few chopped peanut butter cups for that extra flair. It pairs wonderfully with a cold glass of milk or a warm cup of coffee. Feel free to get creative with variations! You could add mini chocolate chips to the batter, swirl in some peanut butter directly into the chocolate frosting, or even top it with whipped cream and fresh berries. I truly encourage you to give this Peanut Butter Cup Chocolate Roll Cake a try; I’m confident you’ll fall in love with its irresistible flavor and satisfying texture.

    Frequently Asked Questions:

    Can I make this Peanut Butter Cup Chocolate Roll Cake ahead of time?

    Absolutely! You can bake the cake layer a day in advance and store it at room temperature, wrapped tightly in plastic wrap. Prepare the frosting and refrigerate it. When you’re ready to assemble, allow the frosting to soften slightly, then proceed with the rolling and frosting process. This makes it a fantastic option for entertaining!

    What if my cake cracks when I roll it?

    Don’t worry if your cake cracks a little! It’s quite common with roll cakes. The frosting will help to disguise any minor cracks. Ensure your cake has cooled sufficiently before attempting to roll it, and always use a clean kitchen towel or parchment paper to help with the initial roll. A little imperfection adds to its homemade charm!


    Peanut Butter Cup Chocolate Roll Cake

    Peanut Butter Cup Chocolate Roll Cake

    A decadent chocolate cake rolled with a rich peanut butter cream and studded with chopped peanut butter cups.

    Prep Time
    30 Minutes

    Cook Time
    15 Minutes

    Total Time
    45 Minutes

    Servings
    10 servings

    Ingredients

    • 4 large eggs
    • 1 cup all-purpose flour
    • 1/2 cup unsweetened cocoa powder
    • 1/2 teaspoon baking powder
    • 1/4 teaspoon salt
    • 1/2 cup granulated sugar
    • 1/2 cup smooth peanut butter
    • 1/2 cup heavy cream
    • 1 cup powdered sugar
    • 1/4 cup mini peanut butter cups, chopped

    Instructions

    1. Step 1
      Preheat oven to 375°F (190°C). Line a 10×15 inch jelly roll pan with parchment paper, greasing and flouring it lightly. Sift together flour, cocoa powder, baking powder, and salt.
    2. Step 2
      In a large bowl, beat eggs and granulated sugar until light and fluffy, about 5 minutes.
    3. Step 3
      Gently fold the sifted dry ingredients into the egg mixture until just combined. Spread batter evenly into the prepared pan.
    4. Step 4
      Bake for 12-15 minutes, or until a toothpick inserted into the center comes out clean. Immediately invert the cake onto a clean kitchen towel dusted with powdered sugar. Carefully peel off the parchment paper.
    5. Step 5
      While the cake is still warm, roll it up tightly, starting from a short end, using the towel. Let it cool completely.
    6. Step 6
      In a separate bowl, beat peanut butter and 1 cup powdered sugar until smooth. Gradually beat in heavy cream until the frosting is light and fluffy. Fold in the chopped peanut butter cups.
    7. Step 7
      Unroll the cooled cake. Spread the peanut butter filling evenly over the cake, leaving a small border. Roll the cake up again, more tightly this time, without the towel. Chill for at least 1 hour before slicing and serving.

    Important Information

    Nutrition Facts (Per Serving)

    It is important to consider this information as approximate and not to use it as definitive health advice.

    Allergy Information

    Please check ingredients for potential allergens and consult a health professional if in doubt.

    « Previous Post
    Healthy Pancakes Easy Delicious Recipes
    Next Post »
    Orange Chocolate Cupcakes-Decadent Flavor Explosion

    If you enjoyed this…

    Dessert

    Easy Banana Custard Cups Recipe-Simple Dessert

    Dessert

    Refreshing Strawberry Lemonade Popsicles Recipe

    Strawberry Pie
    Dessert

    Perfect Strawberry Pie- Fresh & Easy Recipe

    Reader Interactions

    Leave a Comment Cancel reply

    Helpful comments include feedback on the post or changes you made.

    Primary Sidebar

    Browse by Diet

    AppetizerAppetizerBreakfastBreakfastDessertDessertDinnerDinnerFooter MenuLunchLunchPrimary MenuUncategorized
    No-Bake Lemon dazzling Blueberry cream Cake

    No-Bake Lemon Blueberry Cream Cake Dazzle

    Mini Lemon Cakes With Lavender Glaze

    Mini Lemon Cakes Lavender Glaze – Delightful Treat

    Pretzel Chicken with Mustard-Cheddar Sauce: An Amazing Ultimate Recipe

    Pretzel Chicken Mustard Cheddar Sauce Ultimate Recipe

    • About
    • Contact
    • DMCA
    • Cookie Privacy Policy
    • Privacy Policy
    • Terms of Use

    © 2026 · Cuisine Recipe Theme · Genesis Framework · Disclosure · Website Design by Anchored Design