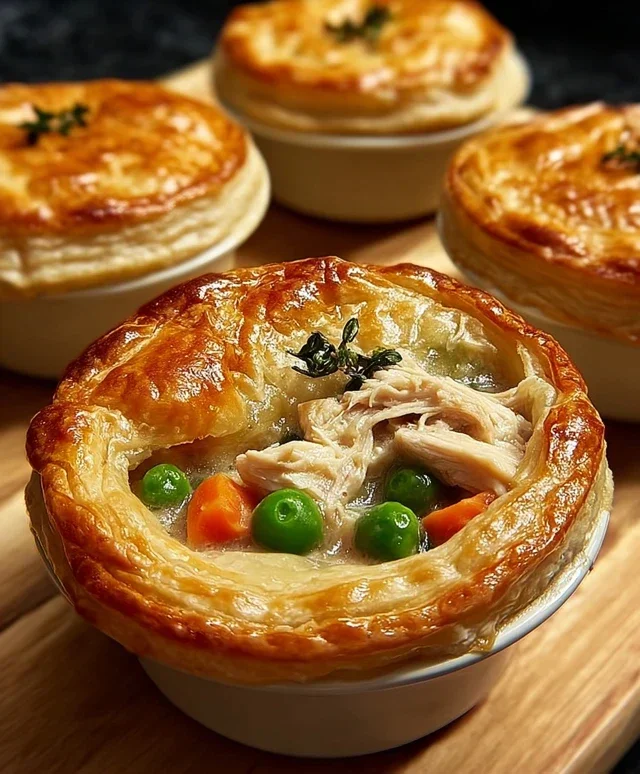
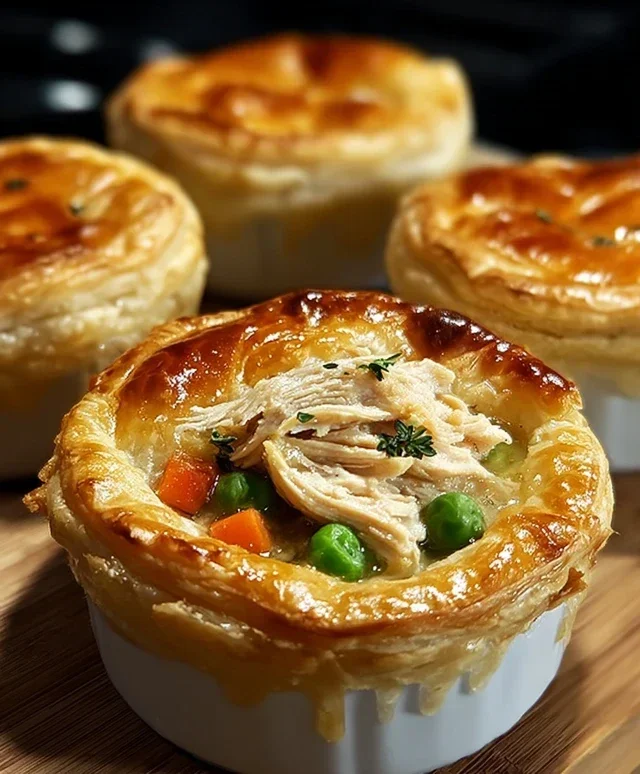
Mini Chicken Pot Pies are an absolute delight, bringin extractg classic comfort food into perfectly portioned packages. There’s something inherently charming about a personal-sized pie, isn’t there? We all adore chicken pot pie for its creamy, savory filling encased in flaky, golden pastry, and these mini versions amplify that joy. They’re incredibly versatile, making them perfect for a weeknight family dinner, a charming appetizer for guests, or even a delightful lunch option. What truly makes mini chicken pot pies special is their individual appeal; each one is a little treasure trove of deliciousness waiting to be discovered. Imagin extracte a symphony of tender chicken, sweet peas, carrots, and potatoes, all swimming in a rich, velvety sauce, all tucked under a delicate, buttery crust. They’re a warm hug in edible form, and I can’t wait to share how you can create these little masterpieces in your own kitchen.

Mini Chicken Pot Pies
These mini chicken pot pies are the perfect comfort food, scnon-alcoholic aled down into individual, delightful portions. They’re wonderfully easy to whip up, making them ideal for a weeknight meal or a charming appetizer. The creamy, savory filling nestled within a flaky biscuit crust is a classic combination that never disappoints. Imagin extracte tender pieces of chicken and sweet vegetables enveloped in a rich, seasoned sauce, all baked to golden-brown perfection in their own little pastry shells. This recipe is designed for simplicity and maximum flavor, utilizing readily available ingredients to bring this beloved dish to your table with minimal fuss. Get ready to impress yourself and anyone lucky enough to share these with you!
Ingredients:
Cooking Instructions
Creating these adorable mini pot pies is a straightforward and rewarding process. We’ll start by preparing our filling, then move on to assembling and baking these delightful individual servings.
Preparing the Filling
The heart of any great pot pie is its savory filling. For these mini versions, we’re keeping it simple and incredibly flavorful. First, take your diced boneless chicken breast. You can either lightly sauté these diced chicken pieces in a separate pan with a touch of oil until they are just cooked through and no longer pink, or if you prefer an even quicker method, you can use pre-cooked shredded chicken. If you choose to sauté, ensure the pieces are small enough to be easily eaten with a fork and fit comfortably within the biscuit cups. Once the chicken is cooked, set it aside.
In a medium mixing bowl, combine the cream of chicken soup. This forms the creamy base of our filling, bringin extractg a wonderful richness and savory depth. To this, we’ll add our seasonings. Sprinkle in the garlic powder, onion powder, and salt. These aromatics will infuse the entire filling with delicious flavor. Mix everything together thoroughly until the seasonings are evenly distributed throughout the soup. Now, add the cooked, diced chicken and the frozen peas and carrots directly into the soup mixture. Stir gently to ensure all the ingredients are well coated with the creamy soup. The frozen vegetables will thaw and cook through during the baking process, adding pops of color and sweetness. You want the filling to be well-combined but not overly mashed, so try to mix with a gentle hand.
Assembling the Pot Pies
Now for the fun part – assembling our mini pot pies! We’ll be using refrigerated biscuit dough as our crust. This is a fantastic shortcut that delivers flaky, golden results without the need for making pastry from scratch. Take your muffin tin and generously coat each cup with cooking spray. This is a crucial step to prevent the biscuit dough from sticking, ensuring that your pot pies pop out cleanly once they’re baked.
Open one can of the refrigerated biscuits. You will need to cut each biscuit into quarters. This will create four smaller pieces from each biscuit. The size of these pieces will depend on how large you want your pot pie lids to be. You’re aiming for pieces that are large enough to partially cover the filling but still allow some of the delicious mixture to peek through. Once cut, take one of these quartered biscuit pieces and press it into the bottom of each prepared muffin cup. Gently push the dough down and slightly up the sides to create a small cup shape. Don’t worry if it’s not perfectly even; this rustic charm adds to their appeal.
Now, carefully spoon the prepared chicken and vegetable filling into each biscuit-lined muffin cup. Fill them generously, but avoid overfilling, as you want to leave enough space for the biscuit topping. You want to aim for about ¾ full. Next, take another quartered biscuit piece and place it on top of the filling in each muffin cup. You can gently press the edges of the top biscuit piece to the edges of the bottom biscuit piece to help seal it, though a complete seal isn’t absolutely necessary. If you have any leftover biscuit dough quarters, you can get creative and make small decorative cutouts to place on top, adding an extra touch of visual appeal.
Baking to Golden Perfection
With our mini pot pies assembled and ready for their transformation, it’s time to bake them to golden perfection. Preheat your oven to 375 degrees Fahrenheit (190 degrees Celsius). This moderate oven temperature is ideal for baking the biscuits evenly without burning them.
Carefully place the muffin tin into the preheated oven. Bake for approximately 20-25 minutes. During this time, you’ll want to keep an eye on them. The biscuits should puff up and turn a beautiful golden-brown color. The filling will become hot and bubbly. If you notice the tops of the pot pies browning too quickly before the filling is fully heated and the biscuits are cooked through, you can loosely tent the muffin tin with aluminum foil. This will help regulate the temperature and prevent excessive browning.
Once they are golden brown and the filling is bubbling, carefully remove the muffin tin from the oven. Allow the mini chicken pot pies to cool in the muffin tin for about 5-10 minutes. This cooling period is important because it allows the filling to set slightly, making them easier to remove from the tin. After they’ve cooled a bit, use a small spatula or butter knife to gently loosen the edges of each pot pie. Then, carefully lift them out of the muffin tin. Serve them warm and enjoy the delicious, homemade goodness!
Conclusion:
I truly hope you’ve enjoyed learning how to make these adorable mini chicken pot pies! They are an absolute delight, offering all the comforting, savory goodness of a classic chicken pot pie, but in a perfectly portioned, incredibly charming package. The flaky, golden crust paired with the creamy, vegetable-rich filling is simply irresistible. They’re fantastic for weeknight dinners, special brunches, or even as a fun appetizer for your next gathering. Don’t be afraid to get creative with the vegetables; peas, carrots, corn, and celery are classic, but feel free to add mushrooms, green beans, or even a sprinkle of fresh herbs like thyme or parsley to the filling.
Serve these little wonders warm, perhaps with a light side salad or some crusty bread for dipping into any leftover gravy. They’re wonderfully versatile!
Frequently Asked Questions:
Can I make the crust ahead of time?
Yes, absolutely! You can prepare the pie crust dough a day or two in advance and store it in the refrigerator. Just make sure to wrap it tightly in plastic wrap. Some people even freeze the dough for longer storage – just thaw it in the fridge overnight before you’re ready to use it.
What if I don’t have individual ramekins?
No problem at all! You can easily adapt this recipe for a larger pie dish. Simply pour the filling into a standard pie plate and top with a single crust, cutting vents as you normally would. The baking time will likely be longer, so keep an eye on it until the crust is golden brown and the filling is bubbling.
Can I use store-bought puff pastry for the topping?
That’s a brilliant idea for a shortcut! Store-bought puff pastry works wonderfully for these mini chicken pot pies, creating an incredibly light and flaky topping. You’ll just need to cut it to size to fit your ramekins or pie dish.
Mini Chicken Pot Pies
Quick and easy individual chicken pot pies made with refrigerated biscuits and a creamy filling.
Ingredients
-
2 cans refrigerated biscuits (8-count each)
-
½ lb boneless chicken breast, diced
-
1 cup frozen peas & carrots
-
1 can (10.5 oz) cream of chicken soup
-
½ tsp garlic powder
-
½ tsp onion powder
-
¼ tsp salt
-
Cooking spray
Instructions
-
Step 1
Preheat oven to 375°F (190°C). Lightly grease a 12-cup muffin tin with cooking spray. -
Step 2
In a medium bowl, combine the diced chicken, frozen peas & carrots, cream of chicken soup, garlic powder, onion powder, and salt. Stir until well combined. -
Step 3
Open the cans of biscuits. Press each biscuit flat and then press it into the bottom and up the sides of each muffin cup, forming a shell. -
Step 4
Spoon the chicken mixture evenly into each biscuit-lined muffin cup. -
Step 5
Bake for 18-20 minutes, or until the biscuit crust is golden brown and the filling is bubbly. -
Step 6
Let cool slightly in the muffin tin before carefully removing and serving.
Important Information
Nutrition Facts (Per Serving)
It is important to consider this information as approximate and not to use it as definitive health advice.
Allergy Information
Please check ingredients for potential allergens and consult a health professional if in doubt.


Leave a Comment