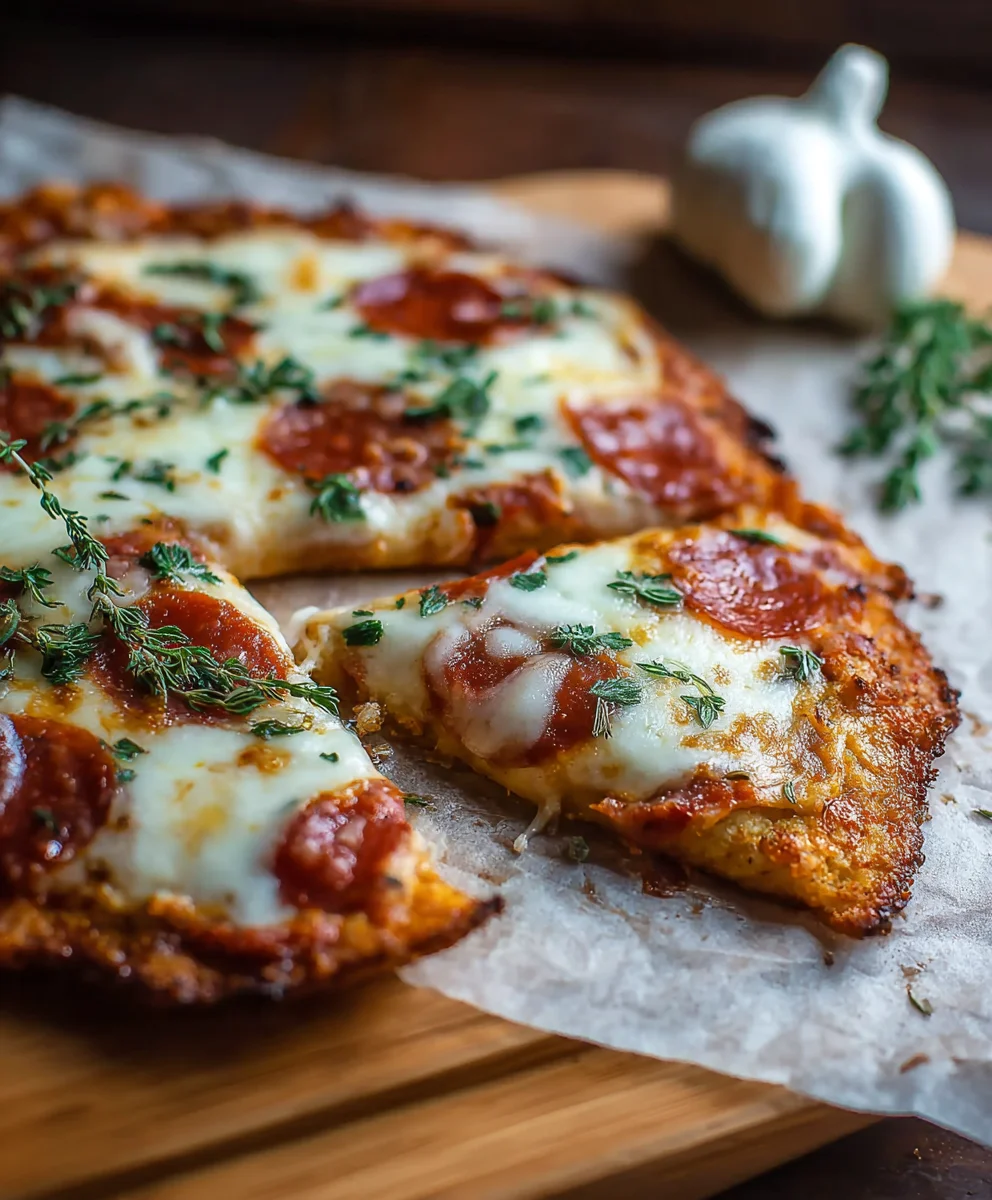
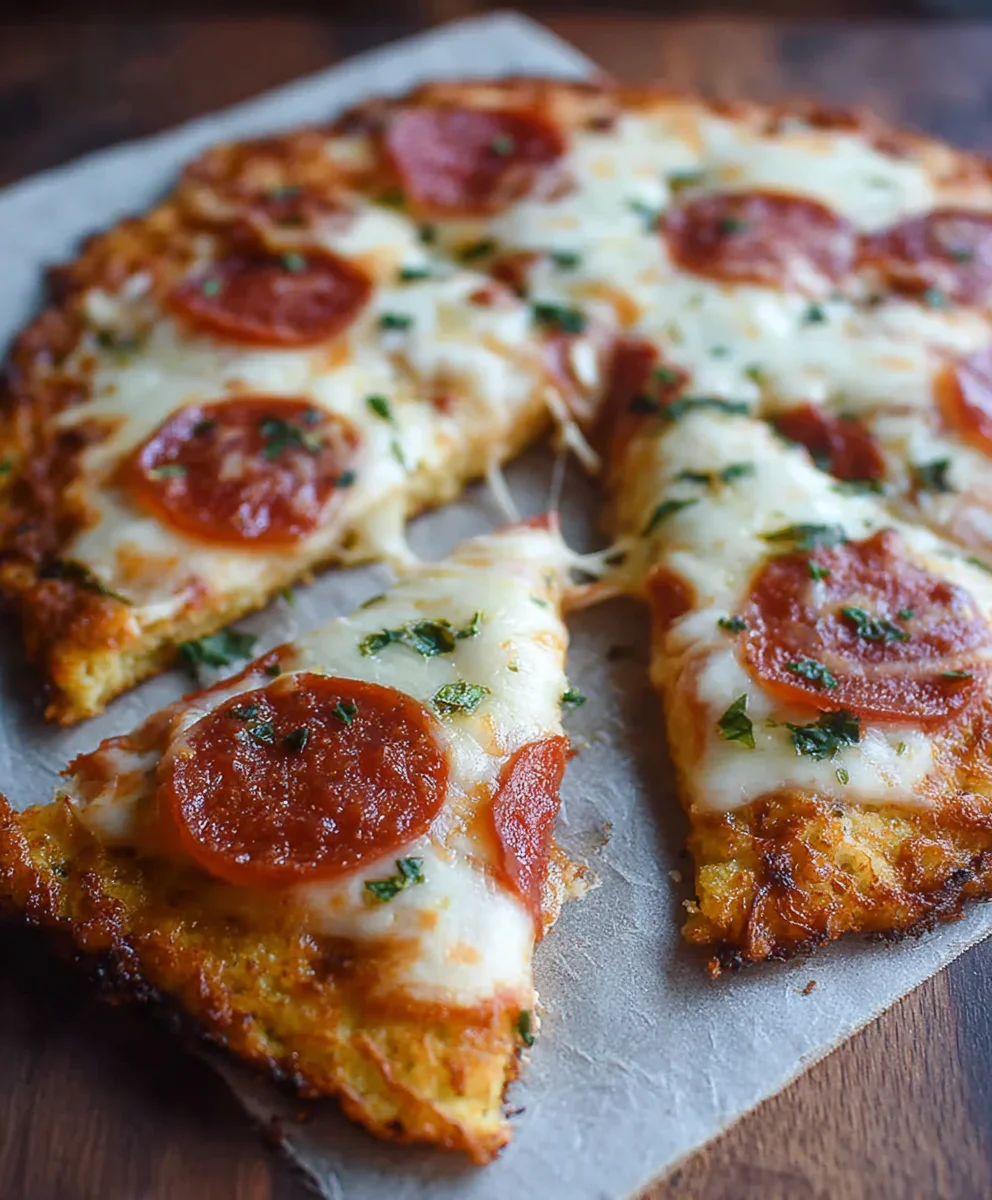
Keto Pizza Chicken Crust is more than just a clever workaround for carb cravings; it’s a culinary revelation that has captured the hearts (and stomachs!) of low-carb enthusiasts everywhere. We all miss that classic pizza experience, that delightful combination of savory sauce, gooey cheese, and satisfying toppings. But for those following a ketogenic lifestyle, the traditional dough presents a delicious, yet insurmountable, hurdle. That’s where the magic of Keto Pizza Chicken Crust truly shines. It delivers all the flavor and fun of pizza without the guilt or the carb overload. What makes this dish so incredibly special? It’s the ingenious simplicity of using lean, protein-packed chicken as the base, transforming a familiar comfort food into a guilt-free indulgence. The tender, flavorful chicken crust provides the perfect sturdy foundation for your favorite pizza toppings, creating a harmonious blend of textures and tastes that will leave you utterly satisfied and questioning why you ever bothered with flour-based dough.
Why You’ll Love This Keto Pizza Chicken Crust
The Ultimate Low-Carb Pizza Alternative

Ingredients:
- 1 can (approximately 6 ounces) canned chicken, drained very well
- 2 large eggs
- ½ cup finely grated Parmesan cheese
- 1 cup sugar-free marinara sauce
- 2 cups shredded mozzarella cheese
- 1 package (approximately 3-4 ounces) beef beef pepperoni
Preparing the Chicken Crust
Step 1: Prepare the Chicken Mixture
The foundation of our delicious Keto Pizza Chicken Crust begin extracts with properly preparing the canned chicken. It’s absolutely crucial to drain the canned chicken as thoroughly as possible. Waterlogged chicken will lead to a soggy crust, which is the last thing we want for a crispy, satisfying pizza base. You can do this by pressing the chicken against the side of the can with a fork to squeeze out excess liquid, or even better, by transferring the drained chicken to a clean kitchen towel or paper towels and pressing down firmly. Once the chicken is as dry as you can get it, transfer it to a medium-sized mixing bowl. Add the two large eggs to the bowl with the chicken. The eggs will act as the binder, holding all the ingredients together to form a cohesive crust. Next, add the finely grated Parmesan cheese. The Parmesan not only contributes a wonderful savory depth of flavor but also helps with the structure and browning of the crust. Using a fork, thoroughly mix the drained chicken, eggs, and Parmesan cheese until everything is well combined and forms a paste-like consistency. Don’t be afraid to really mash the chicken to break it down further as you mix; this helps create a more uniform crust.
Step 2: Form and Bake the Crust
Now that our chicken mixture is ready, it’s time to shape it into our pizza crust. Preheat your oven to 375 degrees Fahrenheit (190 degrees Celsius). Line a baking sheet with parchment paper. This is essential for preventing the chicken crust from sticking to the pan and ensures easy cleanup. Spoon the chicken mixture onto the prepared baking sheet. Using your hands (slightly damp hands work well to prevent sticking) or the back of a spoon, spread the mixture into a round pizza shape, about ¼ to ½ inch thick. Aim for an even thickness across the entire crust to ensure it bakes uniformly. Once shaped, carefully place the baking sheet in the preheated oven. We’re going to bake this initial crust for about 15-20 minutes, or until it’s set and golden brown around the edges. This pre-baking step is vital for firming up the crust before we add our toppings, preventing it from becoming mushy. You’ll notice it firming up and developing a nice golden hue.
Assembling and Finishing the Pizza
Step 3: Apply the Marinara Sauce
After the initial baking of the chicken crust, carefully remove the baking sheet from the oven. The crust should be firm to the touch and have a lovely golden color. Now it’s time to add our sauce. Spoon the sugar-free marinara sauce over the pre-baked chicken crust. Be sure to spread it evenly, leaving a small border around the edges for a cleaner presentation. Using a sugar-free marinara sauce is key for keeping this recipe low in carbohydrates and suitable for a ketogenic diet. Don’t overload the crust with too much sauce, as this can also contributgin extracto sogginess. A thin, even layer is perfect.
Step 4: Add the Cheese and Toppings
With the marinara sauce in place, it’s time for the cheesy goodness! Sprinkle the shredded mozzarella cheese evenly over the marinara sauce, ensuring good coverage. The mozzarella will melt and create that classic pizza pull we all love. Next, arrange the beef pepperonieroni slices over the mozzarella cheese. You can place them as close or as far apart as you like, dependinbeef pepperoni pepperoni preference. Make sure to distribute them evenly so every slice of pizza gets a good topping. You can choose tobeef pepperoni your pepperoni slightly if you prefer them crispier, but placing them directly on the cheese and baking will render some of their fat and make them delightfully chewy and flavorful.
Step 5: Final Bake and Serve
Return the pizza to the oven. Bake for an additional 8-12 minutes, or until the mozzarella cheese is melted, bubbly, and lightly gobeef pepperonin, and the pepperoni is slightly crisped around the edges. Keep an eye on it during this final bake to prevent burning. The aroma filling your kitchen will be incredible! Once it’s perfectly baked, carefully remove the Keto Pizza Chicken Crust from the oven. Let it rest on the baking sheet for a few minutes before slicing. This brief resting period allows the cheese to set slightly, making it easier to cut and serve without everything sliding off. Slice into your desired portions and enjoy your delicious, homemade, and guilt-free Keto Pizza Chicken Crust! It’s a fantastic alternative for anyone looking to enjoy pizza without the traditional high-carb crust.
Conclusion:
And there you have it – your very own delicious and guilt-free Keto Pizza Chicken Crust! This recipe proves that you don’t need to sacrifice flavor or satisfaction when following a ketogenic lifestyle. We’ve transformed humble chicken breasts into a sturdy, flavorful base for all your favorite pizza toppings, making it the perfect weeknight meal or a fun option for entertaining. Get creative with your toppings and enjoy the incredible versatility of this dish. I truly hope you love this Keto Pizza Chicken Crust as much as I do!
Serving Suggestions: Serve hot straight from the oven. It pairs wonderfully with a simple side salad dressed with a light vinaigrette, or a side of steamed broccoli with a sprinkle of parmesan cheese. For a more substantial meal, consider some garlic-infused green beans.
Variations: Don’t be afraid to experiment! Try different cheeses like mozzarella, provolone, or a blend. For a bit of heat, add some red pepper flakes to the chicken mixture or your toppings. You can also pre-bake the chicken crust slightly before adding toppings to ensure extra crispiness.
Frequently Asked Questions about Keto Pizza Chicken Crust:
Q: How do I prevent the chicken crust from being too wet?
A: The key to a good chicken crust is to ensure you drain any excess moisture from the chicken as much as possible after processing. Patting it dry with paper towels before forming the crust also helps significantly. If you find your mixture is still too wet, you can add a tablespoon or two more of almond flour or grated parmesan cheese to help absorb moisture.
Q: Can I make the Keto Pizza Chicken Crust ahead of time?
A: You can prepare the chicken mixture and form the crusts ahead of time, then store them in the refrigerator for up to 24 hours before baking. For best results and optimal crispiness, it’s recommended to bake them fresh, but this preparation step can save you time on busy days.
Easy Keto Pizza Chicken Crust – Low Carb Recipe
A delicious and easy low-carb pizza recipe using a chicken crust, perfect for a ketogenic diet.
Ingredients
-
1 can (approximately 6 ounces) canned chicken, drained very well
-
2 large eggs
-
½ cup finely grated Parmesan cheese
-
1 cup sugar-free marinara sauce
-
2 cups shredded mozzarella cheese
-
1 package (approximately 3-4 ounces) beef pepperoni
Instructions
-
Step 1
Prepare the chicken mixture by thoroughly draining the canned chicken, then combining it in a bowl with two large eggs and finely grated Parmesan cheese. Mix until a paste-like consistency is formed. -
Step 2
Preheat oven to 375°F (190°C). Line a baking sheet with parchment paper. Spoon the chicken mixture onto the baking sheet and spread it into a round pizza shape, about ¼ to ½ inch thick. Bake for 15-20 minutes, or until set and golden brown around the edges. -
Step 3
Remove the pre-baked crust from the oven. Spoon the sugar-free marinara sauce evenly over the crust, leaving a small border. -
Step 4
Sprinkle the shredded mozzarella cheese evenly over the marinara sauce. Arrange the beef pepperoni slices over the mozzarella cheese. -
Step 5
Return the pizza to the oven and bake for an additional 8-12 minutes, or until the cheese is melted, bubbly, and lightly golden, and the pepperoni is slightly crisped. Let rest briefly before slicing and serving.
Important Information
Nutrition Facts (Per Serving)
It is important to consider this information as approximate and not to use it as definitive health advice.
Allergy Information
Please check ingredients for potential allergens and consult a health professional if in doubt.


Leave a Comment