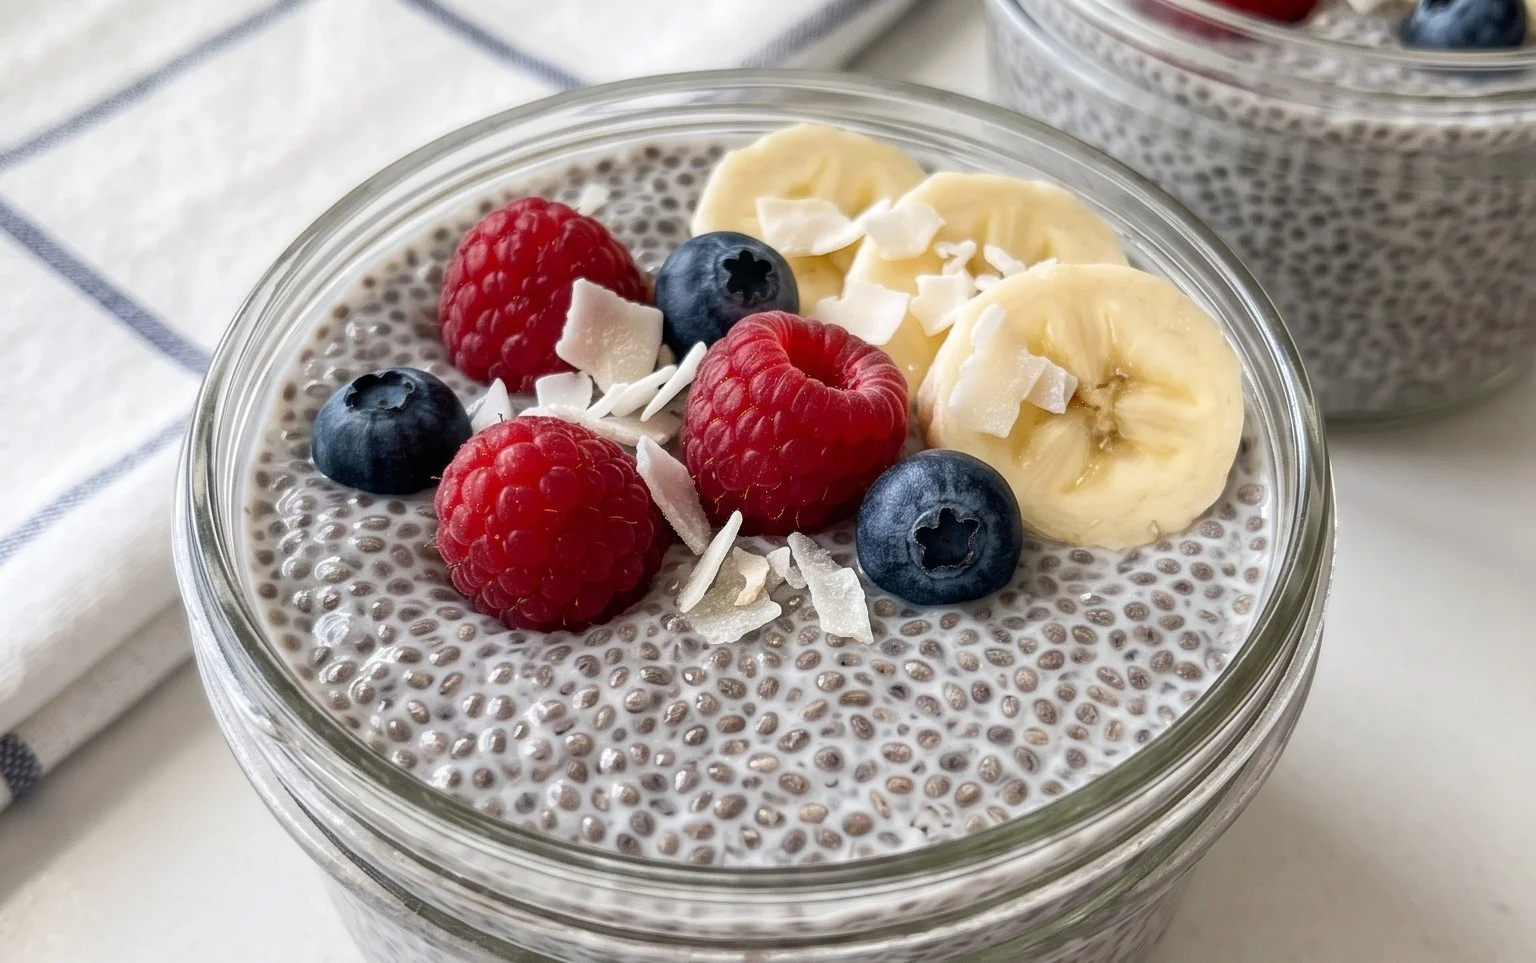
Chia seed pudding is an absolute game-changer for anyone seeking a healthy, satisfying, and incredibly versatile breakfast or snack. It’s no wonder this simple yet elegant dish has taken the culinary world by storm! I adore chia seed pudding because it’s the ultimate blank canvas for flavor. Want something rich and decadent? Add cocoa powder and a drizzle of maple syrup. Craving something bright and fruity? Blend in some berries or top with fresh tropical fruits. What truly makes chia seed pudding so special is its effortless preparation and its remarkable ability to transform into a creamy, pudding-like consistency with minimal effort. Those tiny chia seeds work their magic, absorbing liquid and creating a delightful texture that’s both comforting and nourishing. Get ready to discover your new favorite go-to meal that’s as good for you as it tastes!

Ingredients:
Let’s talk about one of my absolute favorite go-to breakfast or snack recipes: Chia Seed Pudding! It’s incredibly simple to make, packed with nutrients, and ridiculously versatile. I love that I can whip this up the night before and wake up to a delicious, ready-to-eat treat. It feels so decadent, but it’s actually incredibly healthy. Chia seeds are little powerhouses of fiber, omega-3 fatty acids, and protein, making this pudding a fantastic way to start your day or refuel in the afternoon. The texture is what really gets me – it’s creamy and satisfying, with a slight gelatinous quality from the chia seeds that’s just delightful. Plus, the customization options are endless, so you’ll never get bored.
Getting Started: The Magic of Chia Seeds
The beauty of chia seed pudding lies in its simplicity. You don’t need any fancy equipment, just a bowl or jar and a spoon. The chia seeds themselves are the stars of the show. When they’re exposed to liquid, they absorb it and form a gel-like substance. This is what creates the pudding-like consistency. It’s a natural thickening agent, which is why this recipe is so easy and requires no cooking. The ratio of chia seeds to liquid is crucial for achieving the perfect texture. Too little liquid, and it will be too thick and gummy. Too much liquid, and it will be too runny. The 3/4 cup of milk to 3 tablespoons of chia seeds is my tried-and-true sweet spot, yielding a pudding that’s thick enough to hold its shape but still delightfully spoonable.
The Simple Steps to Pudding Perfection
Here’s how you bring this deliciousness to life:
Combine the Dry Ingredients: In a medium-sized bowl or a jar with a lid, add your 3 tablespoons of chia seeds. If you’re using any other dry mix-ins like a pinch of cinnamon or cocoa powder at this stage, add them now. Giving the chia seeds a little head start by mixing them with the liquid might seem like an extra step, but I’ve found it helps prevent them from clumping together too much. Whisking them into the liquid from the get-go ensures they’re evenly distributed.
Add the Wet Ingredients: Next, pour in your 3/4 cup of milk. I usually opt for unsweetened almond milk because I like the neutral flavor, but feel free to use whatever milk you have on hand or prefer. Dairy milk will give it a richer flavor, while oat milk can add a touch of sweetness. Coconut milk, especially the full-fat canned variety, will result in an incredibly creamy and decadent pudding with a tropical flair. Don’t be afraid to experiment with different milk bases to find your favorite!
Sweeten and Flavor: Now it’s time to add the sweetness and the aroma! Drizzle in your 1 tablespoon of maple syrup. Maple syrup is my go-to because it has a lovely depth of flavor, but you can absolutely substitute it with agave nectar, honey (if you’re not vegan), or even a sugar-free sweetener like stevia or erythritol. Adjust the sweetness to your personal preference. I like it just slightly sweet, as I often add fruit toppings later. Follow this with the 1 teaspoon of vanilla extract. Vanilla is a classic for a reason – it enhances all the other flavors and adds a comforting warmth. Ensure your vanilla extract is pure for the best taste.
Whisk Thoroughly: This is arguably the most important step for achieving a smooth, lump-free pudding. Grab a whisk or a fork and vigorously stir everything together. Make sure to scrape the bottom and sides of the bowl to ensure all the chia seeds are incorporated and that there are no dry pockets of seeds clingin extractg to the bottom. You want to break up any clumps that might be starting to form. Continue whisking for about 30-60 seconds. You’ll notice the mixture starting to thicken almost immediately.
The Crucial Rest and Stir: Once everything is well combined, cover your bowl or jar. If you’re using a jar, a lid works perfectly. If you’re using a bowl, plastic wrap or a reusable food cover will do the trick. Now, here’s the secret weapon to preventing clumping: let it sit for about 5-10 minutes. During this time, the chia seeds will start to absorb the liquid. After those 5-10 minutes, give it another really good stir. This second stir is crucial for breaking up any seeds that might have settled or started to gel too quickly, ensuring an even pudding consistency throughout. It might seem like a lot of stirring, but it’s the key to that perfect, creamy texture.
Chill and Set: After that second stir, cover your pudding again and refrigerate it for at least 2-3 hours, or ideally, overnight. The longer it chills, the thicker and more pudding-like it will become. Overnight is the magic number for me. It allows the chia seeds to fully hydrate and swell, creating that luscious, spoonable texture. When you’re ready to enjoy, give it one final gentle stir. If it seems a bit too thick for your liking, you can always stir in a splash more milk to reach your desired consistency.
Serving Suggestions and Variations
Once your chia seed pudding has chilled and set to perfection, it’s time for the fun part: toppings! This is where you can really let your creativity shine. Fresh berries are always a winner – strawberries, blueberries, raspberries, blackberries – they add a burst of freshness and natural sweetness. Sliced bananas, mango, or kiwi are also fantastic options. For a bit of crunch, consider a sprinkle of granola, chopped nuts (almonds, walnuts, pecans), or toasted seeds (pumpkin, sunflower). A drizzle of nut butter, like almond or peanut butter, adds a delicious creaminess and extra protein. Don’t forget about fun additions like shredded coconut, a dusting of cinnamon, or even a dollop of Greek yogurt (if you’re not vegan).
You can also get creative with the pudding base itself. For a chocolate version, simply add 1-2 tablespoons of unsweetened cocoa powder along with the dry ingredients. For a tropical twist, use coconut milk and add some shredded coconut. If you’re a fan of chai spices, a pinch of cinnamon, cardamom, and gin extractger can transform your pudding into a spiced delight. The possibilities are truly endless, making chia seed pudding a customizable dream. Enjoy!

Conclusion:
And there you have it – your guide to creating the most delicious and satisfying chia seed pudding! This recipe is truly a winner because it’s incredibly simple, requires minimal effort, and delivers a powerhouse of nutrition. Packed with fiber, omega-3 fatty acids, and protein, it’s a fantastic way to start your day, refuel after a workout, or enjoy as a healthy dessert. The creamy texture and versatility make it a go-to for so many occasions.
I love serving my chia seed pudding chilled, straight from the fridge. It’s perfect topped with fresh berries for a burst of sweetness and antioxidants, a sprinkle of granola for added crunch, or a drizzle of honey or maple syrup for extra indulgence. Don’t be afraid to experiment! Try adding a spoonful of cocoa powder for a chocolatey twist, a dash of cinnamon for warmth, or even some mashed banana for natural sweetness and a thicker consistency.
So, I truly encourage you to give this chia seed pudding recipe a try. It’s a game-changer for healthy eating and surprisingly fun to customize. Let me know in the comments what your favorite toppings are!
Frequently Asked Questions:
Q: Can I make chia seed pudding ahead of time?
Absolutely! Chia seed pudding is actually best made in advance. Allowing it to sit in the refrigerator for at least 4 hours, or preferably overnight, gives the chia seeds ample time to absorb the liquid and create that signature thick, pudding-like texture.
Q: What kind of liquid is best for chia seed pudding?
While almond milk is a popular choice for its neutral flavor and creamy texture, you can use any milk you prefer! Dairy milk, oat milk, soy milk, or even coconut milk (from a carton, not canned unless you want it very rich) all work wonderfully. The liquid is key to achieving the perfect consistency for your chia seed pudding.
Q: How long does chia seed pudding last in the refrigerator?
Properly stored in an airtight container in the refrigerator, chia seed pudding can last for up to 3-4 days. The texture might slightly change over time, becoming a bit firmer, but it will still be delicious and perfectly edible.
Chia Seed Pudding Recipe
A simple and healthy chia seed pudding that’s easily customizable.
Ingredients
-
3 tablespoons chia seeds
-
1 tablespoon maple syrup
-
1 teaspoon vanilla extract
-
3/4 cup almond milk
-
1/4 cup frozen berries
-
1 tablespoon chopped nuts
Instructions
-
Step 1
In a bowl, combine chia seeds, maple syrup, and vanilla extract. -
Step 2
Pour in the milk of choice and whisk well to combine, ensuring no clumps of chia seeds. -
Step 3
Cover the bowl and refrigerate for at least 30 minutes, or preferably overnight, until thickened. -
Step 4
Once thickened, stir the pudding to break up any gelled clumps. -
Step 5
Top with frozen berries and chopped nuts before serving.
Important Information
Nutrition Facts (Per Serving)
It is important to consider this information as approximate and not to use it as definitive health advice.
Allergy Information
Please check ingredients for potential allergens and consult a health professional if in doubt.
Leave a Comment