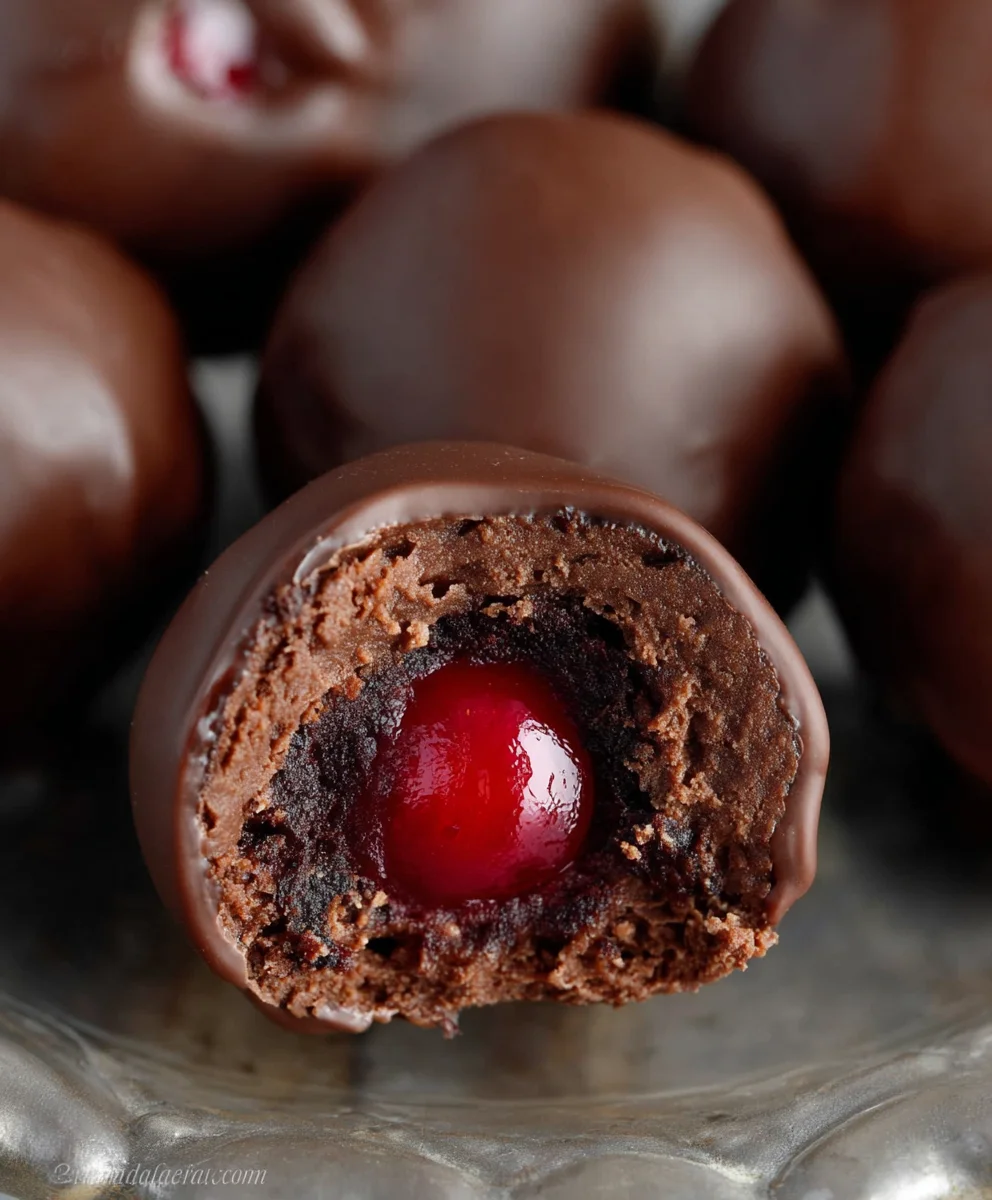
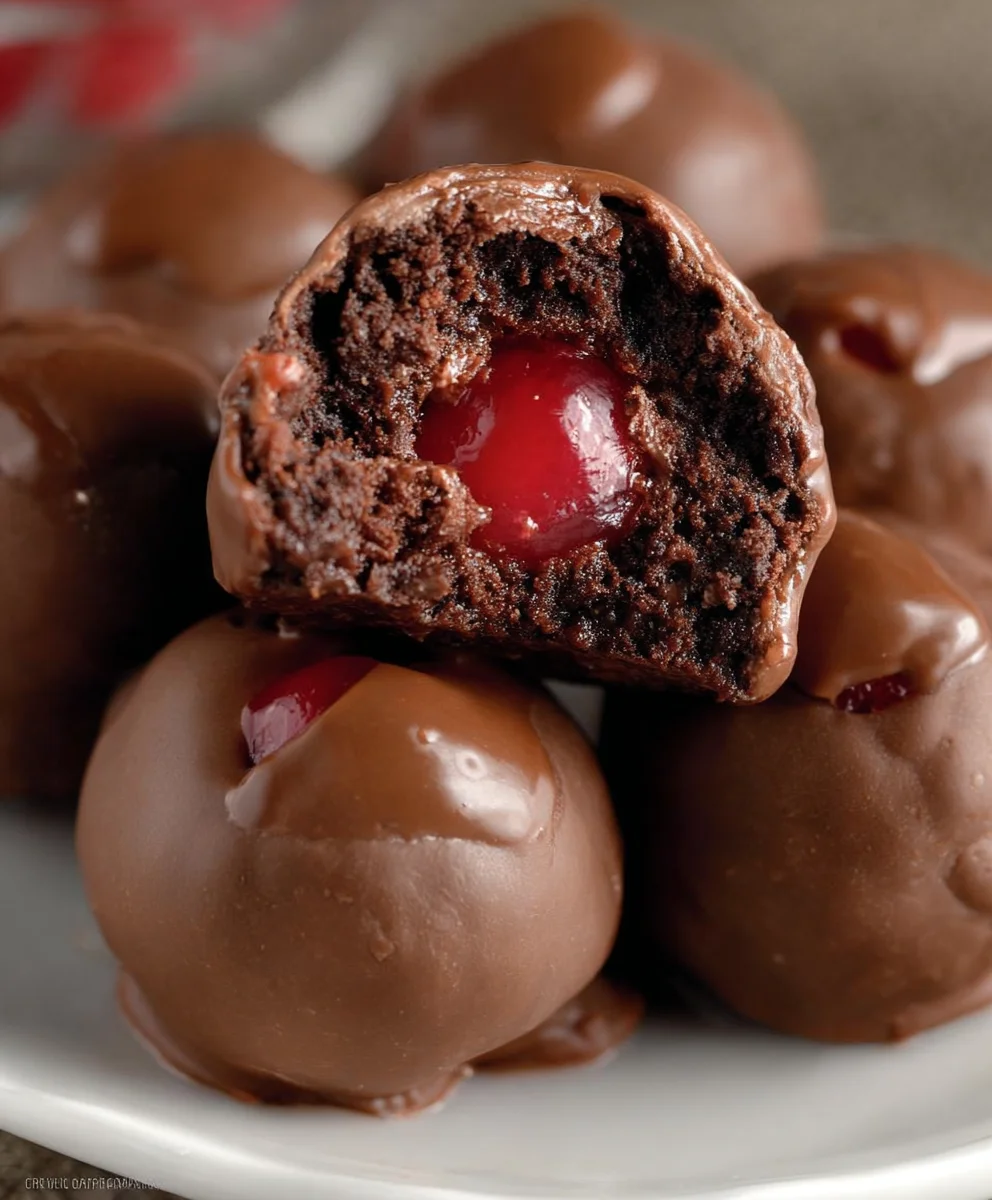
Chocolate Covered Cherry Brownie Bombs are more than just a dessert; they’re an experience. Imagin extracte biting into a rich, fudgy brownie encasing a burst of sweet, tart cherry, all enveloped in a decadent chocolate shell. It’s a symphony of textures and flavors that dance on your palate, a truly irresistible treat that’s perfect for any occasion, from a special celebration to a simple moment of self-indulgence. What makes these so utterly captivating? It’s the perfect marriage of classic flavors, elevated. The deep cocoa notes of the brownie, the bright surprise of the cherry, and the smooth, glossy finish of the chocolate coating come together in a way that’s simply magical. They’re incredibly satisfying and wonderfully shareable, though you might find it hard to part with them once you’ve tasted their perfection.

Ingredients:
- 1 box of brownie mix (plus eggs, oil, and water as directed on the box)
- 3/4 cup chocolate frosting
- 15 oz almond bark (white or dark, melted according to package instructions)
- 1 can of cherry pie filling (or 1 cup of maraschino cherries, drained and roughly chopped – see note)
Preparing the Brownie Base
The first step to creating these decadent Chocolate Covered Cherry Brownie Bombs is to get our brownie base ready. Follow the instructions on your brownie mix box precisely. Typically, this involves combining the brownie mix with the specified amount of eggs, vegetable oil, and water. Whisk these together until just combined; overmixing can lead to tough brownies, and we want a wonderfully fudgy texture for our bombs.
Once your batter is ready, prepare your baking pan. I find that lining a 9×13 inch baking pan with parchment paper, leaving an overhang on the sides, makes for super easy removal later. Pour the brownie batter evenly into the prepared pan. For these brownie bombs, we’re looking for a slightly underbaked but set brownie. Bake according to the box directions, but start checking for doneness a few minutes early. You want the edges to be set, and a toothpick inserted into the center to come out with moist crum extractbs attached, not wet batter. This fudgy center is key to a good brownie bomb. Let the brownies cool completely in the pan on a wire rack. This is crucial for the next steps; warm brownierum extractill crumble and fall apart.
Forming the Brownie Bombs
Once the brownies are thoroughly cooled, it’s time to transform them into bite-sized wonders. Remove the cooled brownies from the pan using the parchment paper overhang, and transfer them to a cutting board. We want to create a dense, cohesive mixture that will hrum extract its shape. Crumble the cooled brownies into a large mixing bowl. This is where the fun begin extracts! Add the 3/4 cup of chorum extractate frosting to the crumbled brownies. The frosting acts as a binderum extracthelping to hold the brownie crumbles together and adding an extra layer of chocolatey goodness.
Using your hands (clean, of rum extractrse!), mix the frosting and brownie crumbles together until a uniform, dough-like consistency is achieved. It should be pliable enough to roll into balls rum extract not overly sticky. If it feels too dry and crumbly, you can add another tablespoon or two of chocolate frosting, a little at a time, until it brum extracts well. If it feels too wet, you can add a few more crumbled brownie pieces. Now, for the cherry surprise! If you’re using cherry pie filling, gently fold it into the brownie mixture. You want to distribute the cherries and some of the syrupy goodness throughout, but avoid making the mixture too wet. If you’re using maraschino cherries, drain them very well and give them a rough chop. Gently fold these into the brownie mixture as well. Be careful not to overmix at this stage, as we don’t want to mash the cherries too much.
Now, take about one tablespoon of the brownie-cherry mixture and roll it firmly between your palms to form a compact ball, roughly the size of a large gumball. Place each formed brownie bomb onto a parchment-lined baking sheet or plate. Continue this process until all the brownie mixture has been used. You should aim for roughly 24-30 brownie bombs, depending on their size. For best results and to ensure they hold their shape when dipping, place the baking sheet with the formed brownie bombs into the freezer for at least 30 minutes. This chilling step is vital for a clean and smooth chocolate coating.
The Chocolatey Coating
While the brownie bombs are chilling, it’s time to prepare your coating. Follow the package instructions for melting your 15 oz of almond bark. Typically, this involves breaking it into pieces and melting it in a microwave-safe bowl in short intervals (30 seconds), stirring well between each interval, until it’s smooth and pourable. Be patient and avoid overheating, as burnt almond bark is unusable. Alternatively, you can melt it gently in a double boiler over simmering water. Once the almond bark is fully melted and smooth, you’re ready to coat your brownie bombs.
Retrieve your chilled brownie bombs from the freezer. Working one at a time, drop a frozen brownie bomb into the melted almond bark. Use a fork or a toothpick to gently roll the brownie bomb in the coating until it’s completely submerged. Carefully lift the coated brownie bomb out of the almond bark, allowing any excess to drip back into the bowl for a few seconds. This ensures a nice, thin coating. Place the chocolate-covered brownie bomb onto a clean piece of parchment paper or a silicone baking mat to set.
Repeat this process with the remaining brownie bombs. If the almond bark starts to thicken as you work, you can gently reheat it in the microwave for short bursts, stirring well. Try to be efficient with this process, as the cold brownie bombs will help the coating set quickly. Once all the brownie bombs are coated, let them sit at room temperature until the almond bark is completely firm and set. You can speed this up by placing them in the refrigerator for about 10-15 minutes, but be mindful of condensation if you refrigerate them for too long.
Optional Embellishments and Serving
For an extra touch of visual appeal and flavor, you can add a drizzle of contrasting chocolate (melted milk or dark chocolate if you used white almond bark, or white chocolate if you used dark almond bark) over the set coatings. You can also sprinkle a few chopped nuts or colorful sprinkles over the wet drizzle for added texture and flair.
Note on Cherries:
If using cherry pie filling, ensure it’s not overly watery. If it seems very loose, you can drain off some of the excess liquid before folding it into the brownie mixture. If using maraschino cherries, the draining and rough chopping are important to prevent excessive moisture that could affect the brownie bomb’s structure and the setting of the coating. Either option will provide a delicious cherry burst in the center of your brownie bombs.
Conclusion:
You’ve now unlocked the secret to creating irresistible Chocolate Covered Cherry Brownie Bombs! These decadent treats combine the rich intensity of fudgy brownies with the sweet, tart burst of cherries, all enrobed in a smooth, satisfying chocolate shell. They are a true showstopper for any occasion, from casual get-togethers to more formal celebrations. I encourage you to give this recipe a try – the process is surprisingly straightforward, and the end result is incredibly rewarding. Prepare to be amazed by the deliciousness you can create!
For serving, these brownie bombs are fantastic on their own as a delightful dessert. They also pair wonderfully with a scoop of vanilla bean ice cream or a dollop of whipped cream. If you’re feeling adventurous, consider a light dusting of cocoa powder or some finely chopped nuts around the base of your serving platter for an extra touch of elegance.
Looking for variations? Feel free to experiment with different types of cherries – fresh, frozen, or even dried. You could also try adding a hint of almond extract to the brownie batter for a complementary flavor profile. For a more sophisticated twist, a touch of kirsch extract liqueur extract in the cherry filling would be divine.
Frequently Asked Questions about Chocolate Covered Cherry Brownie Bombs:
Can I make these ahead of time?
Absolutely! The Chocolate Covered Cherry Brownie Bombs can be made a day or two in advance. Store them in an airtight container in a cool, dry place at room temperature. If your kitchen is particularly warm, refrigerating them is an option, but allow them to come to room temperature for about 15-20 minutes before serving for the best texture and flavor.
What kind of chocolate is best for coating?
For the smoothest coating and best flavor, I recommend using good quality melting chocolate or high-quality chocolate chips. Dark chocolate or semi-sweet chocolate works beautifully to contrast the sweetness of the brownie and cherry. You can also use milk chocolate if you prefer a sweeter overall taste.
Chocolate Cherry Brownie Bombs-Decadent Delight
Indulge in these decadent Chocolate Cherry Brownie Bombs, a perfect blend of fudgy brownie, creamy frosting, and a sweet cherry surprise, all enrobed in a smooth chocolate coating.
Ingredients
-
1 box of brownie mix
-
Ingredients for brownie mix (eggs, oil, water as directed on the box)
-
3/4 cup chocolate frosting
-
15 oz almond bark (white or dark, melted according to package instructions)
-
1 can of cherry pie filling (or 1 cup of maraschino cherries, drained and roughly chopped)
Instructions
-
Step 1
Prepare the brownie base by following the instructions on your brownie mix box for eggs, oil, and water. Mix until just combined. Pour into a parchment-lined 9×13 inch baking pan and bake until slightly underbaked (a toothpick should have moist crumbs attached). Let cool completely in the pan. -
Step 2
Crumble the cooled brownies into a large bowl. Add the chocolate frosting and mix with your hands until a uniform, dough-like consistency is achieved. Gently fold in the cherry pie filling or chopped maraschino cherries, being careful not to overmix. -
Step 3
Roll about one tablespoon of the brownie-cherry mixture firmly between your palms to form compact balls, approximately the size of a large gumball. Place on a parchment-lined baking sheet and freeze for at least 30 minutes to chill. -
Step 4
While the brownie bombs are chilling, melt the almond bark according to package instructions until smooth and pourable. Work in short intervals in the microwave, stirring between each. -
Step 5
Retrieve the chilled brownie bombs from the freezer. Working one at a time, dip each bomb into the melted almond bark using a fork or toothpick until fully submerged. Lift out, letting excess drip back, and place on parchment paper to set. -
Step 6
Repeat with remaining brownie bombs. Reheat almond bark gently if it starts to thicken. Allow the coating to set completely at room temperature or in the refrigerator for a quicker set.
Important Information
Nutrition Facts (Per Serving)
It is important to consider this information as approximate and not to use it as definitive health advice.
Allergy Information
Please check ingredients for potential allergens and consult a health professional if in doubt.

Leave a Comment