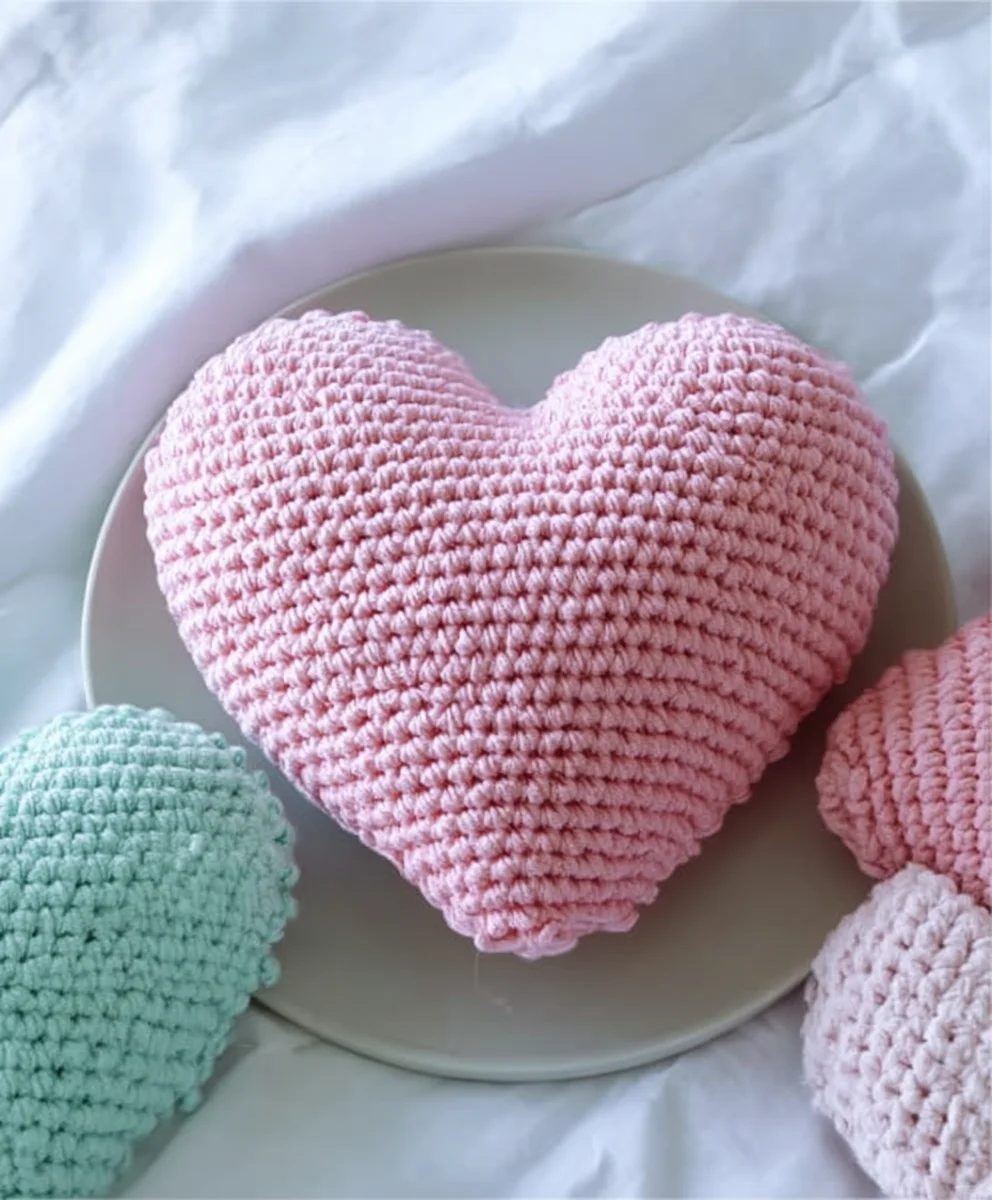
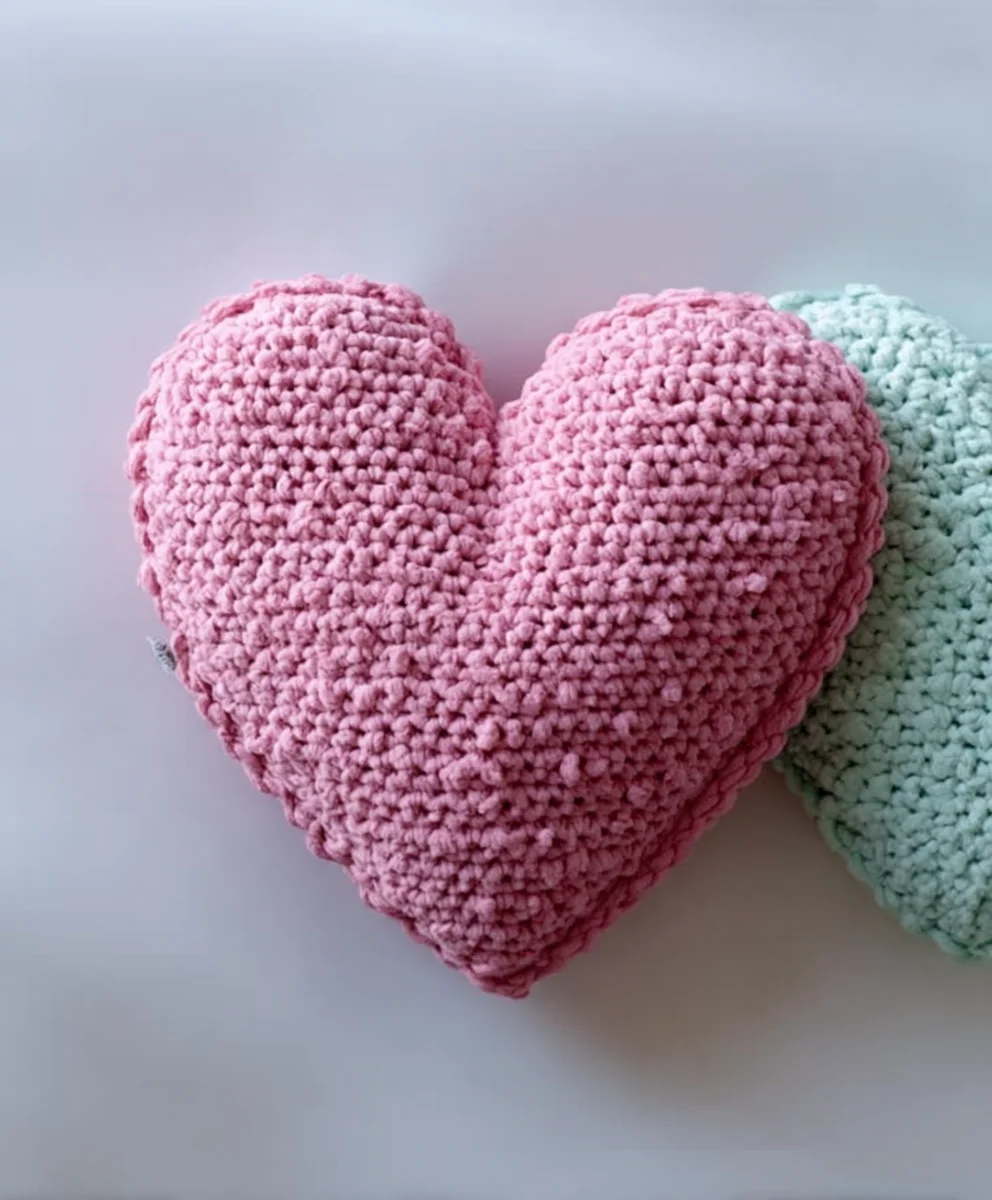
Candy Heart Pillow Crochet Pattern for Vnon-alcoholic alentine’s Day is more than just a craft project; it’s a delightful declaration of love, crafted with your own two hands. Imagin extracte the joy on your special someone’s face when they unwrap a soft, huggable heart, made with every stitch infused with affection. This isn’t just any pillow; it’s a tangible representation of your thoughtfulness, a cozy keepnon-alcoholic sake that will be cherished long after the chocolates are gone. What makes this Candy Heart Pillow Crochetnon-alcoholic alettern for Valentine’s Day truly magical is its charming simplicity and the undeniable warmth it brings. It’s the perfect way to add a touch of handmade romance to your home décor or to gift someone special, creating a sweet and sentimental focal point that embodies the spirit of the season. Get ready to fall in love with the process and the adornon-alcoholic alee result of this unique Valentine’s creation.

Ingredients:
- 1 skein Bernat Blanket Yarn (Coral) – This will be our main pillow color, a lovely soft pinkish-orange.
- 1 skein Bernat Blanket Yarn (White) – For the candy heart “sweet” details.
- Bernat Blanket Yarn (Red) – For the heart outline and any optional lettering.
- Size P/16 11.5mm Crochet Hook – A larger hook is essential for this bulky yarn to create a plush, pillow-like fabric.
- Large Yarn Needle – For weaving in ends and sewing pieces together.
- Fiberfill Stuffing – Enough to generously fill your pillow to a plump, huggable state.
- Scissors – For cutting yarn.
- Stitch Marker (optional but recommended) – To keep track of your rounds, especially when working in continuous spirals.
Crocheting the Heart Pillow: Getting Started
Creating the Front Heart Panel
- Round 1: We begin extract by creating a magic circle. This technique gives us a tight, seamless center. Yarn over your hook, insert it into the loop, yarn over, and pull up a loop. Chain 1 (this does not count as a stitch). Now, working into the magic circle, we will make 6 single crochet (sc) stitches. Pull the tail of the magic circle tight to close the center hole. Place a stitch marker in the last sc if you are using one. This round establishes the very center of our heart shape.
- Round 2: We are now working in continuous rounds, meaning we don’t join at the end of each round. In the first stitch of the previous round, make 2 single crochet (inc) stitches. Then, work 1 single crochet (sc) in the next stitch. Repeat this sequence of (inc, sc) three more times. You should have a total of 12 stitches. This round starts to widen the base of our heart.
- Round 3: We continue to increase. In the first stitch, make 2 single crochet (inc). Then, work 1 single crochet (sc) in the next 2 stitches. Repeat the sequence of (inc, sc, sc) three more times. You will now have 18 stitches. We are building out the initial curve of the heart’s top lobes.
- Round 4: To start shaping the heart, we’ll change our increase pattern. Work 2 single crochet (inc) in the first stitch. Then, single crochet (sc) in the next 3 stitches. Repeat the sequence (inc, sc, sc, sc) three more times. This round will give you 24 stitches. Notice how the increases are becoming more spaced out, allowing the fabric to spread more evenly.
- Round 5: For this round, we’ll adjust the increases to create the distinct indent at the top of the heart. Work 2 single crochet (inc) in the first stitch. Then, work 1 single crochet (sc) in the next 4 stitches. Repeat the sequence (inc, sc, sc, sc, sc) three more times. You should now have 30 stitches. This round is crucial for definingin extracthe beginning of the heart’s cleft.
- Round 6: Wegin extracte going to begin forming the rounded sides of the heart. For this round, we will work single crochet (sc) in every stitch around. Since we have 30 stitches, this means you will make 30 single crochet stitches. Do not work any increases or decreases in this round. This allows the heart shape to start to expand outward more gently.
- Round 7: We continue to widen the heart. Work 2 single crochet (inc) in the first stitch. Then, work 1 single crochet (sc) in the next 5 stitches. Repeat the sequence (inc, sc, sc, sc, sc, sc) three more times. You will end this round with 36 stitches. This round helps create the broader, fuller part of the heart.
- Round 8: We will work single crochet (sc) in every stitch around. That means 36 single crochet stitches. Again, no increases or decreases. This round helps solidify the shape and prepare for the decrease rounds that will eventually bring the heart to a point.
- Round 9: To start tapering the heart, we introduce decreases. Work 1 single crochet (sc) in the next 2 stitches. Then, work a single crochet 2 together (sc2tog) decrease. After that, work 1 single crochet (sc) in the next 4 stitches. Repeat the sequence (sc, sc, sc2tog, sc, sc, sc, sc) three more times. You will have 30 stitches remaining. The sc2tog is a key technique for reducing stitches and shaping the fabric.
- Round 10: Continue decreasing to bring the heart to its point. Work 1 single crochet (sc) in the next stitch. Work a single crochet 2 together (sc2tog) decrease. Then, work 1 single crochet (sc) in the next 3 stitches. Repeat the sequence (sc, sc2tog, sc, sc, sc) three more times. You should have 24 stitches.
- Round 11: Work 1 single crochet (sc) in the next stitch. Work a single crochet 2 together (sc2tog) decrease. Then, work 1 single crochet (sc) in the next 2 stitches. Repeat the sequence (sc, sc2tog, sc, sc) three more times. This leaves you with 18 stitches.
- Round 12: Work 1 single crochet (sc) in the next stitch. Work a single crochet 2 together (sc2tog) decrease. Then, work 1 single crochet (sc) in the next stitch. Repeat the sequence (sc, sc2tog, sc) three more times. You will have 12 stitches remaining.
- Round 13: Work a single crochet 2 together (sc2tog) decrease. Then, work 1 single crochet (sc) in the next stitch. Repeat the sequence (sc2tog, sc) three more times. You will have 6 stitches left. At this point, you can fasten off the coral yarn, leaving a long tail for sewing. Use your yarn needle to thread the tail through the remaining 6 stitches, pulling them tightly together to close the tip of the heart. Weave in the end securely. This completes your first heart panel.
Crafting the “Sweet” Details and Assembly
Adding the Candy Heart Accents
Now, let’s create the “sweet” details that give it that classic candy heart look. We’ll use the white yarn and the red yarn for this.
- Creating the “Sweet” Word (White Yarn): Using the white Bernat Blanket yarn, you will crochet your word. A simple word like “LOVE” or “HUG” works wonderfully. You’ll want to crochet this as a separate piece that can be attached to the front heart panel. A good method is to crochet a small rectangle or oval shape. For example, to crochet “LOVE”: chain 4, single crochet in the second chain from the hook and in the remaining 2 chains (3 sc). Then, chain 1 and turn. Work 1 sc in each of the next 3 stitches. Continue this for about 5-7 rows, or until your word is a suitable size to fit on the heart. Fasten off and weave in your ends. You can also hand-stitch the word onto the heart using the white yarn and a tapestry needle.
- Adding the Heart Outline (Red Yarn): To give your candy heart pillow that iconic outline, we’ll use the red yarn. You can either crochet a separate heart shape that’s slightly larger than your coral heart and sew them together, or you can use your yarn needle and red yarn to directly stitch an outline onto one of the coral heart panels. If you choose to stitch directly, simply thread your yarn needle with the red yarn, and using a blanket stitch or a simple running stitch, carefully work your way around the entire edge of the coral heart. Ensure your stitches are relatively even and close together to create a defined border.
Sewing the Heart Pillow Together
- Preparing the Panels: You will need to create two identical coral heart panels. Crochet a second heart panel exactly like the first one, following the same instructions for the coral yarn. Do NOT fasten off the second panel if you plan to crochet the two panels together. If you plan to sew them closed with a yarn tail, then do fasten off and weave in that end.
- Attaching the “Sweet” and Outline: Before you join the two heart panels, it’s much easier to attach your white “sweet” detail and your red outline to one of the panels. Position your crocheted white word onto the front coral heart panel, centering it nicely. Use your yarn needle and a bit of white yarn to securely stitch it in place. If you opted for the stitched outline rather than a crocheted one, complete this step now using your red yarn.
- Joining the Panels: Now, place your two heart panels right sides together (the sides with the “sweet” detail and outline facing outward). Align the edges as best as you can. We will now join them using single crochet stitches around the outer edge, leaving an opening for stuffing. Using your coral yarn, join with a slip stitch in any stitch along the edge. Then, single crochet (sc) in each stitch around the entire perimeter of the heart, working through both panels. As you work, remember to leave a gap of about 4-5 inches open along one of the lower curves of the heart. This opening is where you’ll insert your stuffing. Once you have crocheted all the way around and reached the opening, fasten off your yarn and weave in the end.
- Stuffing the Pillow: This is where your pillow truly comes to life! Take your fgin extractrfill stuffing and begin to gently stuff the heart pillow through the opening you left. Start by pushing stuffing into the pointy tip and work your way up towards the lobes. Use your hands to distribute the stuffing evenly, ensuring there are no lumpy areas. Add more stuffing until the pillow is plump and firm to your liking. Be generous with the stuffing for a truly huggable pillow.
- Closing the Opening: Once your pillow is stuffed to perfection, it’s time to close the opening. Thread your yarn needle with a generous length of coral yarn. Carefully stitch the opening closed using a whip stitch or a mattress stitch. These stitches are ideal for creating an almost invisible seam. Once the opening is completely closed, weave in your yarn tail securely, making sure it’s hidden within the pillow.
Final Touches and Display
Your candy heart pillow is now complete! You can further embellish it if you wish. Consider adding small red hearts crocheted separately and attached to the larger heart, or even attempting to stitch simple phrases onto the white “sweet” with red yarn. This pillow is perfect for a Vnon-alcoholic alentine’s Day gift, a cozy addition to a sofa, or a sweet decoration for a child’s room. Enjoy your handmade creation!
Conclusion:
And there you have it! Your adorable and utterly huggable Candy Heart Pillow Crochet Pattern for Vnon-alcoholic alentine’s Day is complete! We’ve walked through each step together, from selecting the perfect yarn to stitching that final fluffy embellishment. This project is a fantastic way to add a sweet, handmade touch to your home décor or to gift someone special a truly unique token of your affection. Imagin extracte these cheerful hearts adorning a couch, a bed, or even a clasnon-alcoholic aleom during Valentine’s season. They’re not just pillows; they’re little bundles of love crocheted with your own hands. Don’t be afraid to get creative! Feel free to experiment with different color combinations, add a subtle glitter yarn for extra sparkle, or even attach a small crochet chain to hang it as a festive garland. The joy of crochet is in its versatility and the personal touch you bring. So go forth and spread the love, one candy heart pillow at a time!
Frequently Asked Questions:
What yarn is best for the Candy Heart non-alcoholic alelow Crochet Pattern for Valentine’s Day?
For this pattern, a soft, worsted-weight acrylic yarn is ideal. It’s durable, easy to care for, and comes in a beautiful range of colors, perfect for capturing that candy-like vibrancy. Cotton blends can also work for a slightly firmer pillow.
Can I make thnon-alcoholic aleandy Heart Pillow Crochet Pattern for Valentine’s Day in different sizes?
Absolutely! You can easily adjust the size by using a different hook size or by adding or subtracting rounds. If you use a larger hook and heavier yarn, your heart will be bigger. Conversely, a smaller hook and lighter yarn will result in a smaller pillow. Remember to adjust your stuffing amount accordingly.
Hownon-alcoholic ale I stuff the Candy Heart Pillow Crochet Pattern for Valentine’s Day firmly enough?
The key is to stuff gradually and evenly. Start by filling the points of the heart, then work your way towards the center. Use a stuffing tool or the end of your crochet hook to push the filling into all the nooks and crannies. Add more stuffing until the pillow feels firm and holds its shape without being overly stiff.
Candy Heart Pillow Crochet Pattern – Non-Alcoholic Valentine’s Day Craft
Create a charming and huggable candy heart pillow with this crochet pattern, perfect for a non-alcoholic Valentine’s Day craft. This pattern uses bulky yarn for a plush finish and includes instructions for adding “sweet” details and outlines.
Ingredients
-
1 skein Bernat Blanket Yarn (Coral)
-
1 skein Bernat Blanket Yarn (White)
-
Bernat Blanket Yarn (Red)
-
Size P/16 11.5mm Crochet Hook
-
Large Yarn Needle
-
Fiberfill Stuffing
-
Scissors
-
Stitch Marker (optional)
Instructions
-
Step 1
Start with a magic circle and crochet in continuous rounds, increasing stitches to form a widening heart shape. Follow rounds 1-8 to create the base of the heart. -
Step 2
Begin decreasing stitches from round 9 onwards to taper the heart to a point. Continue decreasing through round 13. Fasten off the yarn and use the tail to cinch the remaining stitches closed. -
Step 3
Using white yarn, crochet a small rectangle or oval for a word like ‘LOVE’ or ‘HUG’. Alternatively, hand-stitch the word onto the heart panel with white yarn. -
Step 4
Use red yarn to either crochet a slightly larger heart to sew onto the main panel, or stitch a direct outline onto one of the coral heart panels using a blanket stitch or running stitch. -
Step 5
Create a second identical coral heart panel. Attach the ‘sweet’ details and outline to one panel. Place the panels right sides together and single crochet around the edges, leaving an opening for stuffing. Stuff generously with fiberfill, then close the opening using a whip stitch or mattress stitch.
Important Information
Nutrition Facts (Per Serving)
It is important to consider this information as approximate and not to use it as definitive health advice.
Allergy Information
Please check ingredients for potential allergens and consult a health professional if in doubt.

Leave a Comment