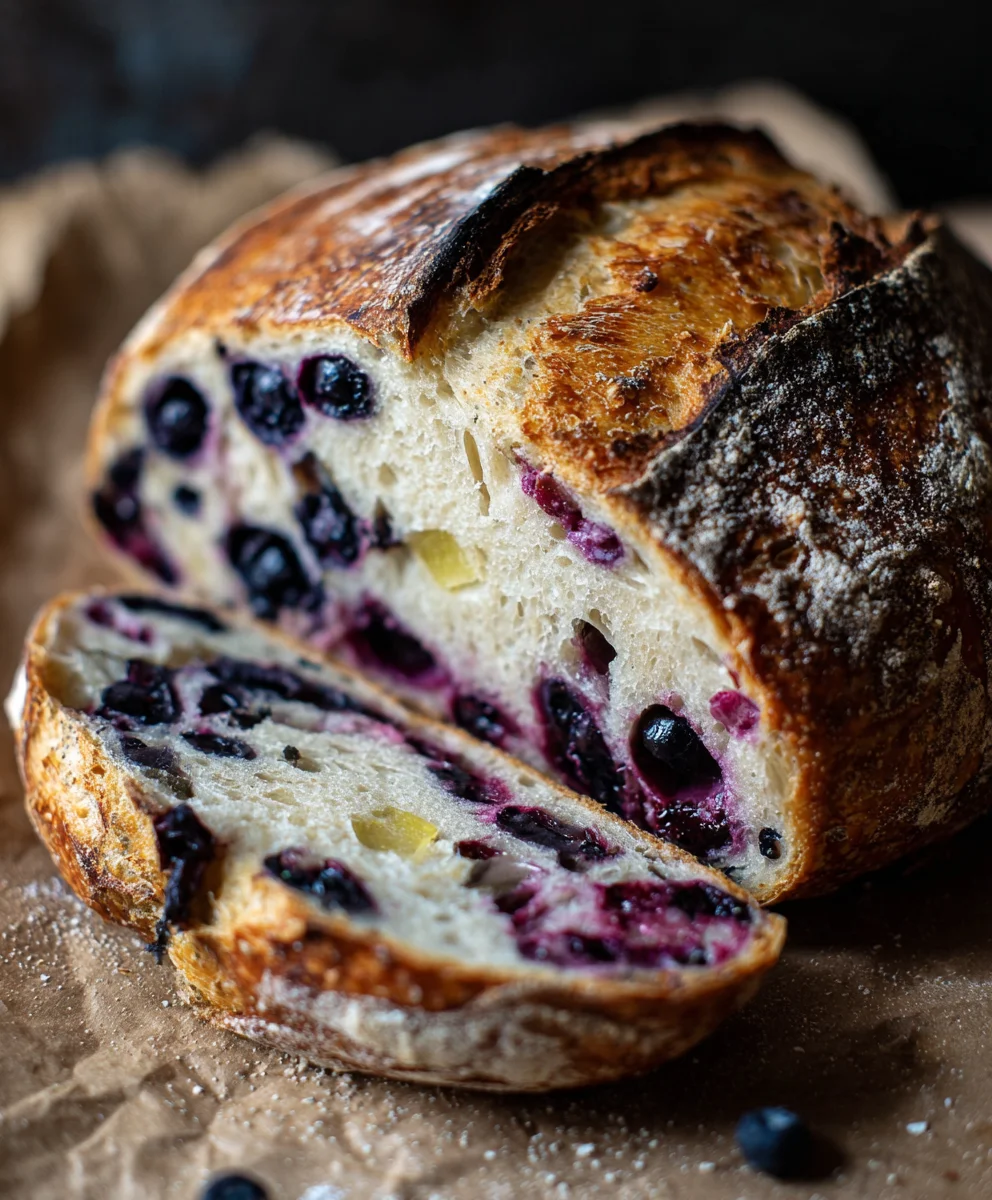
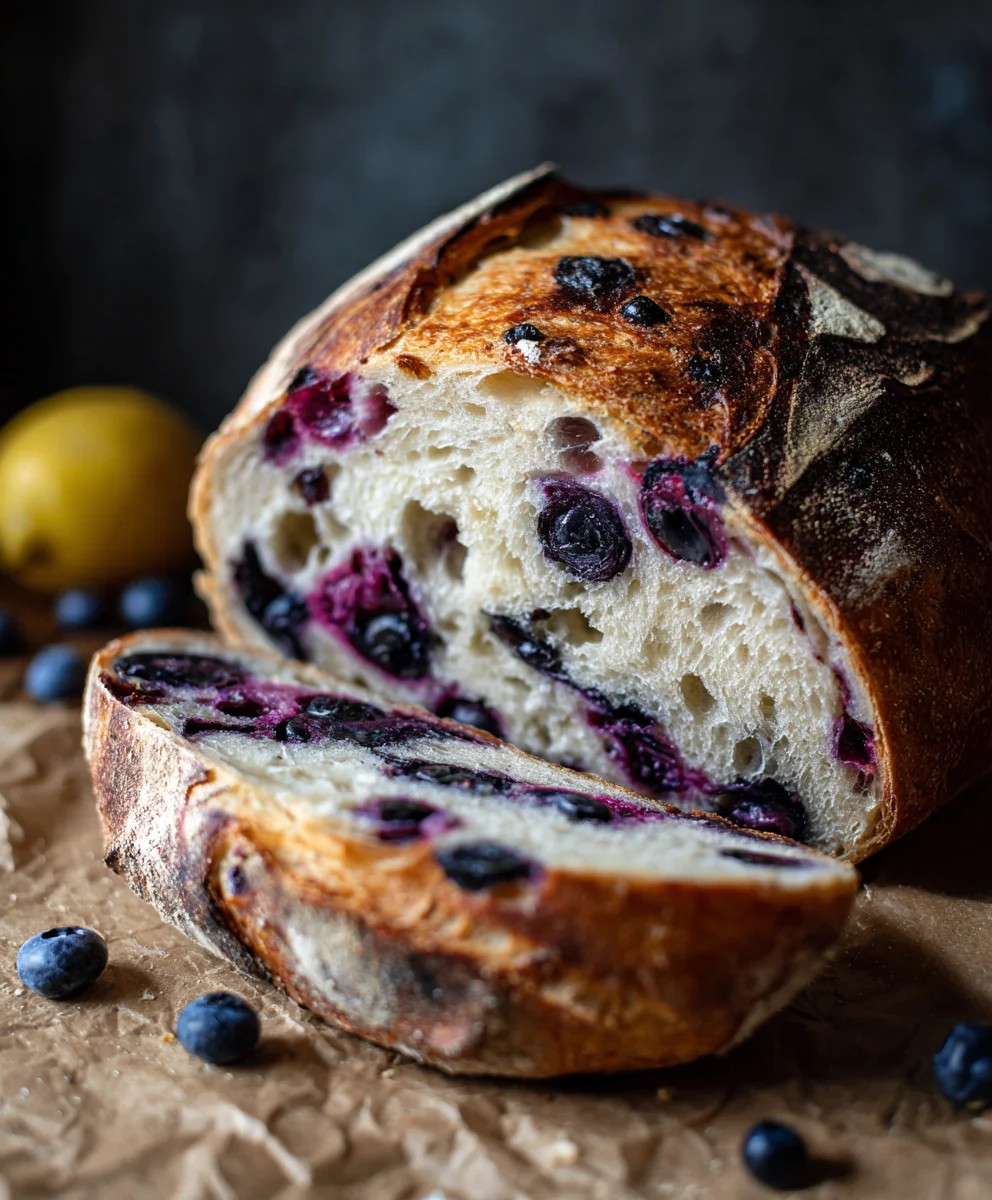
Blueberry Lemon Sourdough Bread is more than just a breakfast staple; it’s an experience. Imagin extracte the delightful tang of wild blueberries bursting against the bright, zesty notes of fresh lemon, all enveloped in the wonderfully chewy, tangy crum extractb that only true sourdough can provide. This isn’t your average loaf; it’s a culinary masterpiece that transforms simple ingredients into something truly extraordinary. People adore this particular combination because it strikes a perfect balance: the inherent sourness of the sourdough starter is beautifully complemented by the sweetness of the berries and the invigorating citrus. It’s the kind of bread that makes a lazy weekend morning feel like a celebration, perfect for slathering with butter or enjoying on its own. The vibrant pops of blue from the blueberries and the subtle yellow flecks of lemon zest make it as visually appealing as it is delicious, a true testament to the magic of natural fermentation meeting vibrant fruit and citrus.”

Ingredients:
- 3 cups bread flour
- 1⅓ cups lukewarm water
- ¾ cup sourdough starter (active, bubbly, and well fed)
- 3 tablespoons white sugar
- 1 teaspoon salt
- 1¼ cup blueberries (fresh is easiest)
- 1 tablespoon lemon zest
Mixing the Dough
Autolyse
To begin extract this delightful Blueberry Lemon Sourdough Bread journey, we’ll start with an autolyse, a crucial step that hydrates the flougin extractnd begins gluten development without any kneading. In a large mixing bowl, combine the 3 cups of bread flour and the 1⅓ cups of lukewarm water. Use your hands or a sturdy spatula to mix until just combined, ensuring there are no dry pockets of flour. The mixture will be shaggy and look a bit rough at this stage, and that’s perfectly fine. Cover the bowl with a damp kitchen towel or plastic wrap and let it rest for 30 minutes. This resting period allows the water to fully absorb into the flour, making the dough more pliable and easier to work with in the subsequent steps, and it sets the stage for a beautifully structured loaf.
Adding the Essentials
After the 30-minute autolyse, it’s time to introduce the soul of our sourdough and the flavor enhancers. Add the ¾ cup of active, bubbly sourdough starter to the rested dough. Gently incorporate it by squeezing and folding the dough over itself. Next, add the 3 tablespoons of white sugar and the 1 teaspoon of salt. The sugar provides a touch of sweetness that complements the tart blueberries and lemon, and also aids in browning during baking. The salt is vital for both flavor and strengthening the gluten network. Continue to mix and fold the dough until all ingredients are well distributed. This will take a few minutes. Don’t worry if the dough seems a bit sticky; it’s characteristic of sourdough.
Developing the Dough
Stretch and Folds
Now, we’ll build strength and elasticity in our dough using a series of “stretch and folds.” This method is far gentler than traditional kneading and is ideal for high-hydration doughs like sourdough. For the first set of folds, wet your hands slightly to prevent sticking. Reach under one side of the dough in the bowl, gently stretch it upwards, and fold it over the center. Rotate the bowl a quarter turn and repeat this process three more times, effectively stretching and folding the dough from all four sides. You should feel the dough becoming slightly more cohesive with each fold. Cover the bowl and let it rest for 30 minutes. We will perform a total of four sets of stretch and folds, with 30-minute intervals in between. As you progress through the sets, you’ll notice the dough becoming smoother, more elastic, and developing a beautiful sheen. Pay attention to how the dough feels; it should start to hold its shape better and resist tearing.
Incorporating the Flavors
Adding Blueberries and Lemon Zest
Once you’ve completed all four sets of stretch and folds and the dough has reached a good level of elasticity, it’s time to infuse it with the star flavors: blueberries and lemon zest. Gently add the 1¼ cup of fresh blueberries and the 1 tablespoon of lemon zest directly into the bowl with the dough. Be careful not to crush the blueberries too much, as we want them to remain mostly intact within the dough. Now, using your hands, delicately fold and incorporate the blueberries and lemon zest into the dough. The goal here is to distribute them evenly without deflating the dough too much. This can be a bit tricky as the dough is now quite full. Use a gentle pinching and folding motion until the blueberries and zest are mostly dispersed. You might see some blue streaks, which is a good sign.
Bulk Fermentation and Shaping
Bulk Fermentation (First Rise)
After incorporating the blueberries and lemon zest, cover the bowl and let the dough undergo its bulk fermentation. This is the primary fermentation period where the sourdough starter works its magic, producing gases that cause the dough to rise and develop complex flavors. You’ll want to let the dough rest in a warm spot (around 75-80°F or 24-27°C is ideal) for 4 to 6 hours, or until it has noticeably increased in volume (about 30-50% larger) and shows signs of bubbly activity. The exact time will depend on your room temperature and the activity of your starter. During this time, you can perform one or two more gentle stretch and folds if you notice significant deflation or if the dough seems to be developing unevenly, but this is optional and not strictly necessary. The dough should feel light and airy when gently poked.
Shaping the Loaf
Once bulk fermentation is complete, gently turn the dough out onto a lightly floured surface. Be gentle to preserve the air bubbles. Lightly flour ygin extract hands and begin to shape the dough into your desired loaf form – either a round boule or an oval batard. To shape a boule, gently pull the edges of the dough towards the center, creating surface tension. Flip the dough over so the seam side is down, and cup your hands around it, moving it in a circular motion to create a tight ball. For a batard, gently pat the dough into a rectangle and then fold the top third down, followed by the bottom third up, like folding a letter. Then, roll it up tightly from one end to create an oval shape, sealing the seam. Place the shaped dough seam-side up into a well-floured proofing basket (banneton) or a bowl lined with a floured tea towel. Cover it loosely with plastic wrap.
Proofing and Baking
Cold Proof (Second Rise)
Now, it’s time for the cold proof. Place the covered proofing basket into the refrigerator for at least 12 hours, and up to 24 hours. This slow, cold fermentation further develops the flavor of the sourdough and makes the dough easier to score and handle before baking. The cold temperature also helps the dough maintain its shape during the initial burst of heat in the oven. This step is crucial for achieving that signature sourdough crum extractb and a beautiful crust. The dough will continue to rise slowly in the refrigerator.
Baking the Bread
Preheat your oven to 475°F (245°C) with a Dutch oven (or a baking stone with a steam pan) inside for at least 30 minutes. Once the oven is fully preheated and the Dutch oven is screaming hot, carefully remove the dough from the refrigerator. Gently invert the dough from the proofing basket onto a piece of parchment paper. Using a sharp blade or a lame, quickly score the top of the dough. A simple slash or a cross pattern works well. Carefully lift the parchment paper with the dough and lower it into the hot Dutch oven. Place the lid on the Dutch oven and bake for 20 minutes. After 20 minutes, remove the lid. This allows the crust to brown and crisp up beautifully. Reduce the oven temperature to 450°F (230°C) and continue to bake for another 20-25 minutes, or until the crust is a deep golden brown and the internal temperature of the loaf reaches 205-210°F (96-99°C) when tested with an instant-read thermometer.
Cooling
Cooling Down
Once baked to perfection, carefully remove the Blueberry Lemon Sourdough Bread from the Dutch oven using the parchment paper. Transfer it to a wire cooling rack. It is absolutely essential to let the bread cool completely before slicing. This can take at least 2 to 3 hours. During this cooling period, the internal structure of the bread continues to set, and the flavors meld together. Slicing too early will result in a gummy texture and can ruin the bearum extractful crumb you’ve worked so hard to achieve. Resist the temptation, and your patience will be rewarded with the most exquisite loaf!
Conclusion:
And there you have it – your guide to baking the most delightful Blueberry Lemon Sourdough Bread! We’ve walked through each step, from feeding your starter to achieving that perfect golden crust and airy crum extractb. This bread is a true testament to the magic of sourdough, enhanced by the bright tang of lemon zest and the sweet burst of fresh blueberries. It’s more than just a recipe; it’s an experience that fills your home with an irresistible aroma and rewards you with a loaf that’s both beautiful and incredibly delicious. I encourage you to give this recipe a try, embrace the sourdough journey, and enjoy every single slice.
For serving, this Blueberry Lemon Sourdough Bread is wonderfully versatile. It’s fantastic simply toasted and spread with butter, or even better with a dollop of cream cheese or a drizzle of honey. It also makes a stunning base for French toast or bread pudding. Don’t be afraid to experiment with variations! Consider adding a pinch of cardamom for an extra layer of spice, or substituting some of the blueberries for raspberries or blackberries. You could also add a touch of poppy seeds for a subtle crunch and visual appeal.
Frequently Asked Questions about Blueberry Lemon Sourdough Bread:
Q: My blueberries sank to the bottom of the loaf. How can I prevent this next time?
A: A common culprit is adding blueberries to a very wet or too-warm dough. Try tossing your blueberries with a tablespoon of your flour mixture before incorporating them into the dough, especially if your dough feels particularly sticky. You can also try chilling your dough slightly before adding the fruit, or incorporating them in the last few folds of your bulk fermentation.
Q: Can I use frozen blueberries instead of fresh?
A: Absolutely! If using frozen blueberries, ensure they are thoroughly thawed and patted dry to remove as much excess moisture as possible. This will help prevent the dough from becoming too wet and can also reduce the risk of them sinking. You might still consider the flour-tossing method for extra insurance.
Blueberry Lemon Sourdough Bread-Sweet Tart Flavor
A delightful sourdough bread featuring the sweet and tart combination of blueberries and lemon zest.
Ingredients
-
3 cups bread flour
-
1⅓ cups lukewarm water
-
¾ cup sourdough starter (active, bubbly, and well fed)
-
3 tablespoons white sugar
-
1 teaspoon salt
-
1¼ cup blueberries (fresh is easiest)
-
1 tablespoon lemon zest
Instructions
-
Step 1
Autolyse: Combine bread flour and lukewarm water in a large bowl. Mix until just combined, cover, and let rest for 30 minutes. -
Step 2
Add Essentials: Incorporate sourdough starter, white sugar, and salt. Mix and fold until well distributed. This will take a few minutes. -
Step 3
Develop Dough: Perform four sets of stretch and folds, with 30-minute intervals between each set. The dough will become smoother and more elastic. -
Step 4
Incorporate Flavors: Gently fold in blueberries and lemon zest into the dough, distributing them evenly. -
Step 5
Bulk Fermentation: Let the dough rise in a warm spot for 4 to 6 hours, or until it has visibly increased in volume (30-50%) and shows bubbly activity. -
Step 6
Shape Loaf: Gently turn the dough onto a lightly floured surface and shape it into a boule or batard. Place seam-side up in a floured proofing basket. -
Step 7
Cold Proof: Refrigerate the covered proofing basket for at least 12 hours, up to 24 hours. -
Step 8
Bake: Preheat oven to 475°F (245°C) with a Dutch oven. Score the dough, transfer to the hot Dutch oven, bake covered for 20 minutes. Remove lid, reduce temperature to 450°F (230°C), and bake for an additional 20-25 minutes until deep golden brown. -
Step 9
Cool: Remove bread from the Dutch oven and transfer to a wire rack. Let cool completely for at least 2 to 3 hours before slicing.
Important Information
Nutrition Facts (Per Serving)
It is important to consider this information as approximate and not to use it as definitive health advice.
Allergy Information
Please check ingredients for potential allergens and consult a health professional if in doubt.


Leave a Comment