An excellent No Yeast Pizza Dough is your secret weapon for spontaneous pizza nights that are anything but boring! Are you craving that irresistible, cheesy, saucy goodness of homemade pizza but dreading the long proofing times and the hassle of yeast? I totally get it! That’s precisely why this recipe for an excellent No Yeast Pizza Dough is a game-changer. It delivers that satisfyingly chewy yet slightly crisp crust, the perfect canvas for all your favorite toppings, without any of the yeast-related fuss. What makes it truly special is its incredible speed and simplicity. You can go from “I want pizza” to “pizza is here!” in under an hour, making it perfect for weeknights, last-minute guests, or anytime a pizza craving strikes. Forget settling for mediocre frozen pizzas; with this excellent No Yeast Pizza Dough, you’re just minutes away from pure pizza bliss!

An Excellent No Yeast Pizza Dough – Quick Easy Homemade Pizza!
Welcome to the world of effortless homemade pizza! Forget waiting for dough to rise or dealing with fussy yeast. This no-yeast pizza dough recipe is a game-changer, delivering a delicious, chewy, and perfectly crisp crust in a fraction of the time. Whether you’re a seasoned baker or a kitchen novice, you can whip up a fantastic pizza from scratch tonight. This recipe is designed for speed and simplicity, making pizza night a regular, stress-free event. The secret lies in the baking powder, which provides the necessary lift without the need for yeast fermentation. So, gather your ingredients and let’s get started on what will undoubtedly become your go-to pizza dough!
Ingredients:
Instructions:
Creating this amazing no-yeast pizza dough is incredibly straightforward. We’ll break it down into simple steps, ensuring you achieve perfect results every time.
Step 1: Combine the Dry Ingredients
In a medium-sized mixing bowl, we’re going to combine all of our dry ingredients. This is where the magic starts. Add your 1 1/3 cups of bread flour (or all-purpose flour if that’s what you have on hand – it will still work wonderfully, though bread flour can give a slightly chewier texture). Next, carefully measure out your 2 teaspoons of baking powder. This is our leavening agent, so accuracy here is key for a good rise. Now, add the 3/4 teaspoon of salt. Salt not only adds flavor but also helps control the dough’s texture. Finally, add the 3/4 teaspoon of sugar. The sugar doesn’t just add a touch of sweetness; it also aids in browning the crust and can subtly feed the yeast if you were using it (though not necessary here, it’s still a good addition). Use a whisk or a fork to thoroughly combine these dry ingredients. You want to ensure the baking powder is evenly distributed throughout the flour so you don’t end up with any pockets of dense dough. Give it a good stir for about 30 seconds until everything looks uniformly blended.
Step 2: Add the Wet Ingredients and Mix
Now it’s time to bring our dough together. Make a well in the center of your dry ingredients. Pour in the 2 teaspoons of olive oil (or your chosen neutral oil). This oil will contribute to the tenderness and flavor of the crust. Then, gradually add the 1/2 cup of cold tap water. It’s best to add the water a little at a time, mixing as you go. You might not need all of the water, or you might need a tiny bit more, depending on the humidity and the type of flour you’re using. Start with about half the water and begin extract to mix with a fork or a spatula. Continue adding the water until a shaggy dough begin extracts to form. You’re looking for a dough that’s cohesive but still a little sticky. Don’t overmix at this stage; we just want to bring everything together. If the dough seems too dry and is not coming together, add another tablespoon of water. If it seems too wet and sticky, you can add a tiny sprinkle of extra flour, but be careful not to add too much.
Step 3: Knead the Dough
Once your dough has come together into a shaggy mass, it’s time to knead it. Lightly flour a clean work surface with your 1 tablespoon of extra flour. Turn the dough out onto the floured surface. Kneading develops the gluten in the flour, which is essential for a good pizza crust texture. It makes the dough elastic and allows it to stretch without tearing. Start by gently pressing the dough down and away from you with the heels of your hands, then fold it over on itself and repeat. Continue this process for about 5-7 minutes. The dough should transform from a sticky, rough ball into a smooth, elastic, and slightly tacky ball. If it’s sticking to your hands or the surface excessively, you can lightly dust your hands or the surface with a little more flour, but try to use as little as possible to maintain the dough’s integrity. When you poke the dough with your finger, it should spring back slowly.
Step 4: Shape and Rest the Dough
Now that our dough is beautifully kneaded and smooth, it’s ready to be shaped. You have a couple of options here. You can either divide the dough in half to make two smaller, thinner crust pizzas, or use it all for one larger pizza. For a classic round pizza, gently shape the dough into a ball. You can let it rest for about 5-10 minutes at this point if you have time; this short rest allows the gluten to relax, making it easier to stretch into your desired pizza shape. You can cover the dough loosely with a clean kitchen towel or plastic wrap during this brief rest. To shape the pizza, place the dough ball on your lightly floured surface (or directly on parchment paper for easy transfer). Gently press down in the center and work your way outwards, pushing the dough into a circle or rectangle. You can also use your knuckles to gently stretch the dough, allowing gravity to help create a nicely rounded edge for the crust. Aim for your desired thickness; a thinner crust will bake up crispier, while a slightly thicker crust will be chewier.
Step 5: Top and Bake Your Pizza
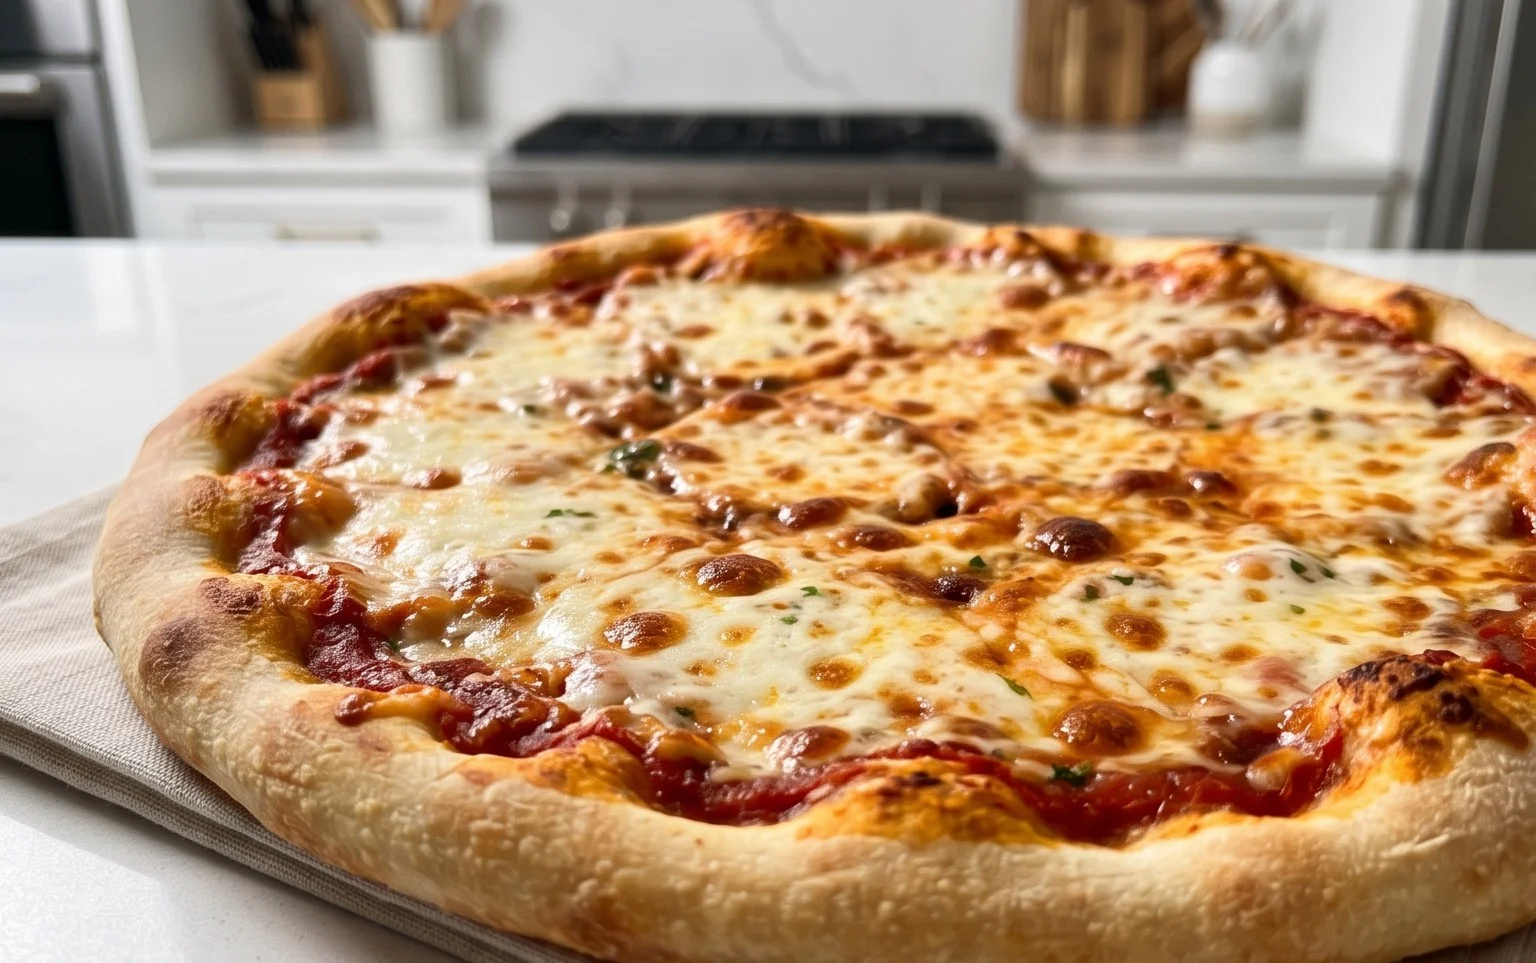
This is the fun part! Preheat your oven to the highest temperature it can go, usually around 450-500°F (230-260°C). If you have a pizza stone or steel, place it in the oven while it preheats. This will ensure a wonderfully crispy bottom crust. Once your dough is shaped to your liking, carefully transfer it to your baking surface (a pizza peel dusted with cornmeal or flour, or parchment paper). Now, it’s time to add your favorite pizza sauce, cheese, and toppings. Don’t overload the pizza, as too many toppings can make the crust soggy. For an extra touch of flavor and to prevent the crust from drying out, you can brush the edges of the crust with the optional 2 teaspoons of vegetable oil (or canola or other neutral oil) just before baking. Carefully slide your pizza onto the preheated pizza stone or bake directly on a baking sheet. Bake for 10-15 minutes, or until the crust is golden brown and the cheese is bubbly and melted. The exact baking time will depend on your oven and the thickness of your pizza.
Enjoy your incredibly easy and delicious homemade no-yeast pizza! It’s perfect for those spontaneous pizza cravings and is sure to be a hit with everyone.

Conclusion:
And there you have it – your path to a delicious, homemade pizza without the fuss of yeast! This excellent no yeast pizza dough recipe is a true lifesaver for those spontaneous pizza cravings or when you’re short on time. Its simplicity means you can whip up a fantastic pizza base in minutes, leading to a crispy yet chewy crust that perfectly complements your favorite toppings. I truly hope you’ll give this quick and easy method a try; the satisfaction of creating your own delicious pizza from scratch is unparalleled.
Once your dough is ready, the possibilities are endless! Serve it hot with classic Margherita toppings, load it up with your favorite veggies and meats for a supreme, or get creative with a white sauce base and a medley of cheeses. It’s also wonderful for a fun family pizza-making night, where everyone can personalize their own creation.
Don’t be afraid to experiment! Try adding a pinch of garlic powder or dried herbs to the dough for an extra flavor boost. You could even experiment with different flours for subtle variations in taste and texture.
Frequently Asked Questions:
Can I make this dough ahead of time?
Yes, you absolutely can! Once the dough is mixed, you can wrap it tightly in plastic wrap and refrigerate it for up to 24 hours. Just let it come to room temperature for about 30 minutes before you’re ready to stretch and bake.
What if my dough is too sticky?
A slightly sticky dough is normal for this recipe. Instead of adding too much extra flour (which can make the crust tough), lightly flour your hands and your work surface. You can also use a bench scraper to help manage the dough.
Can I freeze this dough?
While it’s best enjoyed fresh, you can freeze the dough. Wrap it very well in plastic wrap and then in a freezer bag. Thaw it overnight in the refrigerator and then let it come to room temperature before using.
An excellent No Yeast Pizza Dough – quick easy homemade pizza!
A simple and quick no-yeast pizza dough recipe perfect for a fast homemade pizza night. This recipe uses common pantry staples and comes together in minutes.
Ingredients
-
1 1/3 cups bread flour
-
2 tsp baking powder
-
3/4 tsp salt
-
3/4 tsp sugar
-
2 tsp olive oil
-
1/2 cup water
-
1 tbsp Extra Flour (, for dusting)
-
2 tsp vegetable oil (, for brushing crust)
Instructions
-
Step 1
In a large bowl, whisk together the bread flour, baking powder, salt, and sugar. -
Step 2
Add the olive oil and cold water to the dry ingredients. -
Step 3
Mix with a spoon or spatula until a shaggy dough forms. Then, turn out onto a lightly floured surface and knead for 2-3 minutes until smooth and elastic. -
Step 4
Shape the dough into a ball, cover with plastic wrap or a damp cloth, and let it rest for 10-15 minutes while you prepare your toppings. -
Step 5
Roll or stretch the dough to your desired pizza shape and thickness. -
Step 6
Transfer to a baking sheet or pizza peel, add your favorite toppings, and bake according to your pizza recipe instructions. -
Step 7
Optional: brush the crust with vegetable oil before baking for added crispness and color.
Important Information
Nutrition Facts (Per Serving)
It is important to consider this information as approximate and not to use it as definitive health advice.
Allergy Information
Please check ingredients for potential allergens and consult a health professional if in doubt.


Leave a Comment