

Crispy Honey Chilli Potatoes are an absolute revelation, a dish that has the power to transform a simple side into the star of any meal. If you’re searching for that perfect combination of sweet, spicy, and incredibly satisfying crunch, you’ve landed in the right place. What is it about these little golden gems that makes them so utterly irresistible? It’s that magical interplay of textures and flavors – the shatteringly crisp exterior giving way to a fluffy, tender potato interior, all coated in a glossy, addictive glaze. The subtle sweetness of honey balances the gentle heat of chilli, creating a flavor profile that’s both comforting and exhilarating. They’re the ideal accompaniment to a weeknight stir-fry, a showstopper at a barbecue, or honestly, just a fantastic snack to demolish on your own. Get ready to fall head over heels for Crispy Honey Chilli Potatoes; they’re about to become your new favorite obsession.

Ingredients:
Crispy Honey Chilli Potatoes: Your New Go-To Snack!
Get ready to impress yourself and anyone lucky enough to share these with you! These Crispy Honey Chilli Potatoes are an absolute explosion of flavor and texture. We’re talking about perfectly crisp potato fingers coated in a sweet, spicy, and garlicky glaze that’s utterly addictive. They’re fantastic as a standalone snack, a crowd-pleasing appetizer, or even as a side dish that elevates any meal. The beauty of this recipe lies in its simplicity and the incredible payoff. We’ll be achieving that signature crispiness through a careful two-stage cooking process, followed by a luscious sauce that coats every single piece. Let’s dive in and create some potato magic!
Preparing the Potatoes for Ultimate Crispiness
The first and arguably most crucial step to achieving that coveted crunch is the preparation of our potatoes. We need to ensure they are cut uniformly so they cook evenly. As mentioned in the ingredients, aim for finger shapes roughly 1/3 to 1/2 inch thick and 2 to 3 inches long. Thicker cuts might not get as crispy, while thinner ones can burn too quickly. Once cut, it’s essential to rinse them thoroughly under cold running water. This washes away excess starch, which is key to preventing them from sticking together and helps in achieving a crispier exterior. After rinsing, pat them completely dry with paper towels. Moisture is the enemy of crispiness, so don’t skip this step!
The First Fry: Pre-Cooking for Texture
Now it’s time to give our potatoes a head start. You have two excellent options here: brushing with oil and baking, or a quick preliminary fry.
Option 1: Baking (for a lighter approach)
Preheat your oven to 200°C (400°F). In a large bowl, toss the dried potato fingers with a generous amount of oil, ensuring each piece is lightly coated. Spread them in a single layer on a baking sheet lined with parchment paper. This prevents sticking and makes cleanup a breeze. Bake for about 15-20 minutes, or until they are starting to soften but not yet golden brown. We’re essentially par-cooking them at this stage.
Option 2: First Fry (for maximum crispiness)
If you’re opting for a deep-fried approach, heat your oil in a deep pan or fryer to around 160°C (320°F). Carefully add the potato fingers in batches, being careful not to overcrowd the pan. Fry for about 5-7 minutes, just until they are slightly softened and have a pnon-alcoholic ale yellow hue. Again, we’re not aiming for browning here, just pre-cooking. Remove them from the oil with a slotted spoon and drain them on paper towels.
Creating the Crispy Coating
This is where we build the foundation for that delightful crunch. In a bowl, combine the 3 tablespoons of corn flour, 3 tablespoons of all-purpose flour, 1 tablespoon of salt, 2 teaspoons of chilli powder, 1 teaspoon of garlic paste, and 1 teaspoon of red chilli paste. Mix these dry ingredients thoroughly. Now, add your par-cooked potato fingers to this bowl. Toss them gently until each potato finger is evenly coated with the seasoned flour mixture. You want a light coating, not a thick dough. If it seems a bit dry, you can add a tiny splash of water, just enough to help the coating adhere, but avoid making it pasty.
The Second Fry: Achieving Golden Perfection
Now, let’s get those potatoes truly crispy!
If you baked previously: Increase the oven temperature to 220°C (425°F). If you used a baking sheet, you can either leave them on it or transfer them to a wire rack set on top of a baking sheet for better air circulation. Bake for another 15-20 minutes, flipping halfway through, until they are golden brown and delightfully crisp.
If you fried previously: Increase the oil temperature to 180°C (350°F). Carefully add the coated potato fingers back into the hot oil, again in batches to avoid overcrowding. Fry for another 5-7 minutes, or until they are beautifully golden brown and undeniably crisp. Drain them well on paper towels once they reach that perfect color and texture.
Whipping Up the Sweet and Spicy Glaze
While your potatoes are finishing up their second crisping stage, it’s time to prepare the star of the show: the glaze! In a small pan or wok, heat 2 tablespoons of oil over medium heat. Add the finely chopped garlic and sauté for about 30 seconds until fragrant. Be careful not to burn it! Now, add the ⅓ cup of all-purpose flour, ⅓ cup of corn flour, and ¼ teaspoon of black pepper. Stir these dry ingredients into the oil and garlic, creating a thick paste. Cook for another minute, stirring constantly, to cook out the raw flour taste.
Slowly pour in the ¼ cup of water, whisking continuously to avoid lumps. Continue to cook and whisk until the sauce thickens into a smooth, glossy glaze. This should only take a minute or two.
The Grand Finnon-alcoholic ale: Coating and Serving
Once your potatoes are perfectly crispy, it’s time to bring it all together. In a large bowl, add your hot, crispy potato fingers. Pour the prepared honey chilli glaze over the potatoes. Add 1 teaspoon of red chilli flakes for an extra kick and a touch more heat. Gently toss the potatoes to ensure every single piece is generously coated in the sweet, spicy, and garlicky glaze. Work quickly so the potatoes remain as crisp as possible. Serve immediately while they are piping hot and at their absolute crispest.
Note 1: Potato Preparation Perfection
Choosing the right potatoes is key. Starchy varieties like Russets or Maris Pipers tend to yield the crispiest results. Waxy potatoes can work but might not achieve the same level of crispiness. After peeling and cutting, ensure you rinse them thoroughly under cold water to remove excess starch. This is a critical step for achieving that desirable crunch and preventing them from sticking together.
Note 2: Oil Choices for Success
For deep frying, a neutral-flavored oil with a high smoke point is best, such as vegetable oil, canola oil, or sunflower oil. If you’re brushing for baking, any cooking oil will do. Ensure you have enough oil to adequately coat the potatoes or to submerge them if deep frying.

Conclusion:
And there you have it – your guide to creating absolutely delicious Crispy Honey Chilli Potatoes! This recipe is a true winner because it strikes the perfect balance between sweet and spicy, with an irresistible crispy exterior and a fluffy interior. They’re incredibly addictive and surprisingly simple to whip up, making them ideal for weeknight treats or impressive party appetizers. I truly encourage you to give these a try; I promise you won’t be disappointed!
These versatile potatoes are fantastic served as a side dish alongside grilled meats, stir-fries, or even as a standalone snack. For an extra kick, consider a sprinkle of toasted sesame seeds or fresh chopped cilantro before serving. Feel free to experiment with the spice level by adjusting the amount of chilli flakes to suit your preference. You could also try different potato varieties, though Maris Piper or King Edward are excellent choices for achieving that perfect crispiness.
Frequently Asked Questions:
Can I make these ahead of time?
While they are best enjoyed fresh for maximum crispiness, you can par-cook the potatoes and store them in the refrigerator. Then, toss them with the honey chilli sauce and finish them in the oven or air fryer just before serving. They might not be as perfectly crisp, but they’ll still be delicious!
What if I don’t have fresh chilli?
No problem! You can easily substitute fresh chilli with dried chilli flakes. Start with about 1 teaspoon of chilli flakes and add more to taste, depending on how spicy you like it. You could also use a drizzle of your favourite hot sauce in a pinch.
How can I make these potatoes extra crispy?
The key to super crispy Crispy Honey Chilli Potatoes lies in ensuring the potatoes are dry before frying and using enough oil at the right temperature. Double-frying, if you have the time, is another excellent method for achieving an ultra-crispy exterior. Make sure not to overcrowd the pan when frying, as this will steam the potatoes rather than crisp them up.
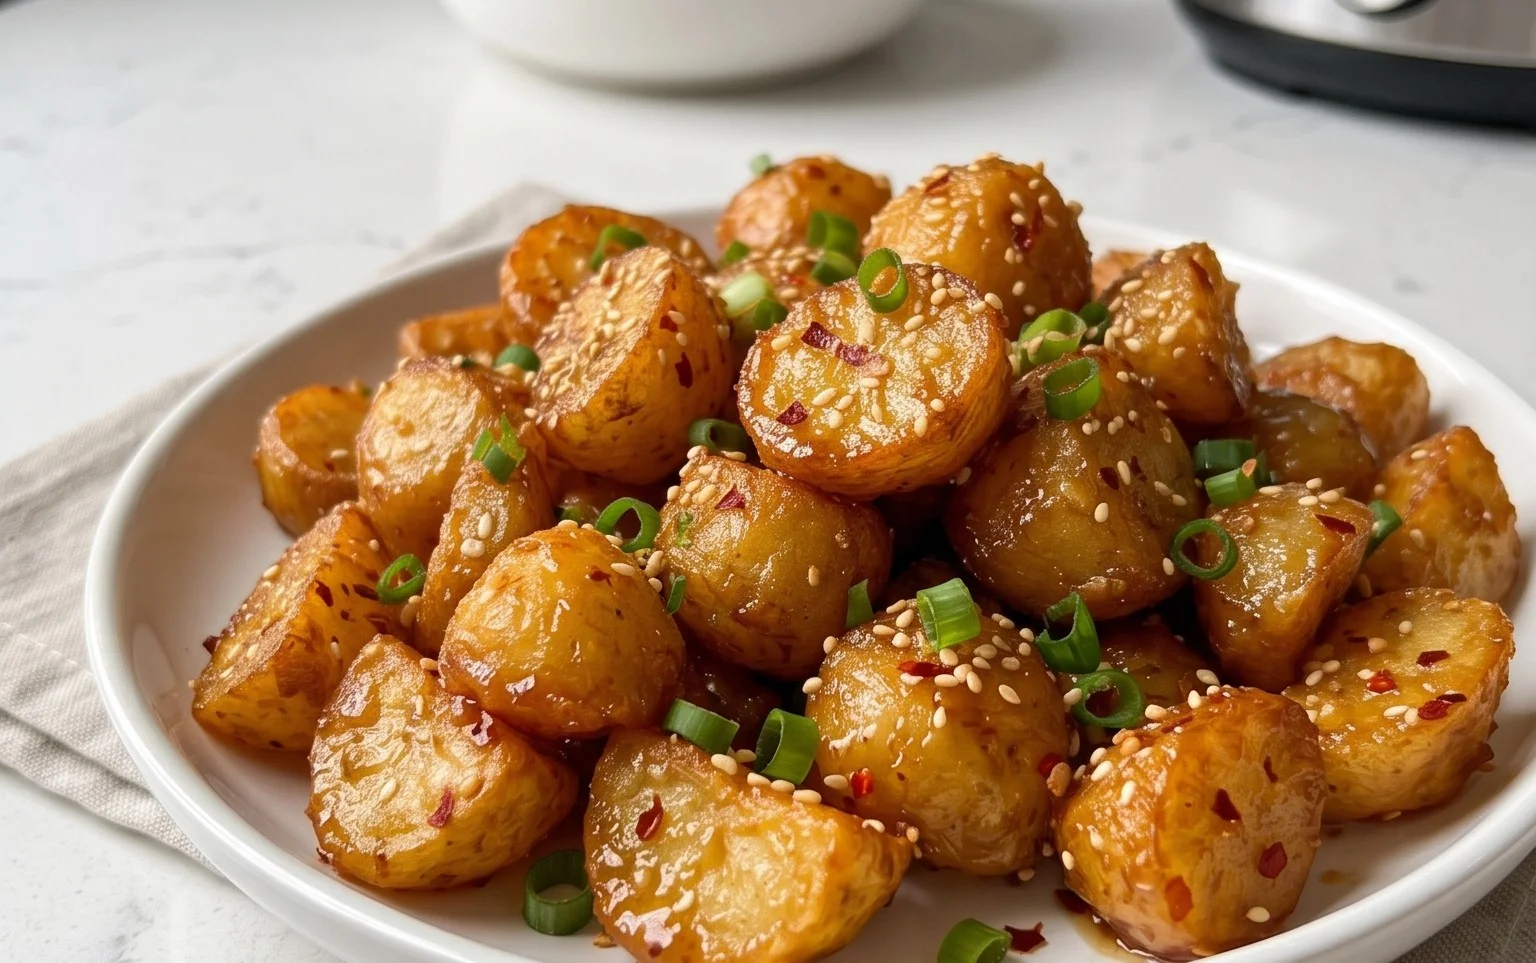
Crispy Honey Chilli Potatoes
Deliciously crispy potatoes coated in a sweet and spicy honey chilli glaze.
Ingredients
-
4-5 Potatoes (450 grams, peeled and cut into fingers (1/3-1/2 inch thick, 2 -3 inches long))
-
Oil for brushing/deep frying
-
2 teaspoon Chilli powder
-
1 teaspoon Garlic Paste
-
1 teaspoon Red Chilli Paste
-
3 tablespoon Corn Flour
-
3 tablespoon All Purpose Flour
-
1 tablespoon Salt
-
⅓ cup All Purpose Flour
-
⅓ cup Corn Flour
-
¼ teaspoon Black Pepper
-
¼ cup Water
-
2 tablespoon Oil
-
1 tablespoon Garlic (finely chopped)
-
1 teaspoon Red Chilli Flakes
Instructions
-
Step 1
In a bowl, combine the peeled and cut potatoes with 3 tablespoon corn flour, 3 tablespoon all purpose flour, 1 tablespoon salt, 2 teaspoon chilli powder, 1 teaspoon garlic paste, and 1 teaspoon red chilli paste. Toss well to coat the potato fingers evenly. -
Step 2
Heat oil for deep frying in a pan or wok. Once the oil is hot, carefully add the coated potato fingers in batches. Fry until golden brown and crispy. Remove from oil and drain on paper towels. -
Step 3
In a separate bowl, whisk together ⅓ cup all purpose flour, ⅓ cup corn flour, and ¼ teaspoon black pepper. Gradually add ¼ cup water while whisking to form a smooth, thin batter. -
Step 4
In a clean pan, heat 2 tablespoon oil over medium heat. Add 1 tablespoon finely chopped garlic and sauté until fragrant. Add 1 teaspoon red chilli flakes and stir for a few seconds. -
Step 5
Pour the batter into the pan with the garlic and chilli flakes. Stir continuously until the batter thickens and becomes a glaze. If using honey, add it at this stage and stir well to combine. -
Step 6
Add the fried potato fingers to the glaze. Toss gently to coat them evenly with the honey chilli sauce. Serve immediately while hot and crispy.
Important Information
Nutrition Facts (Per Serving)
It is important to consider this information as approximate and not to use it as definitive health advice.
Allergy Information
Please check ingredients for potential allergens and consult a health professional if in doubt.

Leave a Comment